|
|
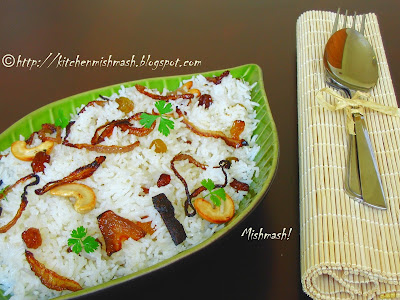 The simplest festive dish where the divine ghee along with an exotic set of Indian spices dress up the fragrant basmati rice with caramelized onions and ghee fried golden raisins and nuts into a beautiful dish………Ingredients: Serves 3 Adults
For Rice: - 2 cups Basmati Rice
- 4 ¼ cups Water
- 1 small size golden yellow big onion, thinly sliced
- 4 cardamom pods
- 6 cloves
- 5-7 small ½ inch long cinnamon sticks
- 1 bay leaf
- 2 whole mace/javinthri
- 4 tbsp Ghee/clarified butter
- Salt to taste
For garnish: - 1 small size, golden yellow big onion thinly sliced
- ¼ cup golden raisins
- ¼ cup halved cashew nuts
- A pinch of sugar
- 3 tbsp ghee (clarified butter) + more ghee/oil for frying onions
Directions:- Wash and drain the rice on a paper towel. When it is medium dry, heat 4 tbsp ghee in a large pan and splutter cardamom, cinnamon, cloves, mace and bay leaf; add thinly sliced onion to this and sauté till it turns golden and edges begin to brown. At this stage add rice stir continuously for 2minutes in very low heat.
- Cook Rice: Microwave Method: Pour the fried rice along with onions and spices into a microwave safe bowl and add 4 ¼ cups of water, flavour with salt and pop it in the microwave and cook for 23-25 minutes or until rice is done. Stove-top Method: Boil water in a heavy bottom cooking vessel, and when it comes to boil, add all the ingredients and bring it to a boil again and then reduce the flame and cook covered in low-medium heat, until rice is fully cooked and water is absorbed.
- While rice is cooking, heat 3 tbsp ghee and fry the raisins, stirring continuously until they turn plump or look like golden grapes and keep them aside; fry the cashew nuts in the same oil, till they turn golden in colour and keep it aside. Add more ghee or oil to the same pan and start frying thinly sliced onion; when they turn translucent, add a pinch of sugar to speed up the process (also adds a nice taste) and fry until they reach a caramel or brown color.
- Once rice is done, using a fork, gently separate/fluff the rice, so as not to get sticky and let it sit for 10 minutes. Then add ghee fried raisins, nuts and caramelized onion to the rice, keeping a handful of all these three ingredients for garnishing later and gently mix well. Garnish with rest of the fried onions, nuts and raisins.
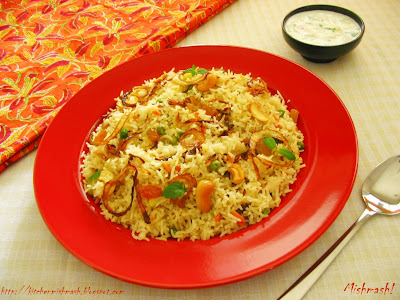
- Serve hot with Mutton curry, Raitha- (Coarsely chopped onions and cucumber mixed in yogurt with a dash of salt and pepper), Pappadam and date pickles. That’s a tasty divine family!
Related Posts:
On a different note, last week I had to deal with a handful of content theft issues ……..I would like to thank some of my readers and blogger buddies, especially Meeta, Silverine,Maria, Nikhil, Mathew, Pooja, Liz & Rashmi for bringing it to my attention as well as helping me with guidance and tips. Though in most cases helplessness has chained me down, I just wanted to let you all know that I am truly honored and moved by the care and support you show for this little space and the person behind it and it has only boosted up my spirits to keep this page more active!! Thanks!Shn
|
No part of the content ( articles, photographs, recipes) of this blog may be reproduced without my written permission.Copyright © 2007-2010 Kitchenmishmash.blogspot.com. All rights reserved.
|
 Subaida, Umma and Baappa stepped into my world when I was a toddler, without even realizing that they were becoming a thread in my childhood fabric. When Subaida walked into our lives to baby sit me and later to take care of my toddler brother, she was just a teenager, staying in a small house at the end of our street. She used to call her parents Umma and Baappa (mom & dad) and I guess that’s how we all started addressing the couple in the same fashion. She was an average brown skinned girl with a beautiful smile on her face which gave a natural blush to her otherwise humble face.
It was those mehendi stained hands of Subaida that sprouted my obsession for Mailanchi/Mehendi (henna). They had lots of Mailanchi plants, the leaves of which she stone grounded into a smooth paste and applied on her hands and feet; me and my cousin, G chechi used to be green eyed whenever we saw those bright reddish stains left on her palms as the paste we made never gave results close to hers. Since she knew I was crazy about applying Mailanchi on my hands, Subaida sometimes shared the freshly ground paste with me and my mother. The next day, on my way to school, as always I would catch her either washing vessels or filling pots at the road-side water-tap, wearing a full skirt and a tight blouse and ‘Thattam’, a long scarf covering her head. I was always excited to talk to her on such days to show off the artistic design my cousin or mother drew on my hands, using the paste she gave. I must admit that the modest art work on her hands still had a brighter shade than mine! The secret she shared was adding some sugared lemon juice occasionally on dried up paste! We owe it to Sulaiman, Subaida’s brother who was my mother’s 911 agent for getting her life-saver nasal drops whenever my father was at work and she wanted a refill badly.
Subaida’s Baappa, Saayu as everyone called him, had a pettikkada (small shop) at the main road where we waited for our school bus. That pettikkada served as a shelter for us during the rainy days while waiting for the bus to come. On a desk supported by wooden boxes, Baappa lined soda bottles which came locked with a marble on the bottle neck; glass jars filled with Kappalandi muttai (candied groundnuts), naaranga muttai (candied lemons), lollipops and had some outdated copies of the bi-monthly publications like Mangalam, Deepika hanging from a rope along with the homemade naaranga achar (pickled lemons) sachets Umma made at home. Those kappalandi muttai and naaranga achar sachets always tempted me but it was my brother, a nursery brat at that time, broke my father’s Lakshman Rekha. One evening while walking back from the bus-stop, he devoured those candies and casually informed my father “ Acha, saayu-nte kadayil oru 50 paisa-de ‘pattu’ undu..” meaning, “Dad..I have a 50 paisa debt at Saayu’s shop”. My parents were quite alarmed and amazed at their 5 year old’s ‘cool’ behavior and mastery over the colloquial language!!Baappa earned his living mainly by selling soda sarbath (lemon soda) and Beedi to men coming to pray at the juma masjid (mosque) behind his shop. This mosque was another target of my curiosity as I saw only men coming to the mosque wearing white mundu (wrap-around) and full sleeve shirt, with a hand-kerchief tied on their head, to cover their hair. After washing their hands and feet in a small pond in the compound, I got a glimpse of them kneeling on a mat offering prayers. It was years later I realized that those men were coming for Niskaram (prayer). Baankuvili (call for prayer) was another fascinating mystery to me for a long-long time. Mosque was crowded with men especially during the festival days of Ramadan and Bakrid. Passing by Subaida's house during that festival time was like self-inflicting excruciating pain as the aromatic neichoru (ghee rice) and kozhicurry (chicken curry), which Umma cooked, made unsolicited entry into our nostrils, making our life miserable. We were on top of our excitement whenever we got an invite to attend Subaida’s sibling’s Nikah (marriage) as for us it was not only an opportunity to relish their ghee loaded fragrant Biryani but to experience the orange squash and ariyunda they served at the Mailanchi kalyanam, a function on the previous day of nikah.Subaida, Umma, Baappa are all proud members of the Kerala Muslim community who is renowned for their rich Biryani and meat preparations with a distinct touch. However, there is a sub-group called Malabar Mappilas who crown the northern coast of Kerala with their flavorful and rich cuisine. Though my paternal family, hailing from a historically significant Muslim dominated area, is affluent in northern Kerala specialties like ‘pathiri’, paper thin-soft-flat rice breads, our exposure to Moplah (Malabar Muslims) flavours has always been limited. I started learning about the Moplah style cooking in large scale through blogs like Malabar Spices and Indian Potpourri. Lucky enough, I was gifted with a copy of ‘Malabar Muslim Cookery’ authored by Ms. Ummi Abdulla who is considered the pioneer in introducing Moplah cookery to the rest of the world. Will elaborate more on this book in my next post and for the time being, let me share a classic Malabar recipe I enjoyed from her book:
Malabar Style Chemmeen/Prawn Biryani (Recipe Source: Malabar Muslim Cookery’ by Ms. Ummi Abdulla. I slightly changed the measurements and methods to suit my cooking conditions.)

Step 1: Make Biryani Masala/Dry Spice Mix
- ½ tsp fennel seeds
- ½ tsp cumin seeds
- ½ tsp Shahjeera/caraway seeds /Sahjeerakam
- 4 cloves
- 1 cardamom
- 1 flat cinnamon ( 1” inch length)
- ¼ tsp grated nutmeg
- 1 whole mace
Grind everything to a fine powder. This yields around 2 tsp masala but you will require only 1 ½ tsp for making this dish.
Step 2: Cook Flavored Rice
- 2 ½ cups Basmati rice
- 5 cups water
- 2 cups thinly sliced big onion
- Salt to taste
- 3 tbsp ghee
Wash and drain the rice on a paper towel. When it is medium dry, heat ghee in a large skillet and adds thinly sliced onions and sauté till it is transparent. Add rice and stir continuously for 2-3 minutes in low heat. Microwave Method: Transfer everything to a microwave safe bowl with 5 cups of water (2 cups of water for 1 cup basmati rice) and adjust the salt and pop it in the microwave and cook for 23-25 minutes or until rice is done. Stove-top Method: Boil water in a heavy bottom cooking vessel, and when it comes to boil, add all the ingredients and bring it to a boil again and then reduce the flame and cook covered in low-medium heat, until rice is fully done and water is absorbed. Using a fork, gently fluff/separate the rice, so as not to get sticky.
Step 3: Make Chemmeen/Prawn Masala
- ½ kg Chemmeen/Prawn/shrimp, shelled and cleaned
- 1 tsp chilli powder
- ½ tsp turmeric powder
- Salt to taste
- Around ¾ cup Oil for shallow frying Chemmeen/Prawn/shrimp
- 2 cups thinly sliced onions
- 3 tbsp finely chopped ginger
- 3 tbsp finely chopped garlic
- 4 ½ tbsp green chillies (around 15-16; adjust according to your tolerance level)
- 2tsp coriander powder
- 1 1/4 tsp Biryani Masala, powdered earlier
- ½ cup water
- 1 ½ to 2 tbsp freshly squeezed lemon juice
- 1/3 cup fresh cilantro/coriander leaves, chopped
- ¼ cup mint leaves chopped
Make a wet marinade with chilli powder, turmeric powder and salt and apply it on prawns and leave it for 20 minutes in room temperature. Meanwhile grind ginger, garlic and green chillies into a paste and keep aside. Heat oil in a pan and shallow fry Chemmeen/Prawn/shrimp to a light brown colour and remove. Add sliced onions to this leftover oil and sauté till light brown. To this, add the ground ginger-garlic-green chilli paste and fry for another 2 minutes. Add coriander powder, stir well and add ½ cup water and salt to taste. Let it cook till the gravy is thick and at this point add fried prawns, lemon juice, chopped coriander leaves and mint leaves and 1 ¼ tsp Biryani masala/dry spice mix. Stir well and let everything come together for a minute and remove from the fire and keep aside.
Step 4: Layering and Final cooking
- 4 tbsp ghee
- ¼ tsp pinches of Biryani Masala
The final part of the cooking can be done either in a conventional oven or on stove top. Decide on your preferred cooking method and based on that decision, choose your cooking vessel. Pour 2 tbsp ghee into your cooking vessel; spread half of the rice at the bottom, followed by the Chemmeen/Prawn masala and sprinkle ¼ tsp biryani masala; spread rest of the rice as the top layer and drizzle 2 tbsp ghee. Conventional oven Method: Preheat oven to 350 F. Close the oven –safe dish with aluminum foil and cook for 30 minutes. Stove top Method: As per the original recipe, remove half the rice ( from the vessel you cooked rice earlier) to a plate ; pour the Chemmeen/Prawn masala, sprinkle biryani masala and then transfer the rice, set aside in the plate, back to the cooking vessel. Keep a tight fitting lid and cook over very low heat for 5 more minutes. Note: I haven’t tested this method and hence I am not sure of the outcome.
To Serve: After the final phase of cooking, let the dish rest undisturbed for minimum 30 minutes on your kitchen counter. Before serving, stir the entire dish gently, mixing rice with the Chemmeen/Prawn masala and plate it. Serve with Pickle, puli inji, Pappadam and Onion-yogurt salad (Thinly sliced big red onion, 1 small green chilli chopped and mixed with yogurt and a dash of salt) or any one of these condiments.
Cooking schedule I followed:
- Wash and drain the rice
- Marinate Chemmeen/Prawns
- Make Biryani Masala/Dry Spice mix
- Make the chilly-ginger-garlic paste for Prawn masala and get the onions sliced
- Roast and cook rice
- While rice is cooking, make Chemmeen/Prawn masala
- Layering and final phase of cooking
- Serve.
Verdict: We liked this dish and felt it is a Biryani preparation that is designed to highlight the flavour of Chemmeen/Prawns. It does not have the customary frou-frou of caramelized onions, nuts and raisins in between the layers or as garnish and yet it comes out tasty and personally I felt it was more “home-style”. Tasty and Easy to put together on a weekend !
You may also check out

You can check out this picture of pettikkada which looks similar to that of Baappa's.
Luv
Shn
|
No part of the content ( articles, photographs, recipes) of this blog may be reproduced without my written permission.Copyright © 2007-2010 Kitchenmishmash.blogspot.com. All rights reserved.
|
An excerpt from the speech made by Egg Biryani at the National Biryani Fest 08….“My dearest gastronomists…….till yesterday, I was this undiscovered jewel, in the deep sea leading a dreary life ………when all my peers made it to the glitz and glam of the dining table receiving great raves from the guests, I was sitting there, with a heavy heart, waiting for the day I will be finally asked to come to the spotlight……but I was always that neglected cousin……many thought of me only when meat loaded freezers and vegetable studded crispers got empty and they had no other option but to dress me up with some curried masala and herbs and then layer and mix with some ghee rice. Yet, I could not impress anyone until the day an artist gave me a much needed makeover……I was given layers of flavour and an identity of my own…..the artist moulded me into a scrumptious delicacy people would crave for, even in their dreams!! ………………”***
This dish is our recent discovery, a new favourite and addition to our repertoire. On one of my aimless leapfrogging on the World Wide Web, I happened to get a glimpse of handful of recipes from ‘The Epicure Cookbook’ by Ms.Ummi Abdulla who captured the essence of Malabar cooking in her cookbooks and introduced this piquant cuisine to the world. The moment I glanced through the recipe, I knew there was something different about it as egg omelette constituted egg masala instead of hardboiled eggs, which in this case was only used as a topping and more than a garnish. Secondly, one more layer of flavour was added to the ghee rice by spicing it up with a green chilly-ginger-garlic paste which gave a real kick to the entire dish. The egg masala was again a surprise as it missed the regular spice parade of coriander powder, chilly powder etc.As much as I was bowled over by the recipe, there were some areas I wanted to add my personal touch. The original recipe does not call for mint leaves and personally I cant imagine a Biryani without the refreshing fragrance and taste of mint leaves and hence I added some; again while layering the dish, I sprinkled some ghee and Biryani masala for an added layer of aroma and flavour; also fried the hardboiled egg with a dry spice rub to jazz up the topping; you may skip it and use plain hardboiled eggs. All these additions gelled well with the original recipe, giving us a real masterpiece.Mutta/Egg Biryani - Malabar Style ( Serves 4 adults )(Recipe Source: Adapted from 'The Epicure Cookbook' by Ms. Ummi Abdulla)
Step 1: Make Biryani Masala/Dry Spice Mix- ½ tsp fennel seeds/Perinjeerakam
- ½ tsp cumin seeds / Jeera
- ½ tsp Shahjeera/Caraway seeds/Sahjeerakam
- 4 cloves (Gramboo)
- 1 cardamom/Elakkaya
- 1 flat cinnamon ( 1” inch length)/ Karukapatta
- ¼ tsp grated nutmeg (Jaathikka)
- 1 whole mace (Jaathipathri)
Grind everything to a fine powder. This yields around 2 tsp masala but you will require only 1 ½ tsp for making this dish.Step 2: Cook Flavored and spiced up Rice- 4 green chillies
- 4 medium garlic cloves
- 1” inch piece ginger, thinly sliced
- 1 medium size big onion, thinly sliced
- 3tbsp ghee
- 4 pods of cardamom
- 4 cloves
- 1 ½ ” inch flat cinnamon stick, broken into 4 pieces
- 2 ½ cups Basmati rice (around 1/2 kg)
- 5 cups water
- Salt to taste
Grind green chillies, garlic and ginger into a paste and keep aside.Wash and drain the rice on a paper towel. When it is medium dry, heat ghee in a large skillet and throw in cardamom, cloves and cinnamon. Now add thinly sliced onions and sauté till it is transparent; then add the ground paste, stir well till it gives out an aroma. Add rice and stir continuously for 2-3 minutes in low heat. Microwave Method: Transfer everything to a microwave safe bowl with 5 cups of water (2 cups of water for 1 cup basmati rice) and adjust the salt and pop it in the microwave and cook for 23-25 minutes or until rice is done. Stove-top Method: Boil water in a heavy bottom cooking vessel, and when it comes to boil, add all the ingredients and bring it to a boil again and then reduce the flame and cook covered in low-medium heat, until rice is fully done and water is absorbed. Using a fork, gently fluff/separate the rice, so as not to get sticky.Step 3: Make Omelette and Egg Masala- 3 eggs
- 2tbsp grated coconut
- A pinch of turmeric powder
- 1 big onion, chopped
- ¼ tsp chilly powder
- 2 Indian green chillies, finely chopped
- Salt to taste
- 2-3 tsp Oil
Beat the eggs and add all the other ingredients and mix well. Heat half of he oil in a pan, pour half of the egg mixture and make a thin omelet. Repeat the process for the rest of egg mixture to make a thin Omelette. When done, remove it to a chopping board and cut them into small bite size pieces and keep aside.- 1 ½ cup big onions, chopped
- 4 green chillies
- 6 big garlic cloves (approx. one small pod)
- 3” inch piece of ginger, thinly sliced
- ½ cup tomatoes, chopped
- 1 ½ - 2tbsp freshly squeezed lemon juice
- 1 ¼ tsp Biryani Masala
- 1/3 cup fresh cilantro/coriander leaves, chopped
- ¼ cup fresh mint leaves, chopped
- Salt to taste
- 2-3 tbsp oil
Grind ginger, garlic and green chillies into a paste and keep aside.Heat oil in a pan and cook thinly sliced onion, till they turn transparent; now add the ground paste and sauté till it gives out a nice aroma. Add chopped tomatoes and fry for a few more minutes. Now add the Biryani masala, and combine well with the base. At this stage add bite size piece of omelette and blend well, followed by chopped cilantro/coriander and mint leaves. Sprinkle lemon juice, mix well. Do a taste test here and adjust the salt. Turn off the stove and remove from heat.Step 4: Layering and Final cooking- 4 tbsp ghee
- 2 pinches of Biryani Masala
The final part of the cooking can be done either in a conventional oven or on stove top. Decide on your preferred cooking method and based on that decision, choose your cooking vessel. Pour 2 tbsp ghee into your cooking vessel; spread half of the rice at the bottom, followed by the egg masala and sprinkle two pinches of biryani masala; spread rest of the rice as the top layer and drop 2 tbsp ghee. Conventional Oven Method: Preheat oven to 350 F. Close the oven –safe dish with aluminum foil and cook for 30 minutes. Stove top Method: As per the original recipe, remove half the rice ( from the vessel you cooked rice earlier) to a plate ; pour the egg masala, sprinkle biryani masala and then transfer the rice, set aside in the plate, back to the cooking vessel. Keep a tight fitting lid and cook over very low heat for 5 more minutes. Note: I haven’t tested this method and hence I am not sure of the outcome.Step 5: Fry Hardboiled Eggs- 4 hardboiled eggs, halved
- A pinch of Biryani Masala
- A pinch of pepper powder
- A pinch of salt
- 2tsp Oil
While rice is at the final phase of cooking, hard-boil 4 eggs and when done, halve them. Sprinkle biryani masala, pepper powder and salt on halved eggs and shallow fry them in oil for a minute. Remove from the pan.To Serve: After the final phase of cooking, let the dish rest undisturbed for minimum 30 minutes on your kitchen counter. Before serving, stir the entire dish gently, mixing rice with the egg masala and plate it. Place fried eggs on top and serve with Pickle, puli inji, Pappadam and Onion-yogurt salad (Thinly sliced red big onion, 1 small green chilli chopped and mixed with yogurt and a dash of salt) or any one of these condiments.Cooking schedule I followed:- Wash and drain the rice
- Hard boil 4 eggs
- Make Biryani Masala/Dry Spice mix
- Make the chilly-ginger-garlic paste for rice and get the onions ready for rice
- Roast and cook rice
- While rice is cooking, make omelette and egg masala
- Layering and final phase of cooking
- Fry hard-boiled eggs while rice is at the last phase of cooking
- Serve.
Verdict: Fantastic! That is the only word I can find for this recipe and dish. I made it on a Saturday, had it for lunch and dinner and again for lunch on Sunday; Monday and Tuesday, both of us silently fantasized its taste and aroma and on Wednesday, it came out, “That egg biryani was really tasty…….feel like having it again now” !!!!!!!!!!!!!!!!!!!! If you trust me, go ahead and make it….it is delicious :)Other Rice specials from this blog:   LuvShn
|
No part of the content ( articles, photographs, recipes) of this blog may be reproduced without my written permission.Copyright © 2007-2010 Kitchenmishmash.blogspot.com. All rights reserved.
|
This post is part of SADYA VIBHAVANGAL – Learn to make the traditional Kerala Feast- An Artist’s Edible Palette !
Kuthari choru is the cooked rice from Rosematta/Kerala red rice. It is the soul food of Kerala and chances of people from other states falling in love with this rice is very remote as generally most of them complain that its too big and plump to eat and hard to chew and perhaps that’s the reason we love it, I don’t know :)
This rice is traditionally cooked by boiling lots of water and when the water starts to boil, grains are added and cooked, in low-medium flame, with lid partially covered, till it turns soft and the rest of the water is drained out. The easiest and less time consuming method to cook this rice is by the pressure-cooking method. Firstly, wash the rice thoroughly in running cold water and drain the excess water. Add the grains to the pressure cooker and pour 3 cups of water for 1 cup of rice and pressure cook, in medium heat, till it is fully cooked and soft enough. It generally takes 3-5 whistles, depending on the variety/brand of the rice and the cooker. Alternatively you can add more than 3 cups of water and once the rice is cooked, drain out the excess water to reduce the starch amount.
Check out Kanji with Rosematta rice.
LuvShn
|
No part of the content ( articles, photographs, recipes) of this blog may be reproduced without my written permission.Copyright © 2007-2010 Kitchenmishmash.blogspot.com. All rights reserved.
|
At the work-area of my grandma’s kitchen, my mother and aunt sit around a small high-table- chopping board, cutting beans and carrots, some diced and some julienned ….. my grandma gives them a plate with thinnest omelets which they cut into thin strips while the elderly maid of the house, doing the laundry, slips in some gossip story which she gathered on her latest visit to the local market…… and me sitting there cross-legged in one corner, with my ears and eyes wide open, watching the whole activity…..I enjoyed those moments listening to their warm chit-chats……juicy gossips….chop-chops……… leading to a plate of fancy looking dishes like fried rice and noodles !
Those days these dishes were some sort of special foods made only when all of them get-together at my grandma’s house . Down the road, somewhere I remember my mother getting all excited at the mere mention of the popular Chinese restaurant in town, Chiyang, and all of us visiting this chic restaurant, with uncles and aunts. In that dimly lit restaurant, I remember my mother ordering her favourite sweet corn chicken soup; somehow the sweet corns did not make a very good first impression with me and I sat there waiting for the rest of the food to be served……that tangy smell of the dishes and exotic look of the fried rice did tickle my taste buds even at that very young age. My mother tried different permutations and combinations to reproduce the same look and taste but still that fancy restaurant won over her daughter. After a while, Bimbis became the talk of the town, especially among the teenagers, with its fancy menu and self-service counters; and on one of my visits there, I saw the sous-chef throwing veggies into a huge pan, followed by that sizzling sound and then holding the pan effortlessly with his right hand and doing tossing technique quite impressively. The fried rice I tasted there had some resemblance to that of the first chic restaurant I mentioned earlier. From there it has been a relentless travel, finding the other pieces of the big puzzle, to dress up fried rice the way I wanted it to be!!

Till now, I have not come close anywhere to” that taste” of my childhood love, but here is what the best I have come up with and surprisingly, now this happens to be “the” recipe my friend R has been looking for and has been asking me to blog for a long-long time now. Fried rice, a popular Chinese dish cooked with leftover rice fried along with some veggies and meat and seasoned with soy sauce has been so popular in India that it has innumerable Indo-Chinese versions to it. It has become so accepted and admired among the Keralites that fried rice has become one main dish served at the time of family gatherings and this is mostly an Indo-Chinese or I am afraid to note, a Kerala-Chinese version!!! I would not be surprised, two-three decades from now, if a school kid claims it to be a staple food of Kerala!!! No offence to anyone here, but the frequency at which we whip up this dish and the adaptability to this one, combined with the fast pace at which the “cereal generation” is growing up, makes me wonder about such a probability.
When I first started cooking this dish, there were a number of times I had to cook the rice twice as the first batch would have got too mushy and sticky, making the final dish look like a sticky rice ball. Some cooking show that caught my attention while flipping channels came up with the best tip ever,” use leftover refrigerated rice when you make fried rice”. That’s when I realized, it is important that rice should be completely cooled and grains should be separated. My mother shared the second best tip, “never miss spring onions, celery and capsicum”. I always stick to these two pointers while preparing it and then adjust the seasonings and sauces, to my taste. Please note that this recipe is developed purely to appease my taste-buds so it may or may not suite your palate :)
 Ingredients: To Fry & Cook the Rice:
- 1 ½ cup Basmati Rice
- 3 cups water
- 1 tbsp Olive oil or vegetable oil
- Salt to Taste
For the final cooking:
- 1 tbsp ginger & garlic, finely chopped
- 1 cup boneless chicken, cooked and shredded into small pieces
- 1 large egg, to scramble
- 3 tbsp carrot, chopped into small pieces
- 4 tbsp bell peppers/capsicum (green & red), chopped into small pieces
- 2tbsp cabbage, finely chopped (Optional)
- ¼ cup celery, chopped into small piece
- 1 ½ tbsp white bulb of scallions/green onions/spring onion, chopped into small pieces
- ¼ cup green stalks of, scallions/green onions/spring onion, chopped into small pieces
- 2-3 tbsp Olive oil/vegetable oil
- 1 tbsp sesame oil
- ½ - ¾ tbsp soy sauce
- ½- ¾ tbsp green chili sauce
- ½ tbsp rice vinegar
- ½ tbsp ketchup
- ½ tsp black or white pepper, freshly ground
- Salt to taste
Directions:
- Wash and drain the rice on a paper towel. When it is medium dry, heat 1 tbsp oil in a large pan and add rice to this and stir continuously for less than a minute in low heat and transfer it to a microwave safe bowl and pour 3 cups of water and sat to taste; pop it in the microwave and cook for 23-25 minutes or until rice is done. Stove-top Method: Boil water in a heavy bottom cooking vessel, and when it comes to boil, add rice and bring it to a boil again and then reduce the flame and cook covered in low-medium heat, until rice is fully done and water is absorbed.
- Using a fork, gently separate the rice, so as not to get sticky (or even transfer to a large platter) and the rice should be cooled thoroughly before you start the final cooking. (Note: You may use leftover rice for this preparation or refrigerate the freshly cooked rice to make sure that it is completely cool and not to end up with mushy rice.)
- Heat up 1 tbsp oil, in a large wok or any round-bottomed vessel, throw in chopped ginger and garlic, when it is medium hot and stir-fry till it turn transparent. Do not let it burn. Now add the white bulb of the scallions/spring onions , stir; add bell peppers, carrots, celery and stir fry, with a dash of salt and pepper, for 1 -2 minutes in medium heat and when it is soft yet crunchy, add the chopped cabbage and half of the green stalks of scallions/spring onion. Toss everything together as leaves get cooked fast and transfer to a plate or depending on your expertise and largeness of the pan, you may slide everything to the side of the wok.
- Add the rest of the olive/vegetable oil, and break one large egg, directly into the pan; with a quick salt and pepper action, stir the egg continuously to get fine scrambled egg and transfer to a plate or slide to the side of the wok. (Note: Alternatively, you can make an omelet and cut them into fine pieces on a chopping board.) Add the cooked shredded boneless chicken and toss them in oil with a mild seasoning of salt and pepper, transfer to a plate or slide to the side of the wok.
- Heat 1 tbsp sesame oil, add the cooked and cooled rice and stir well, in medium-high heat. When the rice is warm and separated nicely, add the cooked veggies, scrambled egg and shredded chicken and mix well. Now start sprinkling rice vinegar, sauces and ketchup one by one and stir and mix well. Do a taste test and adjust the salt and turn off the stove. Remove the wok from the stove and add the rest of the green stalks of the scallions/spring onion, mix well. The heat from the rice will slowly soften the leaves, leaving a nice aroma to the entire dish. (Note: the strength of the soy sauce and green chily sauce differ depending on the brands, so any addition of these ingredients should be in small drops if you use more than what is suggested in the recipe.)
 Here’s a carry-out box ready for YOU with a fortune cookie :) Have a great week ahead!
Shn
|
No part of the content ( articles, photographs, recipes) of this blog may be reproduced without my written permission.Copyright © 2007-2010 Kitchenmishmash.blogspot.com. All rights reserved.
|
A thoughtful gift from my reader! The picture below is what Liz sent me for my reference.
 I know , some of us food bloggers, have a more or less same or similar morning routine……Waking up next to your loved one……..enjoying the sun rays coming through the window….embracing the new day with lots of hopes and plans…..sipping a hot cup of tea/coffee…..logging in the computer and checking the mails and comments, if any……and sometimes we feel a sense of satisfaction realizing that the recipe we blogged became someone else’s family favourite or sometimes we blush reading a nice sweet comment from one of our fellow bloggers or readers or sometimes a humorous comment lightens up our mood and spirit and very-very rarely a bad or disheartening comment that spoils your mood ! On one such day when I was enjoying my morning tea and CJJ was reading out a few comments I received the previous night, we came across a comment from someone named Liz who introduced herself and said how much she enjoyed my posts and the way she appreciated me, made my day!! She became a regular here and also showed her interest in sharing some of her family favourite recipes with me. In between she kept contacting me through the comment section clearing her doubts on the Blackforest Cake recipe. And one fine day, I received a mail from her with a picture of the Blackforest cake she made, based on the recipe I posted! If you are a food blogger, you can imagine how thrilled and excited I was receiving such a beautiful gift from one of my readers!! The story does not end there, she shared a couple of her family favorite recipes with me and Chicken Biryani was one among them. Liz is married to a Muslim family and when she shared her MIL’s classic Chicken Biryani, that was one more reason to try it out immediately for me who was already on top as this was the first time I received such a gift from one of my readers. I really felt good! Since this Muslim Style Chicken Biryani- Indian Rice flavored with spices and herbs in ghee & layered in curried meat, was a hit at our place, I thought of sharing it with you all. This was a gift for Mishmash! and now this is a gift for you all from Liz:)Before I go to the recipe writing, let me write something for my non-Indian readers and bloggers. The number of ingredients and the steps involved in cooking might stop you from trying this dish. Cooking Biryani is time consuming and process oriented but it is worth the effort. An easy route to enjoying a Biryani is probably hitting a good Indian restaurant in town, but to relish an authentic Indian Biryani, one has to go through all this process and it is worth the effort, not just because of the taste but the fact that if there is some leftovers, you can enjoy it the next day too and that’s when it tastes the best!! What you might taste from an Indian restaurant is nothing compared to the home cooked authentic Biryani. Recipe follows: Kerala Muslim Style Chicken Biryani: (Serves 4-5 adults)Ingredients for cooking rice:- 4 cups Basmati Rice (I use Tilda )
- 8 cups water or more depending on the cooking method*
- 10 Cloves
- 8 Cardamom pods
- 5-7 small ½” inch long Cinnamon sticks
- 1-2 bay leaves (Optional)
- A handful of fresh mint leaves
- 2 tsp freshly squeezed lemon juice
- Salt to taste
Ingredients for cooking Chicken:
Step 1: To shallow fry the Chicken:- 1- 1 ¼ kg (Approx. 2 ½ lb) cleaned & cut chicken pieces
- ½ tsp turmeric powder
- ¾ tsp red chilly powder
- ½ tsp garam masala
- Salt to taste
- Oil for shallow frying.
Step 2: To prepare the Chicken KurmaStep 2:A) For the spicy paste:- 1/3 cup sliced garlic (Approx. 50gms)
- 1/3 cup sliced ginger (Approx. 50gms)
- 20-26 Indian Green chillies (Approx. 75gms) (adjust as per your tolerance level)
Step 2:B)For Sautéing:- 2 tbsp ghee
- 4 cups thinly sliced big onions (Approx. 300 gms)
- 2 cups chopped or 2 big tomatoes
- ½ cup yoghurt
- ½ - 1 tsp red chilly powder
- 4 tsp coriander powder
- ¾ tsp turmeric powder
- 1/8 cup lightly packed chopped coriander leaves
- ¼ cup lightly packed chopped mint leaves
Step 2:C) For grinding the Masala Powder- 10 cloves
- 8 cardamom pods
- 3-4 small 1” inch long Cinnamon sticks
- ½ tsp Shajeera
- 1 tsp fennel seeds
- 6 mace
Step 2: D ) For the nutty paste (Soak in water for 30 mins before grinding)- 15 whole cashew nuts
- 5-10 almonds
- 1tbsp poppy seeds
For layering & garnishing:- ½ cup raisins (preferably golden raisins)
- ¼ - ½ cup cashew nuts
- 1 medium size big onion, thinly sliced
- 3tbsp + 2 -3 tbsp ghee + more ghee/ oil for frying onions
- 1/2 cup finely chopped fresh coriander leaves.
- A pinch of saffron
- 2tbsp warm milk
For the aromatic masala powder:- 2-3 cloves
- 2 cardamom pods
- 3-4 small ½ “ inch long cinnamon sticks
- 2 tbsp ghee
Directions:- Make the Chicken Kurma : To shallow fry the chicken first, make a marinade with turmeric powder, red chilly powder, garam masala and salt with some drops of water and apply it on the chicken pieces and leave it in the room temperature for 30 minutes and then shallow fry in oil, not more than 4 minutes, including both the sides. This phase of cooking is done mainly to enhance the taste of the chicken as well as to keep the pieces slightly firm in the cooking process to follow.
In a big cooking vessel, heat 2 tbsp ghee and sauté thinly sliced onions, until golden in colour; make a fine paste of ginger, garlic and green chillies (Step 2: A)and add the same to the cooked onions and sauté till they turn a nice brown colour (Note: This will fetch you a darker brown colour for the chicken Kurma, as shown in Liz’s picture. I did not cook till they turned dark brown and hence the lighter shade for my Kurma.) At this stage, add tomatoes and mix well; add chopped coriander leaves and mint leaves and combine well; add the ground Masala powder (Step 2: C), chilly powder, coriander powder and turmeric powder and mix well with all the ingredients and sauté, until the raw smell of the spices is gone, for a couple of minutes. This is base of the Chicken Kurma masala and it will be dark brown in colour. Once the raw smell is gone, add the shallow fried chicken and cook covered in medium heat. If the chicken was not shallow-fried for a longer time, then this stage will produce some water from the chicken, during the cooking time; but if the chicken is dry and there is no gravy at all, cook with very little water and salt. When the chicken is half-done, add the yoghurt and cook covered and when it is almost done, just before turning off the stove, add the nutty paste of nuts, almonds and poppy seeds (Note: Nuts, almonds and poppy seeds should be soaked in water for 30 mins before grinding them into a fine paste) and cook for a couple of minutes. Chicken should not be overcooked at all or it should not fall off the bones. The Kurma will be a thick, creamy and rich gravy. (Note: Adding the nutty paste will change the really dark brown colour of the chicken kurma to a lighter shade.)
- Cook the Rice:
Microwave Method:Wash Basmati rice well. In a microwave safe bowl, pour 8 cups of water, add rice and whole spices mentioned above, in the respective section, along with bay leaves and a handful of mint leaves and salt to taste and cook until the rice is just cooked. Since my microwave compatible bowl is not large enough to accommodate so much of rice and water, I halve the ingredients, i.e 2 cups of rice and 4 cups of water with half of the spices and herbs and microwave for 23 minutes. This way, you can make sure that no two grains stick to each other. Immediately after the microwave cooking, using a fork, gently separate the rice, so as not to get sticky and sprinkle 2 tsp fresh lemon juice. Please note that you should halve the quantity for lime juice too, if you are cooking the rice in two batches.
Stove-top Method: Liz follows stove top method for cooking rice and she does that in the old fashioned way where in a huge vessel is heated and when water is fully boiling, add the washed rice and whole spices and herbs and cook the rice uncovered, for 12-15 minutes. When the rice is cooked (do not overcook), drain the excess water immediately and sprinkle the fresh lemon juice.
- Prepare the garnish:
For the aromatic masala powder used in between the layers, heat 2tbsp ghee and fry the whole spices, mentioned in the respective section; and grind these into a fine powder. Save this ghee in a small bowl for later use.
Fried Nuts and raisins: In the same pan, add 3 tbsp ghee, fry the raisins, stirring continuously until they turn plump or look like golden grapes and keep them aside; fry the cashew nuts in the same oil, till they turn golden in colour and keep aside.
Fried caramelized onions: Add more ghee or oil to the same pan, to fry the thinly sliced onions till they become golden brown; at this stage sprinkling a pinch of sugar to the onion, while frying, to get a taste of nice caramelized onions is a good idea; remove the fried onions from the oil with a slotted spoon and let them drain on paper towels.
Saffron Milk: Heat 2 tbsp milk and a pinch of saffron
- Get your work-area ready for layering with Chicken Kurma, spices and herb flavored cooked rice, fried nuts, fried raisins, fried onions, saffron milk, ground aromatic masala powder and the leftover spice flavored ghee and some 2-3 tbsp fresh ghee and finely chopped fresh coriander leaves.
- Final layering: This Chicken Biryani can be prepared either in a conventional oven or through the Dum method. Click here, to get a better idea for the Dum Method. Choose your cooking method and depending on your choice, choose your cooking vessel. Grease your cooking dish generously with some ghee. Randomly place some chicken pieces along with gravy in the bottom of the dish; then spread some cooked rice, (do not stack); sprinkle a pinch of ground aromatic masala powder; some fried nuts, fried raisins, fried onions and finely chopped coriander leaves; sprinkle some spice flavored leftover ghee (the one used for frying the spices for making the aromatic masala powder) and also a few drops of saffron milk. Repeat this layering process 3 or 4 times, depending on the quantity of the rice and meat as well as the largeness of the vessel. Reserve some fried onions, nuts and raisins for final garnishing before serving.
- Final cooking:
Conventional Oven Method: Preheat the oven to 350F. Close the oven safe dish with aluminum foil and bake for 20-30 minutes.
Dum Method: Perfectly seal the lid with the dough and cook in low heat for 20-30 minutes.
- Serving: After the final cooking, keep the dish covered for minimum 30 minutes. Ideally, a window of 30 mins to 2 hours is suggested, to get a better taste, and for all the flavors to set in thoroughly. Place your individual serving platter; Just like you slice a cake, dig with a bigger serving spoon and transfer it to the serving platter; you should not mix the rice and meat; it’s already layered and hence just transfer it to the platter and garnish with some fried onions, nuts and raisins. Serve with Raitha (Coarsely chopped onions, tomatoes and cucumber mixed in yogurt and seasoned with a dash of salt and pepper), Indian pickle, Pappadam (Indian wafers) and a chilled Diet Coke or Pepsi :)
Cooking Schedule I Followed : - Cut and clean the chicken; marinate the chicken pieces.
- Chop the onions, cut the tomatoes peel and slice the garlic, ginger and green chilly, and chop the herbs.
- Make the spicy paste of green chilly, ginger and garlic
- Soak the cashew nuts, almonds, and poppy seeds
- Grind and powder the Masala powder
- Shallow fry the chicken
- Prepare the Nutty paste
- When half of the chicken is fried, start sautéing the veggies and make the base masala for the Chicken Kurma
- Prepare the chicken Kurma.
- While chicken is being cooked, wash and cook the rice with spices and herbs.
- Fry the whole spices in ghee and grind and powder them into aromatic masala powder and reserve the leftover ghee.
- Fry the nuts and raisins and onions
- Prepare the saffron milk.
- Get the work area ready.
- Final layering
- Final Cooking
 Verdict & Recommendation: When I finished preparing the Chicken Kurma, I was sure this is going to be a super hit in our place and when I finished cooking and served it , the first response was, ”Adipoli” meaning ”Excellent”!!. It has a nice aroma and the Chicken Kurma is medium spicy which gives a distinct character to the Biryani. The chicken Kurma on its own is very tasty and can be served with Nan or Roti (Indian breads). Though the rice preparation is different from the general method of washing and draining the rice and then roasting that in ghee along with whole spices, it does not reduce the look or taste of the flavored rice. I will be making this again on special occasions and to treat my friends and guests. Liz suggests one more method to make the look appealing; she suggests mixing some lemon juice with a pinch of turmeric powder or saffron and add it to ½ cup cooked rice and reserve and sprinkle this on the top layer to get some colour, as she has done in her picture. This dish taste better the next day but since we cannot serve one day old food to our guests, better to prepare it in the morning if guests are invited for dinner! The amount of ghee given in the recipe is my personal choice , one is free to use more than the noted measurements, it will only increase the aroma and taste.
I have thanked Liz enough already for this very sweet gesture of hers but it is ok if I tell this one more time, "Thank you, sweetie :) "
On another note, I thank all of you who dropped a comment checking on me and visited my blog the last one week. Thanks a lot for showing interest and I appreciate that a lot. Now that I am back, I will catch up with all of you in your blogs :)
Luv
Shn
|
No part of the content ( articles, photographs, recipes) of this blog may be reproduced without my written permission.Copyright © 2007-2010 Kitchenmishmash.blogspot.com. All rights reserved.
|
Memory Disk 1:Quite a vague memory of my grand father’s house…..night time……dull light comes from a petromax lantern….a wooden dining table …..my grandpa sitting on a wooden bench and having Kanji/rice gruel with ‘an organic spoon’ made of plavila/jackfruit tree leaf…..and I am sitting , on the other side, insisting my aunt that I want one of those spoons too……
Memory Disk 2:
Sometime in my early teens…..our family is heading back home after our annual vacation to some place…all of us exhausted and just waiting to reach home and take a shower, my mother asks, “ Is kanji (rice gruel) and uppumanga chammanthi (brined mango chutney) ok for dinner?”. “yes…”, “yes…”, “.I am fine with that too”…all of us travel back with the hope of digging into our comfort food.
Memory Disk 3:
One of those hostel days in Chennai……..Just before reaching the Chennai central railway station, to catch the train to Kerala, Yours truly calls up her mother, to make sure that someone will be there at the destination to pick her up…her mother picks up the phone and after collecting all the information, she throws the very important question,”….so…what do you want for breakfast tomorrow….? Shall I make Appam and Stew or you want puttu and kadala ? “. “ I don’t want all that…..could you pls make some kanji and payar? “, a very affirmative answer from the other side!
Memory Disk 4:
A newly married couple …….girl gets back home quite late from work…completely exhausted….…..makes some fresh sweet-lime juice ……throws herself in a chair, grabs the remote control and switches on the TV…………picks up the phone and calls her husband, “ hey….what time you will reach home..? I am too tired …….want something very light for supper…what do you prefer? “ Husband says….” How about Kanji & payar ?” …A sigh of relief from the girl!
Memory Disk 5:
After 2 years stay in US of A, dying to reach home and meet the family and enjoy mom’s food, Yours truly calls up her home and gives all the flight information and arrival time…..and just before winding up the call, her parents ask, “ so that means you will be here in the morning…so what do you want for breakfast? “ Answer comes quickly,“…hmm…I will be happy to clean up my system with some Kanji & payar, after eating all that lousy flight food “, an answer that is not so welcome to her parents who are eagerly waiting to show all their love and compassion, in the form of food, when they meet their daughter after all those years.
-THE END-
Should I say anything more to show how much Kanji & payar mean to me and my family ?:) Kanji is a rice gruel, a comfort food for many Keralites. As macaroni and cheese is to Americans or Risotto to Italians , so is Kanji and Payar to a Keralite. A light breakfast or a light supper……Though Kanji & payar ( Stir fry with cooked green grams) is the most popular and traditional combo, Kanji can be served with a variety of chutneys, pappadam (Indian wafers) , pickles etc.
Now anyone interested to know why I thought of blogging this? When Mallugirl of Malabar Spices announced her Summer Express Cooking Event, she wanted to know what I was planning to contribute. Honestly speaking I had no plans to participate as I could not think of any interesting dishes to whip up in 30 minutes, I responded with an impish smile saying, “Kanji & Payar is the only thing I can cook in 30 minutes and do you really want me to blog that? “, thinking that I can escape from this and enjoy the round-up happily. But she was quite persistent and gave me a green signal. And there was one more innocent looking silent character from here, who did everything she could to pour oil to the flame!!! And they wanted my ‘stories’ too!!! And today I found myself, cajoling my husband for accompanying me to an Indian store in downtown, driving 16 miles up and down to buy the traditional Kerala rice used for preparing kanji and here I am making you all travel down my memory lane ! You blame those two girls from here & here :)
Pre-requisites for Express cooking Kanji & Payar :
- 2 pressure cookers + 1 shallow pan
OR - 1 pressure cooker and 1 rice cooker + 1 shallow pan
OR - 1 pressure cooker and A microwave + 1 shallow pan
Time Frame :30 mins
0-15 mins:
- Wash rice and keep it in pressure cooker.
- Wash Cherupayar/green grams and keep it in pressure cooker
- Peel off small onions and garlic and make a coarse paste.
16-30 mins:
- Set the table and clean up the kitchen counter and relax until the steam is fully out from the cooker.
- Heat the pan and stir-fry cherupayar/green grams.
  Kanji- Rice Gruel (Serves 2)
Ingredients:
- 1 cup rose-matta rice/Kuthari
- 5-6 cups water
Directions:
- Wash the rice thoroughly in water. Along with 5-6 cups of water, cook rice in a pressure cooker or rice cooker, in medium heat, until it’s cooked well and soft enough. Generally, I wait for 4-6 whistles from the cooker. (Note: Rice can be prepared in microwave too. Rice varieties like boiled ponni rice and sona masoori rice take only 25 minutes in microwave. Rose-matta rice might take more time; since I have never tried cooking this in microwave, I am unable to give you the right cooking time.)
 Cherupayar Mezhukkupuratti – Stir-fry with cooked green grams.
Ingredients:
- ¾ cup cherupayar/green grams
- 2 ¼ cups water
- 4 green chillies slit opened lengthwise
- 7-9 red pearl small onions/shallots
- 3 cloves of small garlic
- 2 dried red chillies
- 1 ½ to 1 ¾ tsp red chilly flakes
- 1 small sprig of curry leaves
- 1tbsp oil, preferably coconut oil
- Salt to taste
Directions:
- Wash the cherupayar/green grams in water and drain the water fully. Heat the pressure cooker and very mildly roast the cherupayar/green grams until they are dry and warm to touch. Add 2 ¼ cups water, green chillies and salt to taste and cook in the pressure cooker and wait for about 5-6 whistles in medium heat.
- Using a mortar and pestle set, crush the small onions and garlic and make a coarse paste. If you dont have a mortar-pestle set, keep all the ingredients on the chopping board and crush with a rolling pin.
- Heat oil in a shallow pan and when it’s hot enough, reduce the flame to low and add 2 dried red chillies and sauté for 4-5 seconds and add the coarse paste of small onion and garlic. When it turns transparent, add red chilly flakes and blend thoroughly with the onion and garlic and sauté for a minute. Now, add the cooked cherupayar/ green grams ( there will not be much water left in the cooker except 1-2 tbsp, which can be poured to the pan along with the green grams/cherupayar) and stir-fry for 2-3 minutes. Do a taste test here and adjust salt and just a minute before turning off the heat, add the curry leaves for a tempting aroma. Serve with Kanji; sprinkle some salt on top of Kanji :)
Note: There is a jet fast way of cooking this dish, which is by replacing big onion for small onions and saute the onions until transparent; add chilly powder and cook for 1-2 minutes; add cooked cherupayar/green grams and curry leaves.
For a very informative post on Kanji and Payar, Click Here.
This is also my contribution to Jihva for Ingredients (JFI) at Neivedyam.
Related Posts:
|
No part of the content ( articles, photographs, recipes) of this blog may be reproduced without my written permission.Copyright © 2007-2010 Kitchenmishmash.blogspot.com. All rights reserved.
|
 During my teens, attending marriage receptions and related functions were not all that exhilarating to me, unless I had some of my cousins or friends to give company…. But every rule has some exceptions….so this particular dislike was not there when it came to attending Mappila/Muslim marriage ceremonies……..I still have a very vague memory of the rich and festive ceremonies at one of our family friends’ daughter’s Mailanji Kalyanam, a Mehendi ceremony which is a pre-wedding ritual among the Muslims of Kerala.…….I think I was a very small kid at that time, may be in my 1st or 2nd grade but that evening is still crystal clear in my mind…..a group of girls, dressed up in bright and vibrant Muslim attires , decked up with ornaments, singing Mappilappatu and performing Oppana…..those girls moving in circles, clapping their hands with a rhythm…….the illuminations in the hall….I regret to say I cannot recollect the bride’s face but that festive mood prevalent in that hall is still fresh in my mind!! And when I grew up, Muslim marriage ceremonies attracted me not just because of the Oppana and Mehendi ceremony but there was something else too…what lured me was the tantalizing aroma and richness and taste of their feast, especially Biriyani, Neichoru & Kozhi curry (Ghee Rice & Chicken Curry) etc…..It might sound funny to you, but after enjoying all that rich food, coming home and smelling our own hand, reliving the aroma and taste of that food again, used to be a pleasant routine for me :)
Ghee rice, a Muslim specialty, popular for its simplicity, is basically basmati or any long grain rice flavored with whole spices and ghee, garnished with some fried nuts and raisins and fried onions…..Vegetable Ghee Rice is a cousin of this original recipe or to put it lightly, it’s a ghee rice with more family members!! I tasted a similar dish for the first time at one of our friends, R & B’s house. I tweaked the recipe a bit and now it is one of our favourite dishes, something which I cook with confidence, when we have friends coming over for dinner or lunch.
Ingredients for Vegetable Ghee Rice:- (Serves 2-3)
- 1 small size, big onion thinly sliced
- ¼ cup golden raisins/kismis
- ¼ cup halved cashew nuts
- 2 ½ cups Basmati Rice
- 5 cups Water
- 2 cardamom pods
- 4 cloves
- 5-7 small ½ inch long cinnamon sticks
- 1 bay leaf
- ¼ cup green peas
- ¼ cup green beans chopped
- ¼ cup cauliflower florets chopped (as small as pearls)
- 3 tbsp carrot coarsely chopped
- Ghee - 3tbsp + 2tbsp + more for frying the onions
- Salt to taste
- A pinch of sugar
Directions:
- Wash and drain the rice on a paper towel. When it is medium dry, heat 2 tbsp ghee in a large pan and splutter cardamom, cinnamon, cloves and bay leaf; add rice to this and stir continuously for 2-3 minutes in low heat and keep them aside.
- Heat 3 tbsp ghee in the same pan and fry the raisins, stirring continuously until they turn plump or look like golden grapes and keep them aside; fry the cashew nuts in the same oil, till they turn golden in colour and let both the nuts and raisins drain on a paper towel. In the remaining oil, sauté all the veggies for 2-3 minutes in low heat, with some salt, until they are well coated with the oil and cooked slightly. No need to cook them fully, as veggies will be cooked along with the rice again. Remove all the veggies and add more ghee to the pan to fry the thinly sliced onions till they become golden brown; at this stage sprinkling a pinch of sugar to the onion, while frying, to get a taste of nice caramelized onions is a good idea; remove the fried onions from the oil with a slotted spoon and let them drain on paper towels.
- Before cooking the rice, keep a spoonful of fried nuts and raisins and half of the fried onions, separately for garnishing. Microwave Method: Mix everything together- fried rice with spices, onion, nuts, raisins & veggies- with 5 cups of water (2 cups of water for 1 cup basmati rice) and adjust the salt and pop it in the microwave and cook for 23-25 minutes or until rice is done. Stove-top Method: Boil water in a heavy bottom cooking vessel, and when it comes to boil, add all the ingredients and bring it to a boil again and then reduce the flame and cook covered in low-medium heat, until rice is fully done and water is absorbed. Using a fork, gently separate the rice, so as not to get sticky, and leave it covered for another 10-20 minutes, for all the flavours to set in. Garnish with the rest of the nuts, raisins & onions and serve with Raitha (Coarsely chopped onions, tomatoes and cucumber mixed in yogurt with a dash of salt and pepper), Pickles and some spicy Chicken/Mutton curry, which is a real bonus to this dish.
Note: For a healthier version, onion can be fried in vegetable oil, instead of ghee. Make sure that onions are not burnt or browned too dark, as this leads to changing the colour of the rice when cooked. Here is recipe for a regular Ghee Rice.
Luv
Shn
|
No part of the content ( articles, photographs, recipes) of this blog may be reproduced without my written permission.Copyright © 2007-2010 Kitchenmishmash.blogspot.com. All rights reserved.
|
|
|
|
|


 All text and Photographs are copyright protected.
Copyright © 2007-2010
Kitchenmishmash.blogspot.com. All rights reserved.