|
|
 A couple years back I read somewhere that in the northern part of Kerala, particularly among the Muslim community, there is a culinary tradition of roasting a whole goat stuffed with chicken which again is stuffed with boiled eggs. I don’t know whether this is true or not….those who can contribute to the authenticity of this culinary tradition, please drop a line here.
What I know for sure is that throughout Kerala , we roast a whole chicken stuffed with either curried eggs or meat liver and boiled eggs or the humble Puttu mixed with a dash of Kattan kaaapi/Black coffee along with a couple of boiled eggs. These stuffing and the method of cooking differ from region to region. Some roast the whole chicken, some deep fry the chicken dipped in a flour batter and some follow the dum method and some cook the chicken in gravy. The idea of having a roasted whole chicken with stuffing, on the centre of the dining table is quite fascinating, especially if you have a large family or friends and for the same reason, this dish is often prepared as part of some marriage function or festivals.For me, the thought of all that mess while carving the whole chicken , at the end of which you re left with some funny looking pieces and the knowledge that stuffing will not be available in all the carved pieces of meat and the amount of leftover that will follow, after feeding our two tiny tummies and finally the difficulty of finding a small chicken of 1 kilo in a country where everything is supersized sort of slowed down my plans to roast a whole chicken.That’s when the moment of brilliance hit me…instead of stuffing a whole chicken, why not stuff a boneless chicken breast!! I remembered a particular show of Tyler Florence demonstrating stuffing the chicken breast and then pan roasting the same. This alternative sounded more feasible to me and I decided to try a particular stuffing recipe I found in Ms. Ummi Abdulla’s Malabar Muslim Cookery book. I followed her stuffing recipe and adapted the recipe for gravy to suit our taste and used a different method of cooking chicken and stirred in a bit of my imagination and voila, I got a gourmet version of an old Kerala classic which was a pure gastronomic pleasure in all its style and elegance. Here’s how I came up with this dish:
Roasted & Stuffed Chicken breasts:For marinating & pan-frying the chicken breasts:- 2 medium size boneless, skinless chicken breasts
- 1 ¾ tsp chilly powder
- ¼ tsp coriander powder
- ¼ tsp turmeric powder
- ½ tsp fresh ginger paste
- ½ tsp fresh garlic paste
- 1 tsp lemon juie
- 4-6 curry leaves, finely chopped
- Salt to taste
- Around ¼ cup oil for pan-frying
- Kitchen twine
For stuffing:(Recipe Source: Ms. Ummi Abdulla's Malabar Muslim Cookery; slightly tailored to suit our taste)- 1 hardboiled egg, shells removed, and thinly sliced
- ¼ cup split Bengal gram/kadala parippu/chana dal
- 1 cup water or more to cook split Bengal gram/kadala parippu/chana dal
- 1tsp coriander powder
- ¼ tsp turmeric powder
- ¾ to 1 cup big onion, thinly sliced
- ½ tsp fresh ginger paste
- ½ tsp fresh garlic paste
- 2 Indian green chillies, finely chopped
- 1tbsp cashewnuts, chopped into small pieces
- 2tbsp cilantro/coriander leaves, finely chopped
- ¼ tsp homemade Biryani Masala
- 1/2 to 1 tsp sugar
- Salt to taste
- 2tsp ghee/clarified butter
For Masala Roast/Gravy:(Recipe Source: Ms. Ummi Abdulla's Malabar Muslim Cookery; altered the cooking method to suit our taste)- 2 cups big onions/thinly sliced
- 4 Indian Green Chillies
- 1tsp fresh ginger paste
- 1tsp garlic paste
- 2tbsp coriander powder
- 1tsp red chilli powder
- ½ tsp turmeric powder
- 1tbsp raisins
- 1tsp powdered fennel seeds/Perinjeerakam
- ¾ cup fresh tomato puree
- 1tsp homemade Biryani Masala
- 2 to 2 ½ tbsp coriander leaves, chopped
- 1tsp Sugar
- 1tsp freshly squeezed lemon juice
- Salt to taste
- 2tsp ghee/clarified butter
 Directions: Directions:- Butterfly the chicken breast: Place one chicken breast at a time, on a clear plastic wrap, on the cutting board; keep your left hand on top of the chicken breast and with a knife carefully cut lengthwise, from the thickest edge on the right side and moving the knife to the centre; do not cut through fully. Stop before you reach the left edge of the chicken breast and open the breast. This gives you a butterfly shaped chicken breast (which is still connected in the centre) that can be opened like you open a book. Now place another sheet of clear plastic wrap on top of the butterflied chicken breast and start pounding the chicken with gentle yet firm hits, using a meat mallet or rolling pin or a bottom of a small pan, to flatten and reduce the thickness of meat to around ¼ to ½ inch. At the end of this cutting process, you will have a more thin meat piece with more surface area. (Note: For a pictorial explanation, click on this read or this video)
- Marinate: Start by mixing all the ingredients from 2 to 9 and marinate only the smooth side (not the pounded/flattened side) of the chicken breast and leave it on the kitchen counter for 1 hour.
- Prepare the stuffing: Wash and cook split Bengal gram/kadala parippu/chana dal , with coriander powder, turmeric powder and salt, until water it is cooked to soft and water is absorbed (I followed pressure cooking method for this). Heat ghee in a small shallow pan, cook thinly sliced onions till it is transparent. Add green chillies , ginger and garlic paste and stir for a minute. To this add the cooked split Bengal gram/kadala parippu/chana dal, chopped cashew nuts, coriander leaves and sprinkle homemade biryani masala and sugar and stir well. Do a taste test and adjust the salt. Turn off the stove and keep aside.
- Stuff the butterflied chicken breasts: Divide the stuffing into two equal portions. Place half of the stuffing on the pounded side of the chicken breast which is not marinated with spices and herbs. On top of it, layer half of the thinly sliced hardboiled eggs and carefully roll this, securing the stuffing tightly inside and tie the stuffed and rolled chicken breasts with a kitchen twine as in the picture given above. Repeat this process for the second one too.
- Pan-fry the stuffed and rolled chicken breasts: Heat oil in a large shallow pan, and when it is hot, place the stuffed and rolled chicken breast and fry each side for 1 to 1 ½ minute in medium heat and immediately transfer this to the baking dish and cover it with a sheet of aluminum foil to lock in the moisture. At this stage, you should not cook the meat more than the time I have mentioned as you continue to cook for longer time during baking. Pan-frying technique is used mainly to add one more layer of richness as well as to hold its shape.
- Prepare the Masala Roast/Gravy: To the same pan , in which you pan fried the chicken breasts, add ghee to the leftover oil. Add thinly sliced onions and green chillies and cook till the edges begin to turn brown. Add ginger and garlic paste and fry for a minute. Add the raisins and stir for few seconds. Sprinkle coriander powder, chilli powder and turmeric powder and blend well with the onion base , until the raw smell goes. Now add the tomato puree, powdered fennel seeds and biryani masala and cook for a minute or two. At this stage, add sugar, lemon juice and chopped coriander leaves. Do a taste test and add salt if required. Turn off the stove and pour everything on top of the chicken breast, making sure that the pan fried stuffed and rolled chicken breasts are lying on a bed of the gravy.
- Preheat the oven to 350F. When the oven is heated well, cover the baking dish with aluminum foil and bake for 15-20 minutes. Halfway through the baking process, turn the chicken breasts to the other side and pour the gravy on top, else the meat is likely to turn dry. When chicken is cooked, turn off the oven and take out the dish and let it cool on kitchen counter for minimum 30 minutes. Continue to keep it covered with the aluminum foil to maintain the moisture in the meat. (Note: Cooking time varies depending on the oven , the thickness of the meat as well as the extent of cooking done at the pan-frying stage)
- When ready to serve, cut off the kitchen twine and slice the stuffed and roasted chicken into 2" pieces; place 1 or two sliced ones on a bed of roasted masala.
- Serve with Ghee rice/peas Pulao/Jeera rice or any flat breads like Chappathi or Pathiri
Tip: To make fresh tomato puree at home, the easiest method is to grate the tomato using a hand grater or box grater; the puree drips into the bowl and you will be left with the skins. Continue grating until you re left with most of the skin. Tip courtesy: Ms. Madhur Jaffrey.Verdict: I don't say this very often in my blog especially for dishes I have used my imagination but for this dish, I must say this, "AWESOME" and “ABSOLUTELY DELICIOUS". This is easily one of the best chicken dishes I have prepared and recommend for any special occasions where you want to prepare something different from the ordinary, to dazzle your family and guests. The Masala Roast/gravy has a balanced spice and herb mix that exudes a level of strength and richness to complement the mildly flavored lentil and boiled egg stuffing . The occasional bite into raisins along with the spicy masala is a pleasant surprise as in plate of Biryani. If you trust me, take my word, go ahead and give it a try :)Related Posts: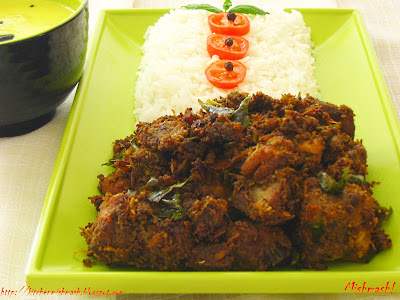 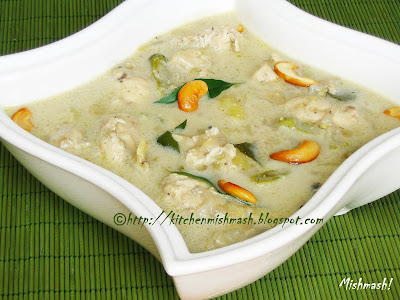   ****************************************************************************************
Well, we all know that a group of nutcases took a boat ride to my country and hoarded 75kg mutton, so they can feed themselves while they kept many innocent people at gunpoint and unleashed terror throughout the city and country. I don’t know if I am angry with crazy guys who kept a city under siege for three days or more frustrated at the ineffectiveness and failure of the intelligence agency and the blame game that followed or plain sad with those who lost their lives, children who are orphaned and spouses who are widowed now……….Though I was anxious about the safety of my cousin and niece and a bunch of friends, I cannot even imagine the trauma these hostages experienced or the pain suffered by many who lost their loved ones…………I wish the political machinery is more responsible to assure atleast reasonable safety to the common man …….my thoughts and prayers are with the victims of this tragedy and salutes to those who fought courageously to save the lives of many..LuvShn
|
No part of the content ( articles, photographs, recipes) of this blog may be reproduced without my written permission.Copyright © 2007-2010 Kitchenmishmash.blogspot.com. All rights reserved.
|
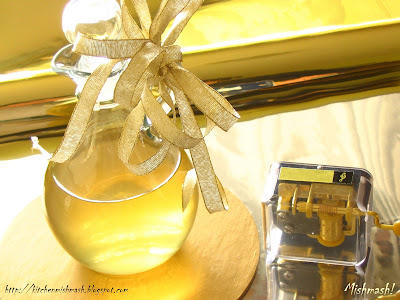
 Till that day the word ‘wine’, to me , was associated with my mother’s ceremonial soaking of some fruits in a brown colored earthenware, Bharani and the occasional stirring and the day my father helped her to strain the fermented juice into glass bottles using a funnel…….until that day , it was that fancy bottle my father’s friends gifted us during the Christmas season……until that day, it was that intoxicating sweetened drink that was served in a tiny stemware, at the Christian wedding receptions immediately after the toast, along with a square piece of fruit cake wrapped in parchment paper and sealed in the centre………
…..but that day, sometime in the first few months of my stay in this country, our friend poured wine into my glass…… the moment I sipped , I knew I was experiencing a phenomenon called ‘taste-shock’…….it was red wine but it was nothing like the one etched in my memories……contrary to the sweet red wine my mother made , this one tasted different….I was not sure if it was bitter or some other taste…….it was sharp and strange……I tried to take one more sip but couldn’t …….it was not just the wine that tasted different…..the wine glass also looked strange in size ….till that day I was used to drinking wine in what can be called a miniature version of the stemware we find in America………the one in which we served wine was tinier than a tequila shot glass….and that’s the day I realized the world of wine and the taste of wine, outside my small state in the southern tip of India, has a whole new spectrum I was not familiar with……..and later, after two years, on a wine tasting tour in California I discovered a variety called dessert wine which came close to the taste of my childhood and adolescence and slowly I started enjoying wine in this country :)Nevertheless, a craving for the sweet wine my parents made dominates me towards the end of every year. When it is time to think about X’mas and when it is time to relish fruit cake I miss the taste and smell of the of the wines my parents made each year with grapes, pineapple, cashew apples and beetroot. As part of starting our own X’mas traditions, year before last, me and CJJ set two batches of wine; one with Beetroot and another with Pineapple and this year, we tried with grapes and since it has turned out so well, I thought of sharing the recipe with you. Recipe Source: Molly Joseph, Bangalore; published in Kerala Magazine, Vanitha, November 2007 issue. Original recipe has been halved to suit my needs.Ingredients: Recipe Source: Molly Joseph, Bangalore; published in Kerala Magazine, Vanitha, November 2007 issue. Original recipe has been halved to suit my needs.Ingredients:- ½ kg dark blue or purple or black, seedless grapes (I used California grapes)
- 5 ½ (1 kg) cups sugar
- Half of one egg white, beaten
- 1tsp Yeast ( I use Fleischmann's active dry yeast)
- ¾ cup (125 gm) wheat kernels/Godhambu
- 19 cups water (2.25 litres), boiled and cooled completely
Directions:- Get an earthenware, Bharani or big glass/ ceramic jar /container thoroughly washed.
- Separate grapes from its stalks and wash nicely. With your hand, crush the grapes thoroughly till it starts releasing juice. Add all the other ingredients along with crushed grapes to the Bharani or big glass/ ceramic jar /container and close with the lid. You may place a large piece of cloth on top of the lid and tie it airtight.
- For the next 20 days, open the Bharani or big glass/ceramic jar /container everyday and stir well with a wooden spoon. The crushed grapes will remain floating on top for the first two weeks and by the end of third week, you will notice them setting to the bottom of the jar and settling on top of the wheat kernels.
- On the 21st day, strain the grape mixture using a muslin/cheese cloth or any thin cotton fabric; transfer the liquid to another Bharani or big glass or ceramic jar /container .
- After 2 days, you will notice sediments at the bottom of the jar; strain this again, using a muslin/cheese cloth or any thin cotton fabric and pour it into clean glass bottles. As the days go by you might notice some sediments at the bottom of the bottle too; so while pouring be careful not to disturb the clouded sediments settled at the bottom.
- In Kerala these wines are served along with a slice of fruit cake during the X’mas season but you can serve this as apéritif too. If taken in small amounts, it is also good for digestion after a festive meal.
Don’t have colour? If the wine does not have color (it depends on the type of grape you use) , add little caramel , until you get the desired depth of colour , without making the wine overly sweet. This is a technique generally followed in Kerala homes to colour the wine if it lacks that dark red shade. But I haven’t tried this technique and hence not sure how much of caramel is required and whether it changes the taste of wine or not. I used a variety called, California grapes which has produced this gorgeous colour. Please keep in mind that it is the skin of the grapes that decides the colour of the wine. I have given recipe and directions for making caramel in my last year’s post on Kerala Fruit Cake /Plum Cake; you may refer the same.I know many of you are busy with the last minute menu planning for the Thanksgiving dinner and it is too early to even think of X’mas but certain preparations like setting the wine and soaking fruits for the plum cake has to be done way in advance. So, those who have not yet soaked the fruits for fruit cake, please do it atleast this week. Last year, I had received lot of queries asking for the availability of tutti-frutti in US and I thought of making a small note here that it has started appearing in the baking aisles of the supermarkets and shops like, Walmart has set up an aisle specially for baking goods for the holiday season. Look for a brand called, SUN-RIPE fruit mix which is mix of candied orange and lemon peels, cherries et al. Those who are looking for the Kerala fruit cake recipe, please go through the recipe I have posted, in detail as well as the updates and the answers I have given in the comment section of the same post as I find it difficult to answer the same question again and again, which I have cleared for the previous readers. Still, if you have queries, please feel free to drop a line in the comment section, I am more than happy to help you :)Related Posts:
LuvShn
|
No part of the content ( articles, photographs, recipes) of this blog may be reproduced without my written permission.Copyright © 2007-2010 Kitchenmishmash.blogspot.com. All rights reserved.
|
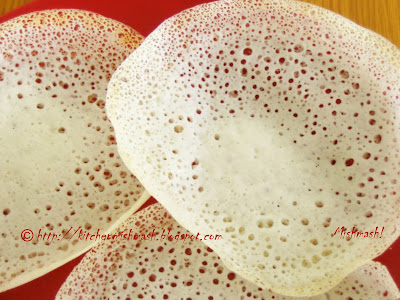
“You can be cultural ambassadors sitting in your own dining room” – Mishmash!I am not kidding…..think about it…..when you stay away from your homeland, the food you serve to others, who belong to different cultures and cuisines, is a representation of your own homeland, its years of culinary legacy and hence a part of its culture. Most of the time food is powerful enough to stir up an active discussion among your guests on various cuisines and styles or if I may put it simply, it’s a sure ‘conversation piece’. Food is a window to knowing a new culture and sometimes a good avenue to learn a bit of new language as well.Well, this inference I have made is based on my personal experiences……Ever since I learned cooking and ever since I gained the confidence to invite people home for food, I have noticed our friends getting excited and showing a genuine interest in discussing and finding out about our traditional Kerala cuisine. Consciously or unconsciously it has influenced our menu planning too. Even when I start our dinner gatherings with a fancy finger food and wrap it up with a decadent and elegant dessert, I make sure that the main food served is our traditional food showcasing the culinary legacy of my homeland, especially if our friends are non-Keralites and visiting us for the first time. One of the regular appearances in such occasions is a thick and creamy stew, meat or vegetable, served with white bread or Paalappam. I got this habit partly because that is how my mother hosted such dinners. She always served a course of stew and Paalappam or the classic stewed fish preparation, Fish Molee with white bread. My family background paired with our friends’ excitement over discovering such delightful creations, always gave me a nudge to include this combination whenever I hosted dinners. Most of the time we saw our friends initiating a discussion on their culinary traditions and variations of the same or similar preparations……it always brought us together, creating a more cozy and warm atmosphere and here I am convinced quite well that food can bring people together and one can be cultural ambassadors sitting in one’s own dining room.Whenever we served stew, it was always a delight to our friends…..something new but very scrumptious. I was asked to share the recipes on numerous occasions……………I have even come across men who made me mail the recipes to them, so their wives could recreate this tasty creation at home. So when we hosted a dinner two days back, I had this natural inclination to go for Paalappam and Stew and what followed was repetition of the history itself. They loved it so much! So I thought I will share my family recipe for Chicken Stew, which is stewed chicken in silky and creamy coconut milk, embellished with minimum spices and herbs. It’s amazing how such simple ingredients can turn a dish into pure elegance.Ingredients:For pressure cooking:- ½ kg chicken with bones, cubed and cleaned
- 5 Indian green chillies, chopped
- 1 tbsp ginger, peeled and thinly sliced
- ¾- 1 tbsp garlic, thinly sliced
- ¼ tsp freshly ground black pepper powder
- Salt to taste
For Stewing:- 1 large (golden) onion thinly sliced
- 8-10 Indian green chillies, split lengthwise
- 1 tsp ginger, peeled and thinly sliced
- 2 sprigs of curry leaves
- 1 medium size potato
- ½ tsp + ¼ tsp homemade masala powder/garam masala
- 1 ¾ to 2 cups of thin coconut milk
- ½ cup thick coconut milk
- Salt to taste
- 2 tbsp coconut oil
For Garnish: (optional)- ¾ tbsp ghee
- 8-10 cashew nuts, split opened
Directions:- Marinate the chicken with all the ingredients specified under pressure cooking for 10 minutes and then pressure cook until chicken is well-done. I usually wait for 3-4 whistles.
- While chicken is cooking, wash the potato well and cube them into small chunks. Microwave or boil the potato with a pinch of salt and enough water, till it is cooked and when warm enough to touch, peel off the skin from the potato.
- Heat oil in a large saucepot, when chicken is done and cooled enough to open the pressure cooker. Add thinly sliced onion and cook till it begins to soften. Now add the green chillies and ginger and curry leaves and cook till onions are transparent. At this stage add the pressure cooked chicken, including the stock it produced while cooking as well as the boiled potato chunks and sprinkle ½ tsp homemade masala powder/garam masala. Stir gently to mix everything coated well and let the boiled potatoes suck up some chicken stock for 2 minutes. Mildly press on the potato chunks with the back of a wooden spoon, so it gets mashed partially still holding a firm shape. Pour thin coconut milk and bring to a boil and then simmer it for around 10-15 mts or until the sauce begins to thicken. Now add the thick coconut milk and sprinkle 1/4 tsp homemade masala powder/garam masala; in medium heat bring it to a boil and immediately reduce the heat, until it reaches a creamy and thick stew consistency. Just before turning off the stove, add rest of the curry leaves for the flavour and fragrance and stir well.
- In another shallow pan, heat ghee and roast the cashew till they begin to look golden. Pour the entire thing to the top of the dish. This dish gains its taste and flavour as it rests for a while, so please make sure that you cook this atleast 1 hour before serving.
- Goes best with Paalappam or white bread. Ideal with Chappathi as well.
Note: My mother suggests adding 4-5 pieces of raw carrot, along with cooked chicken and boiled potatoes, to bring in some colour in the stew to make it look more appealing but make sure that you use very few small pieces without adding more carrot flavour to the stew. Also it is advisable not to go for boneless chicken as the dish will lack the flavour and juices produced by bones while cooking.***
Can you imagine the delight of having this rich and creamy chicken stew with the elegant and pretty looking laced beauty, Paalappam as a breakfast on a weekend? It’s awesome…divine! I can easily make a claim that this is one of the best breakfasts in the world!
Related Posts:
Luv
Shn
|
No part of the content ( articles, photographs, recipes) of this blog may be reproduced without my written permission.Copyright © 2007-2010 Kitchenmishmash.blogspot.com. All rights reserved.
|
 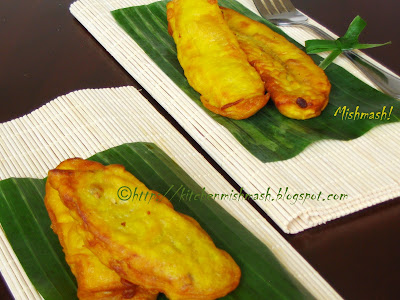 When you make a list of things you should do on your culinary travel in Kerala, then Pazhampori has to find a place in your list! I would say, it is one of those iconic foods in Kerala cuisine. It is deep fried goodness made with a native variety of Kerala banana called Eathappazham or Nenthrappazham which are ripe plantains. The natural sweetness from the ripe plantains, when coated with a flour batter flavored with fragrance seeping out of the crushed cardamoms and deep fried in distinctly flavorful and aromatic coconut oil, is sure enough to take you till the doors of heaven! A bite into this warm, crispy yet soft delicacy, accompanied by a sip of hot tea or coffee is something that every Keralite loves to relish after a long day or on a rainy day or even as a mid-morning/evening snack.Pazhampori is ubiquitous in Kerala. Since this particular variety of plantain is bountiful and abundant, men and women in charge of kitchen grab the frying pan and bunch of ripe plantains at the same breath, whenever we have some impromptu guests. Even when it is a pre-planned function, we have a soft spot for Pazhampori. In some places, because of the regional differences, it is also called as Eathakkaappam.The taste of the Pazhampori made with the native variety available in Kerala is incomparable yet the ones made with the regular ripe plantains are also scrumptious. The only criterion is to look for fully ripe sweet plantains. The flour batter can be made with rice flour or wheat flour or all-purpose flour or even a combination of two types; some add beaten egg or baking powder to give an added texture to the outer covering. I have tried all the combinations and was stuck with maida and rice flour for a long time but now I am a convert. I prefer my mother’s simple recipe as it always gives me perfect crispy, soft and definitely not soggy, Pazhampori.Recipe for Pazhampori/Kerala Banana FrittersIngredients:- 3 fully ripe plantains/Kerala Banana/Nethrappazham/Ethappazham
- ¾ cup rice flour
- ¼ cup all purpose flour/Maida
- 2 cardamom pods crushed
- 3 tbsp sugar (adjust depending on the sweetness of the plantain)
- Around ½ tsp turmeric powder
- 1 ¼ cup water
- Oil for deep frying
Directions:- Make a batter by mixing rice flour, all purpose flour, turmeric powder and sugar with water; finally flavour it with crushed cardamoms and mix well into a smooth batter without any lumps.
- Diagonally slice ripe plantains into thin discs of around 3-4 inches length.
- Heat oil in a deep frying pot, in medium heat and when the oil is hot enough, dip diagonally cut banana slices into the batter and coat the fruit well; slide these batter dipped fruit into the hot oil and deep fry, occasionally flipping each side till the edges start to brown. Using a slotted spoon, remove from the frying pan and strain it on a paper towel, to remove the excess oil. Continue frying other banana slices the same way without over crowding the pan. Serve hot with a cup of tea or coffee.
 When you are in Kerala, please be sure to visit one of those unpretentious small tea-shops called Chaayakkada or the omnipresent road side eateries called, Thattukada or a small scale restaurant, to experience a warmth you will not find in any sophisticated restaurant…….. and in such ordinary places you will find Pazhampori in a different shape. They usually serve the long Pazhampori, like the ones on the picture above, instead of the small diagonally or vertically sliced ones prepared at homes.To recreate that at home, thinly slice a ripe plantain lengthwise and dip it in batter and deep fry in oil. You can make around 3-4 long ones from one ripe plantain.If you travel by train, then you are sure to catch this variety almost at every platform. Get your wallet ready when you hear the quintessential railway platform jingle, “Chaaya…..kaappee…..pazhamporeee……..” The vendor will come wearing a mundu and shirt, carrying an aluminum tray filled with Pazhampori on his head, and a huge steel kettle with tea/coffee in his hand. As he fills that flimsy plastic glass with the steaming tea/coffee and grabs a couple of pieces of Pazhampori, you will also notice the wear and tear on his face, that hidden gaze in his eyes with an undertone of all the struggle he has been facing to make both ends meet!!!! When you are in Kerala, please be sure to visit one of those unpretentious small tea-shops called Chaayakkada or the omnipresent road side eateries called, Thattukada or a small scale restaurant, to experience a warmth you will not find in any sophisticated restaurant…….. and in such ordinary places you will find Pazhampori in a different shape. They usually serve the long Pazhampori, like the ones on the picture above, instead of the small diagonally or vertically sliced ones prepared at homes.To recreate that at home, thinly slice a ripe plantain lengthwise and dip it in batter and deep fry in oil. You can make around 3-4 long ones from one ripe plantain.If you travel by train, then you are sure to catch this variety almost at every platform. Get your wallet ready when you hear the quintessential railway platform jingle, “Chaaya…..kaappee…..pazhamporeee……..” The vendor will come wearing a mundu and shirt, carrying an aluminum tray filled with Pazhampori on his head, and a huge steel kettle with tea/coffee in his hand. As he fills that flimsy plastic glass with the steaming tea/coffee and grabs a couple of pieces of Pazhampori, you will also notice the wear and tear on his face, that hidden gaze in his eyes with an undertone of all the struggle he has been facing to make both ends meet!!!!***
Am curious…..what is your favourite railway platform food? What is your regional platform specialty…..? Enlighten me, please :)
Related Posts:   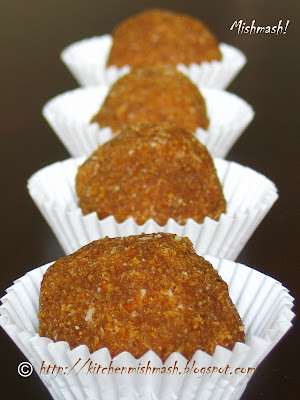 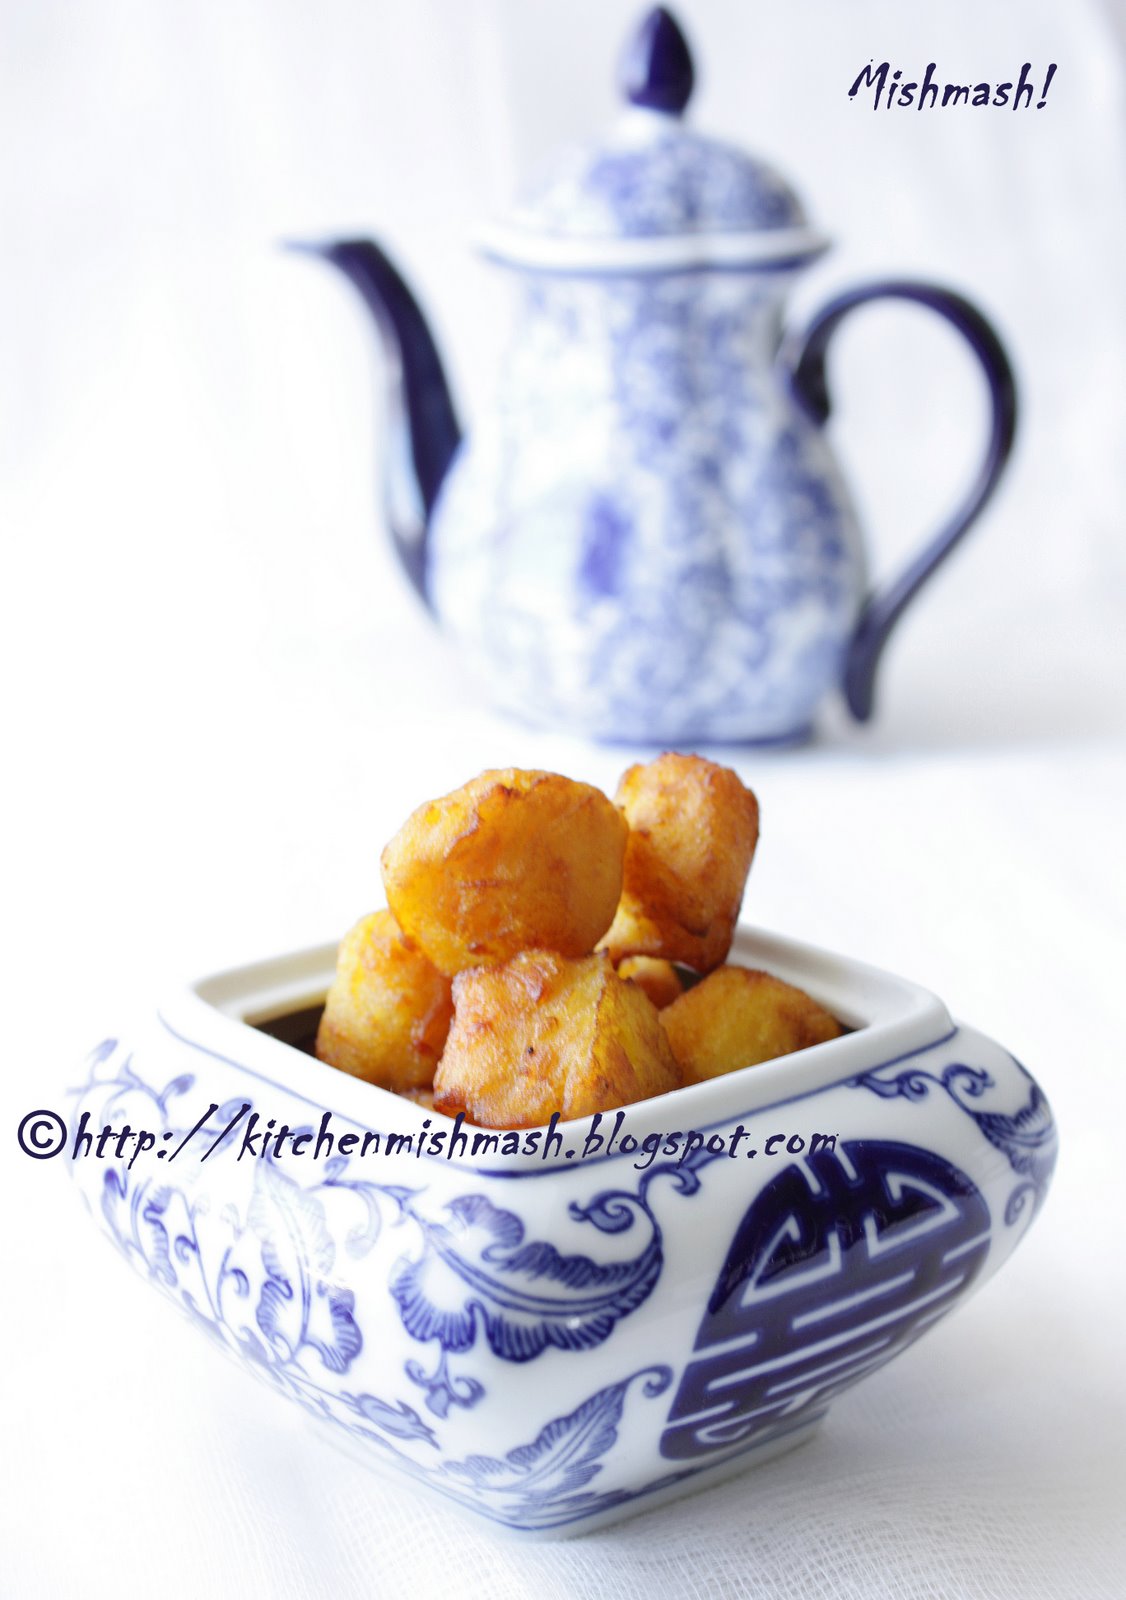 Thanks! Shn
|
No part of the content ( articles, photographs, recipes) of this blog may be reproduced without my written permission.Copyright © 2007-2010 Kitchenmishmash.blogspot.com. All rights reserved.
|
Ariyunda is one of my favourite snacks my grandma made and packed for us whenever she visited us or we returned home after a long stay at her place. It was an ideal snack for munching that made us take a quick peep into the Palahaara-paathram aka snack boxes whenever we wandered lazily through the kitchen after watching television for long or reading a book. Traditionally it is made by roasting the rice which then hand pounded and ground into a fine powder, using ‘Ural & Ulakka’, the bigger versions of modern tabletop mortar and pestle, which is going extinct from most of the Kerala kitchens these days. The powdered roasted rice was them pounded with grated coconut and jaggery and then shaped into small balls. Though it was a physically challenging work to manually pound rice until it transforms into superfine granules, hand pounding made a world of difference. Both my maternal grandma and women at the paternal side resorted to preparing these humble snacks, on a breezy afternoon pounding rhythmically and chit-chatting with each other. It was music to ears when they pounded it with so much of rhythm and fireworks for palate when they were done!
It may take only less than 30 minutes for me to recreate this dish in my small kitchen, but the taste is not as superior as the ones grandma made. One of the key ingredients is grated coconut and it has to be fresh and moist and hand pounding enables the juice and oil components of the freshly grated coconut to ooze out, helping all the ingredients hold together and brings out even the subtle flavours that cannot be achieved with an electric grinder. Since it is one of those snacks embossed with the homemade element, I have seen many families serving this snack for guests visiting on the previous days of marriage. If you are a lucky traveler visiting Kerala, you may find them stacked in glass jars at small roadside shops, Pettikkada as most of the time women of the house prepare these humble snacks with inexpensive and readily available ingredients at home and the next day men folks take it to shop for selling. Let me share with all of you a recipe for Ariyunda from my grandma’s kitchen for temporarily satisfying your curiosity and palate, until you make a visit to Kerala :)Recipe for Ariyunda:Ingredients:- ¾ cup Kerala rosematta rice
- ½ cup grated jaggery
- ½ to ¾ cup freshly grated coconut
- 3 tbsp cashew nuts
- 2 tbsp ghee
- 2 cardamom pods crushed
Directions:- Heat a Kadai/Cheenachatti or a stainless steel pan, and roast the rice, in medium heat, until the rice starts splitting and changes its colour. Reduce the heat to low if required and keep stirring, especially when you hear the splitting sound and continue to roast until the full batch of rice is uniform in colour and shrink a bit from its original size. Remove this to a grinder/mixer/blender
- In the same pan, heat ghee and roast cashew nuts until they reach golden brown and keep this aside.
- Grind the roasted rice into a fine powder and transfer it to a bowl.
- In the same grinder bowl, add cashew nuts and powder it. To this add freshly grated coconut and jaggery and grind for less than a minute or till everything is blended together. Now add the crushed cardamom seeds, finely ground roasted rice powder and leftover ghee, if any, after roasting cashew nuts and whirl everything together until it is thoroughly combined. Transfer the entire mixture to a bowl. Take a fistful of the mixture and shape into a small ball, making the surface as smooth as you can. This yields around 10-11 Ariyunda and you can store it in an airtight container for up to a week and do refrigerate if you want to store it for more than that.
Note: You may notice some white specks on my Ariyunda and that is because I added some more grated coconut towards the end and did not get blended well. Though it is a negligible part, refrain from making the mistake I made :) It is tastier when fresh as it would be moist and has a crumbling texture but as the days go by, it tends to harden.
Related Posts: Luv Shn
|
No part of the content ( articles, photographs, recipes) of this blog may be reproduced without my written permission.Copyright © 2007-2010 Kitchenmishmash.blogspot.com. All rights reserved.
|
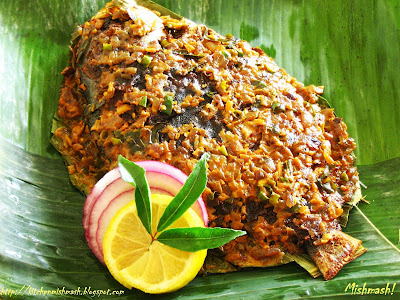
NOTE: If you are looking for the popular Kerala’s signature version of the roasted fish wrapped in banana leaves, Meen Pollichathu, you may go directly to the recipe HERE.
--------------------------------------------------------------------------------------


One of our very dear friends mailed me sometime back, “ My friend here is all admiration for ur blog ;) Some recipes made her feel that you are a mallu christian, while some others like the vishu one gave her the Nair feel! “
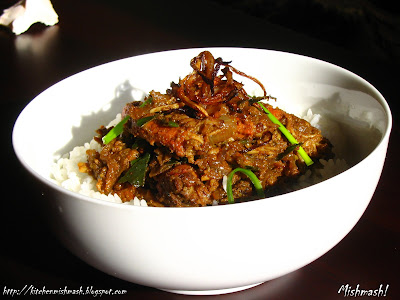
Well, that pretty much sums up my family’s culinary religion and the culinary traditions I have inherited from both my paternal as well as maternal side. In both these families, food was the language and taste was the religion…………. I grew up seeing women on both side pampering their family and friends with food. Food was the focal point….a guest was always treated with a hot glass of steaming beverages, Chaaya/kaappi accompanied by an array of freshly made plantain fritters, Pazhampori or steamed cakes like, Vattayappam or deep fried lentil fritters like, Sukhiyan along with other bakery items………aunts exchanged gossips while stirring a scrumptious uruli of Pradhaman…….. kids woke up to the delicate aroma of steamed coconut and rice flour cake, Puttu followed by the irresistible and formidable fragrance of the roasted coconut simmering in Kadala Curry, a delicacy with black chickpeas………………..lunch boxes were filled with my mother’s leafy thin Chappathi, a flat wheat bread and rolled with the spicy Beef Fry……..birthdays and anniversaries were celebrated with a huge Chembu of lip smacking Chicken Biryani……… on weekends we gorged on the tantalizing Potato stew, Esthtu and the lacy crepes, Paalappam……………. uncles played a round of Rummy or 28, over bottles of toddy and a plate of fish fry , with the freshly caught fish from the pond, Kulam in the backyard of our ancestral home ……………maids shared stories from the market and neighborhood grating mounts of coconut and de-skinning and de-boning a raw chicken caught from our own yard…….newly weds were treated with gourmet rice bread, Pathiri and erachi curry, curried meats……
I remember, long back, one of my cousins from the paternal side making a casual remark with a hint of sarcasm,“ ……ohh….those from our native has this habit of over treating /entertaining the guests even if they are complete strangers”. Well, now when I look back, I am proud to be part of such a large family……men and women who became part of our paternal family, from central and northern part of Kerala brought their tasty culinary traditions too. My maternal grandma, a city dweller, had close associations with her Christian neighbors…....my parents had some Muslim friends from whom my mother learned their tasty secrets. That made my mother’s kitchen a melting pot of various styles of Kerala cuisine. Inevitably the food she cooked and the food we enjoyed at home was a representation of ‘Kerala Food’ in general and me and my brother relished each morsel without realizing that the dish plated in front of us was associated with a particular community or religion some 40-50 years back and now I consider that ignorance a pure bliss as it gave us the ability to approach food with only one criteria, the taste!!
Though the religious/community trademarks were never a point of interest to me, what really confused me was the difference in regional variations when it comes to cooking and the names of many common dishes. My mother is still a virgin in this department but as I started interacting with people from other parts of Kerala and reading through the food blogs around, I realized the extent of variations in different regions for the same dish. For example, for me and for most Keralites, the term ‘Pollichathu’ is associated with a central Kerala delicacy called Meen Pollichathu which is roasted fish wrapped in banana leaves. Surprisingly, at my paternal home, the term has been associated with another fish preparation which is cooked in a base of sliced tomatoes and crushed small onions and then simmered in the sauce until the sauce thickens and an oil coating appears on top. As I delved more into this aspect of same lingo used for two different preparations, CJJ pointed out that at his place, they have a different style of Pollichathu which is pan roasted and served in a coarse base of sliced big onions, tomatoes and spices. Phew, talk about naming problems!!!!
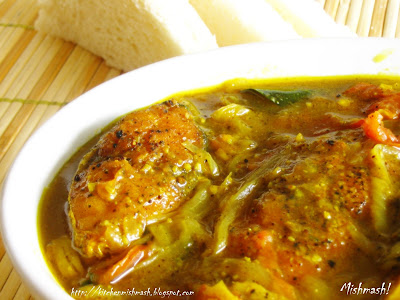
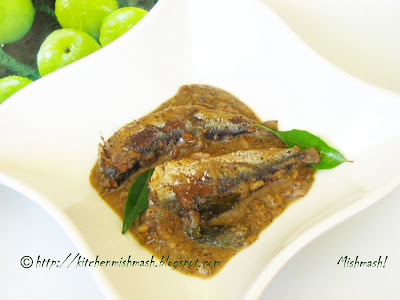
Well, Maththi/Chaala Thakkaali-yittu Pollichathu is basically curried sardines in a crushed onion and tomato base. Tomato acts as the flavoring as well as the souring agent. This is a style of cooking I have inherited from my father’s side and I find it a pleasant change from our usual kudam puli/Gamboge flavored fish curries or the ones in ground coconut base. Here’s my or rather my mother's interpretation of the same:

Ingredients:-
- 8 whole pieces of Sardines/Maththi/Chaala, cut and cleaned
- 6-8 small red pearl onions/Kunjulli, peeled
- 5 green chillies
- 1 small piece of ginger (approx. 1” length), peeled and thinly sliced
- 1 large juicy tomato, thinly sliced
- 2 sprigs of curry leaves
- ½ tsp turmeric powder
- 2 ½ to 3 tsp red chilly powder ( adjust according to individual tolerance)
- ¾ to 1 cup water
- 2 tbsp coconut oil
- Salt to taste
Directions:
- Crush the small red pearl onions/Kunjulli, ginger and green chillies, using a mortar and pestle. If you don’t have a mortar and pestle set, thinly slice each of these ingredients and spread it on a chopping board and crush with the round edge of the rolling pin or anything with which you can pound and get the same result.
- Heat oil, preferably in a ‘curry-chatti’, an earthenware from Kerala or a cooking pan; when the oil is medium hot, throw in half of the curry leaves, snipped off of its stem, and smear the entire ‘curry chatti’/pan with oil and curry leaves, so as to coat the cooking ware fully with the combined flavour and aroma of the oil and curry leaves; DO NOT skip this step. Next, add the crushed small onions, ginger and green chilies, and sauté until transparent; add the thinly sliced juicy tomatoes and cook in low flame. When the tomato slices are soft, add turmeric powder and red chilly powder and combine well; let it cook for 1-2 minutes or until the raw smell goes, in low flame itself. At this stage, spread the fish pieces on this bed of tomato and onion base and pour water, suggested in the recipe or just enough to cover the fish pieces; add salt and bring to a boil in medium heat. Once the fish almost done, do a taste test and adjust the salt and then in low flame, simmer the gravy, in low heat until the sauce begins to thicken a bit and oil coating starts to float on top. This process takes about 15 minutes during which time fish will be cooked fully; so you need to roughly calculate the time ahead for cooking the fish, to make sure that fish is not over cooked. Just 2 minutes before turning off the heat, tear of the rest of the curry leaves, take some oil in your palm and crush some curry leaves with oil and add it to the dish, which accentuates the aroma, flavour and ‘the look’ of the dish. Turn off the stove and let it cool.
- Serve with rice or chappathi.
Note: Since we like to smear our rice with curry, I did not simmer it too much. Those who like a bit more thick texture can thicken a bit more.
Related Posts:
See you all next week!
Luv
Shn
|
No part of the content ( articles, photographs, recipes) of this blog may be reproduced without my written permission.Copyright © 2007-2010 Kitchenmishmash.blogspot.com. All rights reserved.
|
|
|
|
|


