|
|
  Everyday around 11.00-11.30am my phone rings and without the help of a Caller ID, I know for certain that it’s from CJJ, calling in to see,"What’s for lunch, today?" and if the menu includes Fish curry, I hear him chuckling coz that’s his favourite dish :) Fish curry with 'Kudam-puli' (Gamboge is the English word for Kudam-puli, I guess) is a staple in our home and I'm sure it’s same with many households in Kerala. I remember those days, when we were kids, my mother waiting for the fish vendor, who comes on a bi-cycle everyday, and the series of bargaining that follows; it’s to be noted here that the same guy comes riding a Hero Honda these days!!! Ever since I started preparing this dish, I have been trying to reproduce my mother’s recipe, but honestly, I've never been able to reach anywhere near her version! Wonder what’s her secret ingredient, is it mama’s love?? Guess all of us know the answer!
Ingredients: - 6-7 slices of cleaned fish
- 6-8 small onions
- 4 green chilies
- 2 small garlic cloves
- 1 small piece of ginger
- 1 sprig curry leaves
- 2-3 pieces of kudam-puli (Gamboge)
- 2 tsp red chilly powder
- ¼ tsp turmeric powder
- 2 cups thin coconut milk
- ¼ cup thick coconut milk
- 2 –3 tbsp coconut oil
- Salt to taste
Directions:
1. Heat oil and sauté finely sliced small onions, ginger, garlic, green chilies and some curry leaves and when it is transparent, add turmeric powder and red chilly powder and combine well. At this stage add 2 cups thin coconut milk (or sufficient enough to cover all the slices of fish) and pieces of kudam-puli and salt and let it boil. When it is boiling, check the level of sourness and adjust the same by adding/removing one or two pieces of kudam-puli.
2. Place fish pieces to this and cover with a lid and allow it to cook in medium heat; swirl the cooking vessel once in a while; avoid stirring as you may end up breaking the fish pieces.
3. When it is almost done, add the thick coconut milk and adjust the salt and let it cook in a low flame, without the lid, for 5-10 minutes until a thin coating of oil appears on top; Just 2 minutes before turning off the stove add some curry leaves. Serve with rice or tapioca and hey, don’t forget to add that secret ingredient :)
Note:
Fish curry is generally prepared in a 'curry chatti', an earthenware in Kerala and it tastes better compared to the ones prepared in a non-stick pan. The oil coating that appears on the dish at the final stage mainly depends on a fatty fish and the coconut milk extracted from freshly grated coconut. Please do not substitute small onions with big onion as it definitely alters the taste and a generous use of curry leaves is suggested as the dish gains a fresh irresistible aroma when it is added just before switching off the stove. Also the taste will not be the same if kudam-puli is replaced with the tamarind used in Sambar and Rasam.

UPDATE: Kudam puli or Gamboge, is actually a fresh orange-yellowish fruit in its initial stage, which is dried in sun and transformed into black, and later used to add sourness to dishes, in South India and in some part of Sri Lanka too, I guess. The sourness it brings to the fish curry compared to the ordinary tamarind is lot different and unique too. You can find it in most of the Indian stores if you are staying outside India. If the store bought ones are too dry, soak them in water before you start preparing the dish and when it is moist, add it to the dish along with the water. If using the ones prepared at home (like the ones in the pics) then one is enough to get the sourness. Hope this helps!
Luv
Shn
|
No part of the content ( articles, photographs, recipes) of this blog may be reproduced without my written permission.Copyright © 2007-2010 Kitchenmishmash.blogspot.com. All rights reserved.
|
 The name sounded a bit weird when this recipe was passed on to me, by a ‘true friend’ of mine, a couple of years back and I had to google it to find what it really means :) But the devil in this crowd pleaser recipe is the taste itself that tempts you to go for one more piece! This is one Easy, Simple and a Great appetizer that can really tickle the curiosity of your guests :) And hey, for all those Mom’s out there, this is a great evening snack for kids!!
Ingredients:
· 5 Hard boiled Eggs
· ½ cup finely chopped big onion
· 1 ½ tsp pepper powder
· 2 tbsp Coriander leaves/Cilantro
· 3tbsp All purpose Flour/Maida
· 1 cup Breadcrumbs
· Oil for frying
· Salt to taste
Directions :
1. Slice the hardboiled eggs in half lengthwise and remove the yolks to a bowl.
2. Heat 1 tbsp oil and sauté finely chopped onions until translucent. Add pepper, salt and finely chopped coriander leaves/Cilantro. To this, add the yolks and mash till the mixture is well combined.
3. Once the mixture is warm enough, fill them in each of the egg whites carefully.
4. Mix the all-purpose flour/maida with some water and make a smooth paste; dip each egg halves in this and roll in breadcrumbs and shallow fry in oil.
Luv
Shn
|
No part of the content ( articles, photographs, recipes) of this blog may be reproduced without my written permission.Copyright © 2007-2010 Kitchenmishmash.blogspot.com. All rights reserved.
|
 "Wine is bottled poetry."Robert Louis Stevenson "Wine is bottled poetry."Robert Louis StevensonYes it is !! I had been on wine country and wine tasting tours a couple of times last year. Now I have become a huge fan of dessert wines/Sweet wines. But a nostalgia engulfs me whenever I stroll through the wine section of supermarkets; the flavour of that sweet wine I tasted years back, at a Kerala-christian wedding, rushes back followed by a strange craving for the sweet wine my mother makes….Finally, I decided to take a risk. It was X’mas time and I tried my mother’s recipe for Beetroot wine; it turned out to be a great hit ! The beauty is that none can guess its beetroot as it’s quite fruity in aroma and flavour. Many of our friends raved a lot about it and you believe it or not, I did get some calls asking for more wine!!!! So here’s your chance to fetch some compliments; the recipe follows:
Ingredients: (Approx.)Beetroot : 1 kgSugar : 1 kg (50 oz)Yeast : 1 tspLemon : 2 small onesWater : 3.5 litresCinnamon : 3-5 small sticksClove : 7nosWarm water : ½ cupDirections :1. Wash the beetroots and peel off the skin and finely grate them.
2. Dissolve yeast in lukewarm water with ½ tsp sugar and let it rise.
3. Boil 3.5 litres of water in a clean saucepan.
4. Add the grated beetroot to the boiling water and leave it till it cooks.
5. When the beetroot is cooked, turn off the stove and once it is lukewarm, strain the mixture preferably to a Bharani or any earthenware container or a glass jar and leave the grated portion. Use a cheesecloth or muslin cloth for straining the liquid.
6. Once you are done with straining, add the sugar and dilute well with a wooden spatula; then add the squeezed lime juice and the dissolved yeast. At this stage, add the cinnamon sticks and cloves as well.
7. The container should be airtight and store it, in a dark space, for fermentation for 15 days. On the 4th or 5th day, open the container and stir it with a wooden spatula and let it rest till the 15th day.
8. After the fermentation process, strain it once more to make sure that there are no residues and bottle the wine and rack them at room temperature in a cupboard.
9. Serve with a fruit cake and a smile :)
Tips:The colour of the wine will be exactly that of the beetroot used; So make sure that good quality beetroots are used. Also, for the yeast to convert sugar into alcohol, it is mandatory to keep the oxygen out and hence make sure that container is airtight. The alcoholic and the mild fizzy effect also depend on the quality of the yeast used. Please ensure that the fermentation jars and bottled wines are not filled fully; leave some room. Once they are bottled, it can be used any time; it’s better not to age this particular wine as the colour may be compromised and taste also changes. The sweetness of the wine is as per our family choice; you are free to increase or decrease the quantity of sugar but I suggest doing that only after your first trial as you get an idea how much to change and can make adjustments accordingly next time. Related Posts:  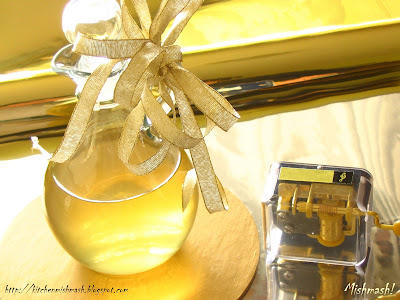 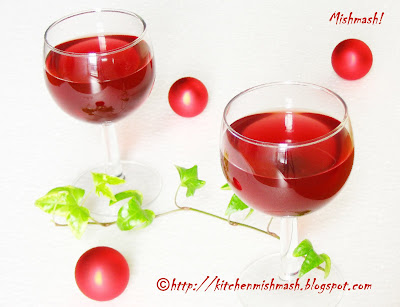
|
No part of the content ( articles, photographs, recipes) of this blog may be reproduced without my written permission.Copyright © 2007-2010 Kitchenmishmash.blogspot.com. All rights reserved.
|
Where do I start..hmm..Till two weeks back, I never thought about having my own blog spot until my husband seeded this brilliant idea of creating a space, where I can share the reflections from my kitchen. I still remember that bright summer day in my teens, when my parents literally dragged me into the kitchen to teach me to prepare two cups of tea and my image of lighting the stove from a distance as though it’s going to explode !!! Another recollection is the mail I received, just a week after our engagement, from my fiancée, my best friend CJJ, with a link from Pachakam.com. Poor guy, he had his own doubts about having some good home made food after marriage, knowing very well that the love of his life had not made any great improvement from the ‘two cups of tea and an omelet’ phase! And Ohhh..there pops up another image in my head where my MIL went speechless when I asked her whether one glass of green grams (as big as our water tumbler in Kerala) is enough for a side dish, for two persons for a meal !!!!!
And with all these above mentioned extensive knowledge and experience of mine, I started my cooking adventures with the notes I prepared, just two days before marriage, with the help of my aunt and Mummy and ofcourse, with the recipes from the great pachakam.com. Then followed innumerable STD/ISD calls to Mummy whenever I was in kitchen, sometimes struggling to differentiate coriander powder and cumin powder...and I can not remember the number of times I tuned to Food TV and other cookery shows. Fortunately, I had the beginner’s luck or I wonder if it was CJJ who was lucky !! But now when I look back I have gone too far from that teenage girl to this confident and responsible young (??) homemaker, diagnosed with the early symptoms of OCD, who can sure host a decent dinner!! And there when I am floating in the clouds, with all the confidence boosting compliments from our friends after relishing the food, here comes my CJJ with his funniest story of my first chicken curry and that chicken who got embarrassed in my kitchen seeing its final shape and am sure, that story is definitely a topping over the dessert for all our friends.
I don’t know how far I will be able to sustain this new found interest in blogging but as long as I have a bulldozer behind me, yes my CJJ, I will be sharing some of my experiments from the kitchen...and I start my first one here, raising a toast to my parents, my CJJ and to all of you, my friends !!
Luv
Shn
|
No part of the content ( articles, photographs, recipes) of this blog may be reproduced without my written permission.Copyright © 2007-2010 Kitchenmishmash.blogspot.com. All rights reserved.
|
|
|
|
|