|
|
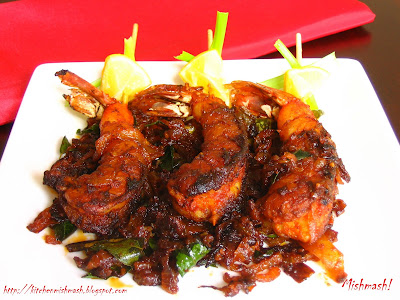 Having difficulty in comprehending the title..? I know it’s a bit strange for my non-Keralite Indian friends and totally clueless for the western tongue. It is a household name for a simple seafood dish prepared and served with a fancy look .......my grandma’s indigenous alternative to store-bought wooden skewers! ‘Eerkkili’ is the tender rib of the coconut leaves and Chemmeen ‘eerkkili’-yil kuthi varuthathu means skewered prawn fry, from Kerala, cooked with its pungent spices, flavorful coconut oil and aromatic fresh herbs. A specialty from my grandma’s kitchen when she expected some special guests or to entertain her sons-in-law .....the fancy prawn dish my mother used to prepare when she got some jumbo prawns, once in a blue moon!! At our place, this is the only “naadan” (an old-fashioned, country side) dish that gets to share the ground with the much elevated chicken wings and personally, I would go for this Kerala style skewered prawn fry anytime over a plate of Kebobs or chicken wings! Having difficulty in comprehending the title..? I know it’s a bit strange for my non-Keralite Indian friends and totally clueless for the western tongue. It is a household name for a simple seafood dish prepared and served with a fancy look .......my grandma’s indigenous alternative to store-bought wooden skewers! ‘Eerkkili’ is the tender rib of the coconut leaves and Chemmeen ‘eerkkili’-yil kuthi varuthathu means skewered prawn fry, from Kerala, cooked with its pungent spices, flavorful coconut oil and aromatic fresh herbs. A specialty from my grandma’s kitchen when she expected some special guests or to entertain her sons-in-law .....the fancy prawn dish my mother used to prepare when she got some jumbo prawns, once in a blue moon!! At our place, this is the only “naadan” (an old-fashioned, country side) dish that gets to share the ground with the much elevated chicken wings and personally, I would go for this Kerala style skewered prawn fry anytime over a plate of Kebobs or chicken wings! Ingredients:For Frying: Ingredients:For Frying:- 5 large prawns/shrimps as in the picture, peeled, deveined and washed thoroughly
- 1 tbsp chilly powder (adjust to your taste and tolerance)
- ¼ tsp turmeric powder
- Around ½ tsp homemade garam masala
- Around ½ tsp freshly ground pepper powder
- 1 ½ tsp freshly squeezed lemon juice
- Salt to taste
- 2 ½ tbsp oil, preferably coconut oil
- 5 wooden skewers, soaked in water for 4 hours or some ‘pacha- eerkkili’
For Sautéing:- 1 small size big onion, thinly sliced
- 4 green chillies finely chopped
- 1 clove of garlic thinly sliced
- 1 small piece of ginger, thinly sliced
- 1 sprig of curry leaves
- 2 tbsp oil, preferably coconut oil
- Leftover marinade applied on prawns
- Salt to taste
Direction:
- Make a marinade with chilly powder, turmeric powder, garam masala, ground pepper powder, salt and lemon juice and apply it on prawns, and insert each of them onto eerkkili/skewer and leave it in room temperature for around 30 minutes. DO NOT throw away the leftover masala; save it as it is needed for sautéing at a later stage.
- Heat oil in a shallow pan and shallow fry the prawns, flipping each side, at medium heat for around 2 minutes, for each side. Keep the fried prawns aside.(Note: Prawns does not require much time to get cooked; also it loses it flavour and taste if it is fried too much and also it turns very dry and firm.)
- Heat oil in another pan and sauté sliced onions till soft; then add green chillies, garlic and ginger and cook until they turn brown which is the stage beyond the golden colour; do not deep fry and let it turn dark brown. When it turns brown, add the leftover marinade, which is kept aside, after applying on the prawns earlier, and mix well with the onion masala and stir for a minute or till the raw smell goes. At this stage, reduce heat to warm-low and add the shallow-fried prawns to this masala and some crushed curry leaves as well. Mix everything well, adjust the salt and pile up all the masala on the prawns and keep the lid and let it cook , in warm-low flame, for a minute or two or and turn off the stove.
- Serve warm as an appetizer or with rice or chappathi (Indian flat bread )or Palappam (Kerala’s laced pancakes)
Note: While peeling the shells, keep the tail intact, as it adds a touch of fancy look to the dish, especially when it is served as an appetizer. Those who want to use eerkkili./coconut leaf rib can use fresh raw ones to give it a “Naadan” touch. The tail end of the eerkkili or skewer can be wrapped with a small piece of aluminum foil, while frying and sautéing the prawns, to keep that part clean, when you serve this as an appetizer at a party. Since I don’t have access to eerkkili here, I used skewers. You may try the same preparation without skewers too.Check out my grandma’s signature dish; "Meen Pollichathu: Fish in Banana leaf wraps – A Central Kerala Delicacy"LuvShn
|
No part of the content ( articles, photographs, recipes) of this blog may be reproduced without my written permission.Copyright © 2007-2010 Kitchenmishmash.blogspot.com. All rights reserved.
|
 At the work-area of my grandma’s kitchen, my mother and aunt sit around a small high-table- chopping board, cutting beans and carrots, some diced and some julienned ….. my grandma gives them a plate with thinnest omelets which they cut into thin strips while the elderly maid of the house, doing the laundry, slips in some gossip story which she gathered on her latest visit to the local market…… and me sitting there cross-legged in one corner, with my ears and eyes wide open, watching the whole activity…..I enjoyed those moments listening to their warm chit-chats……juicy gossips….chop-chops……… leading to a plate of fancy looking dishes like fried rice and noodles ! At the work-area of my grandma’s kitchen, my mother and aunt sit around a small high-table- chopping board, cutting beans and carrots, some diced and some julienned ….. my grandma gives them a plate with thinnest omelets which they cut into thin strips while the elderly maid of the house, doing the laundry, slips in some gossip story which she gathered on her latest visit to the local market…… and me sitting there cross-legged in one corner, with my ears and eyes wide open, watching the whole activity…..I enjoyed those moments listening to their warm chit-chats……juicy gossips….chop-chops……… leading to a plate of fancy looking dishes like fried rice and noodles !
Those days these dishes were some sort of special foods made only when all of them get-together at my grandma’s house . Down the road, somewhere I remember my mother getting all excited at the mere mention of the popular Chinese restaurant in town, Chiyang, and all of us visiting this chic restaurant, with uncles and aunts. In that dimly lit restaurant, I remember my mother ordering her favourite sweet corn chicken soup; somehow the sweet corns did not make a very good first impression with me and I sat there waiting for the rest of the food to be served……that tangy smell of the dishes and exotic look of the fried rice did tickle my taste buds even at that very young age. My mother tried different permutations and combinations to reproduce the same look and taste but still that fancy restaurant won over her daughter. After a while, Bimbis became the talk of the town, especially among the teenagers, with its fancy menu and self-service counters; and on one of my visits there, I saw the sous-chef throwing veggies into a huge pan, followed by that sizzling sound and then holding the pan effortlessly with his right hand and doing tossing technique quite impressively. The fried rice I tasted there had some resemblance to that of the first chic restaurant I mentioned earlier. From there it has been a relentless travel, finding the other pieces of the big puzzle, to dress up fried rice the way I wanted it to be!!

Till now, I have not come close anywhere to” that taste” of my childhood love, but here is what the best I have come up with and surprisingly, now this happens to be “the” recipe my friend R has been looking for and has been asking me to blog for a long-long time now. Fried rice, a popular Chinese dish cooked with leftover rice fried along with some veggies and meat and seasoned with soy sauce has been so popular in India that it has innumerable Indo-Chinese versions to it. It has become so accepted and admired among the Keralites that fried rice has become one main dish served at the time of family gatherings and this is mostly an Indo-Chinese or I am afraid to note, a Kerala-Chinese version!!! I would not be surprised, two-three decades from now, if a school kid claims it to be a staple food of Kerala!!! No offence to anyone here, but the frequency at which we whip up this dish and the adaptability to this one, combined with the fast pace at which the “cereal generation” is growing up, makes me wonder about such a probability.
When I first started cooking this dish, there were a number of times I had to cook the rice twice as the first batch would have got too mushy and sticky, making the final dish look like a sticky rice ball. Some cooking show that caught my attention while flipping channels came up with the best tip ever,” use leftover refrigerated rice when you make fried rice”. That’s when I realized, it is important that rice should be completely cooled and grains should be separated. My mother shared the second best tip, “never miss spring onions, celery and capsicum”. I always stick to these two pointers while preparing it and then adjust the seasonings and sauces, to my taste. Please note that this recipe is developed purely to appease my taste-buds so it may or may not suite your palate :)
 Ingredients: To Fry & Cook the Rice: Ingredients: To Fry & Cook the Rice:
- 1 ½ cup Basmati Rice
- 3 cups water
- 1 tbsp Olive oil or vegetable oil
- Salt to Taste
For the final cooking:
- 1 tbsp ginger & garlic, finely chopped
- 1 cup boneless chicken, cooked and shredded into small pieces
- 1 large egg, to scramble
- 3 tbsp carrot, chopped into small pieces
- 4 tbsp bell peppers/capsicum (green & red), chopped into small pieces
- 2tbsp cabbage, finely chopped (Optional)
- ¼ cup celery, chopped into small piece
- 1 ½ tbsp white bulb of scallions/green onions/spring onion, chopped into small pieces
- ¼ cup green stalks of, scallions/green onions/spring onion, chopped into small pieces
- 2-3 tbsp Olive oil/vegetable oil
- 1 tbsp sesame oil
- ½ - ¾ tbsp soy sauce
- ½- ¾ tbsp green chili sauce
- ½ tbsp rice vinegar
- ½ tbsp ketchup
- ½ tsp black or white pepper, freshly ground
- Salt to taste
Directions:
- Wash and drain the rice on a paper towel. When it is medium dry, heat 1 tbsp oil in a large pan and add rice to this and stir continuously for less than a minute in low heat and transfer it to a microwave safe bowl and pour 3 cups of water and sat to taste; pop it in the microwave and cook for 23-25 minutes or until rice is done. Stove-top Method: Boil water in a heavy bottom cooking vessel, and when it comes to boil, add rice and bring it to a boil again and then reduce the flame and cook covered in low-medium heat, until rice is fully done and water is absorbed.
- Using a fork, gently separate the rice, so as not to get sticky (or even transfer to a large platter) and the rice should be cooled thoroughly before you start the final cooking. (Note: You may use leftover rice for this preparation or refrigerate the freshly cooked rice to make sure that it is completely cool and not to end up with mushy rice.)
- Heat up 1 tbsp oil, in a large wok or any round-bottomed vessel, throw in chopped ginger and garlic, when it is medium hot and stir-fry till it turn transparent. Do not let it burn. Now add the white bulb of the scallions/spring onions , stir; add bell peppers, carrots, celery and stir fry, with a dash of salt and pepper, for 1 -2 minutes in medium heat and when it is soft yet crunchy, add the chopped cabbage and half of the green stalks of scallions/spring onion. Toss everything together as leaves get cooked fast and transfer to a plate or depending on your expertise and largeness of the pan, you may slide everything to the side of the wok.
- Add the rest of the olive/vegetable oil, and break one large egg, directly into the pan; with a quick salt and pepper action, stir the egg continuously to get fine scrambled egg and transfer to a plate or slide to the side of the wok. (Note: Alternatively, you can make an omelet and cut them into fine pieces on a chopping board.) Add the cooked shredded boneless chicken and toss them in oil with a mild seasoning of salt and pepper, transfer to a plate or slide to the side of the wok.
- Heat 1 tbsp sesame oil, add the cooked and cooled rice and stir well, in medium-high heat. When the rice is warm and separated nicely, add the cooked veggies, scrambled egg and shredded chicken and mix well. Now start sprinkling rice vinegar, sauces and ketchup one by one and stir and mix well. Do a taste test and adjust the salt and turn off the stove. Remove the wok from the stove and add the rest of the green stalks of the scallions/spring onion, mix well. The heat from the rice will slowly soften the leaves, leaving a nice aroma to the entire dish. (Note: the strength of the soy sauce and green chily sauce differ depending on the brands, so any addition of these ingredients should be in small drops if you use more than what is suggested in the recipe.)
 Here’s a carry-out box ready for YOU with a fortune cookie :) Have a great week ahead! Here’s a carry-out box ready for YOU with a fortune cookie :) Have a great week ahead!
Shn
|
No part of the content ( articles, photographs, recipes) of this blog may be reproduced without my written permission.Copyright © 2007-2010 Kitchenmishmash.blogspot.com. All rights reserved.
|
  Background of the story: A newly married couple commences their much dreamed about life together in Chennai. Bride’s cooking experience starts with two cups of tea and ends with an omelet. With some simple recipes scribbled in a 100 page notebook and lots of beginner‘s luck in the kitchen, she succeeds in whipping up some everyday recipes. Everything is rosy and pink.***
Location: A small town in KeralaScene: The young couple comes down to Kerala, after celebrating one month anniversary of a beautiful marriage, to visit girl’s parents and during their short stay there, they get an invite for dinner and stay-over at girl’s aunt’s place. Since our girl being the eldest in her maternal family, her aunt prepares a grand feast to receive the bridegroom, starting from drinks and pre-appetizers and a full course menu for the dinner. ….everyone in a happy mood, lots of laughter and teasing going around…….and when everybody is relaxing after a heavy dinner, our aunt enters the scene with a tray of pudding, tempting everyone with its eye candy look…..everyone starts relishing this sweet delicacy and suddenly our hero, bridegroom drops the bomb and asks the girl, “hey…I loved this dessert….absolutely tasty….why don’t you ask your aunt for the recipe?”” Girl, though shell-shocked at this unexpected move from her husband, tries to hide her nervousness and nods her head in agreement and goes to bed with a wishful thinking that husband might forget the whole thing and she can return to her routine cooking after reaching Chennai. The next day morning, while bidding farewell to the relatives, boy asks the girl again, “So, did you get the recipe?” and the girl halfheartedly says, “aunty will mail me by post….” !!Location: ChennaiScene: Newly married couple returns to Chennai and after a week or two, our girl receives a letter from her aunt, with neatly written guidelines for the pudding and seeing her husband’s excitements, she decides to give it a try. So, one day after getting back home from work, she rolls ups the sleeves and knots the apron and starts the work.STD call after 10 minutes :Girl: Aunty, this thing is not thickening, how long should I stir this?Aunt: hmm….only for 4-5 mts after adding the condensed milk.Telecon ends…. Second STD call after 10 mts:Girl: …..sugar has melted now…it is golden colour now, shall I add the nuts?Aunty:….burn the sugar till it is golden brown and then you add the nuts.Telecon ends….. Third STD call after 10 mts:Girl: Caramelized nuts are stuck …I am not able to scrape it offAunt: Where did you pour it?Girs : On a newspaperAunt: : Eh!!!!! You should have used butter paper…anyway try to scrape off after breaking them into small chunksTelecon Ends….. Fourth STD call after 30 mts and uncle picks up the phone:Uncle: Aahhh…….Heard you re making the pudding..so is it done?Girl: mm…I guess this is my first and last time with that pudding….aunty is there?Aunt: Is it ready now?Girl: I am not able to spread the jam …jam is quite thickAunt: oh…slightly smash the jam with the back of a spoon and then spread….Girl: Why didn’t you tell me earlier that it takes lots of time…? I am done with this and if it doesn’t turn out well, I am throwing it out!!Aunt: It is such a simple and easy recipe…..I don’t understand why you re having so much trouble!Girl, quite bugged and impatient at this stage, keeps the phone down, finishes the topping and throws the whole tray into the fridge and wraps up the kitchen. When husband returns from work, they have their dinner together, exchanging the day’s happenings and after some time, girl serves ‘the pudding”. Husband takes the first scoop …..tension builds up…..he smiles and takes another spoonful and tells,” WOW! I am glad you tried this…..now we will make this often…wont you?”. The moment that made the whole thing worth and gratifying at the same time!! :)**THE END**
And I should say, aunt was right then, this is an easy and simple dessert that you can whip up in less than 20-30 minutes, especially if a beginner has clear instructions and I realized that after all these years and it is surprising that this China-grass/Agar-Agar pudding is still one of the toppers in CJJ’s favourite list. China Grass, also known as Agar-Agar is a seaweed derivative and a ‘vegetable gelatin’. Because of its gelatinous nature, it is used as a quick setting base for many desserts and it is flavorless in nature and will get set in room temperature as well. The base pudding in this recipe is quite versatile with any other flavorings as well as topping too. Using canned pineapple chunks or any other fruits in sugar syrup is also a great idea to whip up this easy yet tasty pudding in less than 20 minutes. China Grass is available in Asian stores in US.The right consistency for this pudding is when the base pudding holds together, something like the Jello and at the same time, it is not too thick or hard. Ingredients:For the base: Ingredients:For the base:- ½ litre milk (around 2 1/8 cups)
- 1 can (14oz) sweetened condensed milk
- 5 tbsp sugar
- 2 tsp china grass powder or (Approx.)10gms china grass strands*
For the topping:- 3 tbsp jam of your choice
- 3 tbsp sugar
- 2 tbsp cashew nuts or almonds
Directions:- Prepare the base of the pudding by boiling milk in a saucepan and when it comes to boil, reduce the heat and add sugar and china grass powder; keep stirring continuously, until everything is dissolved well. Now, add sweetened condensed milk, in low flame and stir continuously for 3-4 minutes and switch off the stove. Using a strainer, pour this mixture to an 8 inch pan and let it set in the room temperature, till it is cold and then chill in the refrigerator for 1-2 hours. (Note: If you are using china grass strands soak them in hot water or prepare it as per the package instructions)
- Prepare the praline topping by heating and melting sugar until they turn medium brown. Keep swirling the pan but do not stir. When sugar is completely melted and bubbles start coming up, turn off the stove and add the dry toasted nuts to it, and pour them onto to a non-stick aluminum foil or a lightly oil coated aluminum foil sheet, placed on a cookie sheet and let it set. When completely dry, crush the caramel coated nut sheet using a rolling pin and then powder them in a food processor or in the smallest jar of a mixer/blender. (Note: Hot caramel can create serious burns, so make sure that you play safe and kids are not around while preparing it. While pouring the caramel coated nuts, make sure that a thick layer is not created.)
- Once the base is set, take it out of the refrigerator and spread thoroughly mashed jam on top of the base and sprinkle powdered praline and chill it for another 30-40 minutes. Slice and serve.
This goes to Pooja’s Valentines Day Special Event and Zorra's "Heart for your Valentine"
Check out other Valentinyyy treats from this blog by clicking on the image to view the recipe.
        
UPDATED on 13th Feb* : There was a typo in the measurement of China grass when I first posted the recipe, I have corrected it now. Sorry for the mistake! I have noticed that there is lots of variation in the measurement of china grass we get back home in India and here in US. The measurements I have given above is as per the products we get here in US. Just like the quality of dry yeast differs in India and US, the quality and strength of china grass also differ. So the safest method is to first try diluting it in warm water and see if you re getting the right pudding consistency and then make variations while working with milk.
Luv
Shn
|
No part of the content ( articles, photographs, recipes) of this blog may be reproduced without my written permission.Copyright © 2007-2010 Kitchenmishmash.blogspot.com. All rights reserved.
|
  With Super Bowl just few hours away, if anyone is still wondering what to make to snack on, and if you trust me, here’s something you can prepare in less than 10 minutes ……leave it in the oven for an hour and you will be ready with these crunchies by the time you are all set to watch the game…..TRY this snack only on one condition that you won’t come back and accuse me of getting you addicted to these sweet coated Pecans :D Click here for the recipe.

Enjoy the game !
Three cheers to Brady :P
Shn
|
No part of the content ( articles, photographs, recipes) of this blog may be reproduced without my written permission.Copyright © 2007-2010 Kitchenmishmash.blogspot.com. All rights reserved.
|
|
|
|
|