|
|
  "I can resist everything but temptation" Oscar Wilde. And I say, I can resist everything but 'food temptation' !! An overwhelming desire to eat a plate of tantalizing dish Vs a strong determination to complete one month lent. Howzzat ??
Hmmm...now I see many of you nodding your heads :) Yes, it is hard and I was caught on one such battle last October when CJJ came home, on the 16th day of my lent, with a packet of golden brown, crispy, not greasy, neatly wrapped beautiful egg rolls, gifted by his Vietnamese colleague!! I cursed the moment I turned down CJJ’s offer to join me in my lent! I thought the best way to escape temptation was to yield to it but suddenly my conscience began to prick me; How can I yield to a silly food temptation over my determination to continue lent, to thank God for one of His blessings?? I tried hard, resisted and resisted …… finally I DID it. I took my share of the food and locked it in freezer for the next 14 days!!!! And, I relished those little beauties the day I broke my lent successfully after a month :)
These are delicious finger foods loaded with ground meat, vegetables and basic seasonings. Though a bit time consuming, one can always prepare them in advance and cook them just before your party begins. Our friend was kind enough to share the recipe with me and I tried it today and it came out quite well. Here’s the recipe :-
Ingredients for Egg Rolls:-
- 2 cups cooked and ground chicken
- 2 cups cooked and ground shrimp (optional)
- 2 cups finely chopped cabbage
- 1 cup finely chopped carrot
- 1 cup finely chopped yellow onion
- 1 oz bean threads
- 2 eggs
- One packet Egg roll skins or Spring roll pastry
- 1 tsp Sugar
- 1 tsp Pepper
- Salt to taste
- 1 cup oil for deep frying
Directions:-
- Pressure cook boneless chicken with some salt, ½ tsp pepper powder and 2 green chilies; once chicken is cooked and cooled, ground the meat in a mixer or food processor.
- Steam and cook the cabbage and carrot separately, adding a tinge of salt, until they re soft; drain them well and dry them on a paper napkin or a piece of cloth.
- Break the bean threads into small pieces and cook them as per the package instructions.
- Mix well the ground meat and shrimp, if any, finely chopped raw onions, cooked and dried cabbage and carrots, cooked bean threads and add sugar, pepper and salt and do a taste test. (One might require more sugar and pepper according to personal tastes). To this mixture, add a lightly beaten egg and combine well.
- To wrap, lay the square egg roll skins/spring roll pastry sheets in a diamond shape; place approximately 2 tsp of filling in the middle of the wrapper. Take the bottom point of your wrap and fold it over top of the filling. Fold the sides in towards the middle and tightly roll the filling towards the top point of the wrapper. Brush some beaten egg onto the top point as "glue" and seal it completely.
- Heat oil in a medium flame and slide egg rolls one at a time; deep fry in oil until they are golden brown and crispy, do not overcook the egg rolls; place the fried ones on a paper napkin to absorb the oil and serve them hot with Sweet & Sour dipping sauce. You get around 15-20 rolls.
For a step-by-step pictorial representation of folding the wrappers, click here.Ingredients for Sweet & Sour Dipping Sauce:-
Recipe Source: Rhonda Parkinson, http://chinesefood.about.com - 1/3 cup white or rice vinegar
- 4 tbsp brown sugar
- 1 tbsp ketchup
- 1 tsp soy sauce
- 2 teaspoons cornstarch/all-purpose flour/maida mixed with 4 teaspoons water
Directions:-
Mix the vinegar, brown sugar, ketchup, and soy sauce together and bring to a boil in a small pot. Mix together the cornstarch/all-purpose flour/maida and water, add to the other ingredients and stir to thicken. When the sauce is thick, strain it to the dipping bowl to get rid of the clots and lumps.
Note:-
The egg rolls should be tightly folded to avoid the risk of a leaky filling while frying them. Also the cooked cabbage and carrot should not have any water content to prevent soggy egg rolls. Never stack the egg rolls on top of each other, before or after deep-frying. For freezing egg rolls before frying, wrap them in aluminum foil and seal in a plastic bag in the freezer - this will keep them moist. You may freeze the deep fried egg rolls too.
Luv
Shn
|
No part of the content ( articles, photographs, recipes) of this blog may be reproduced without my written permission.Copyright © 2007-2010 Kitchenmishmash.blogspot.com. All rights reserved.
|
 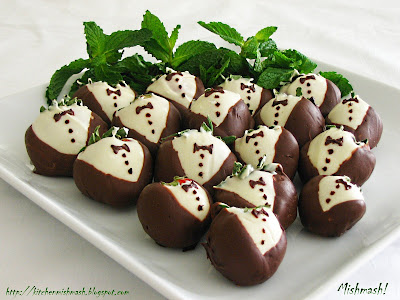 
Valentine’s Day is at the doorstep and my memory is flooded with all those pleasant recollections as well as some embarrassing moments associated with it; well, lets not get into the details of the latter ;-) The one that hovering on top is the V-Day I celebrated with some of my very close friends in college. It was the first semester of our masters program and the V-Day fever was high as usual. Some of us, I should say, a bunch of singles, were left alone with no exciting plans and hence, decided to have a girls’ day out. If my memory is not clouded, I think we decided to pair it with two of our friends’ b’day celebrations as well. We all got-together and had a bash; we went to the pizzeria in town for lunch, had softies for dessert, took a long walk in the breezy marine drive, peeped into Archies Gallery to have a look at those mushy-mushy cards and soft teddies which did evoke some sort of hope that “hmm…one day….someone….” but at the same time, we were all green–eyed monsters too :) The snapshots from that day bring back lots of smiles whenever I flip through the pages of my college album!! Happy to note that we were a lucky bunch as all of us are now happily married and settled with our Valentines :)
This was my first attempt at dressing up the strawberries in tuxedos and gowns and regardless of the imperfection it has, I would like to dedicate this post to all my friends, fellow bloggers for all their words of appreciation and encouragement and DT, LJ, MC, NG, TM and US in particular for those wonderful days we shared !! Here comes a Groom Berry and Bride Berry from miles away to knock on your doors and wish you all a Happy Valentine’s Day !! :)
For dressing up Groom Berries & Bride Berries You Need: -
- 1 ½ cups (Approx.) dark chocolate pieces/morsels
- 2 cups (Approx.)white chocolate pieces/morsels
- 1 dozen strawberries
- Wax Paper
- Toothpicks or skewers.
Melting Chocolate and Dipping strawberries Wash and pat dry the strawberries with its green cap intact. Melt white chocolate, in small quantities, in microwave (or by the double boiler method) for 30 seconds. Take the bowl out and stir and again melt them for 15 to 30 seconds intervals, until the chocolate is completely melted. Stir well to make it creamy. Insert a toothpick or skewer on the center of the strawberry and dip them each in chocolate upto its stems .At this stage, giving the berries a little shake will help you get an even surface and leave them on the wax paper for 20-30min in room temperature until chocolate is dry and hardened. The toothpick/skewer will help you hold the strawberries correctly without breaking the stems or squeezing the fruit while trying to lift them from the melted chocolate.
Once the white-chocolate-dipped-strawberries are completely hardened, start melting the dark chocolate morsels in the same way mentioned earlier. And dip white-chocolate-dipped-strawberries into the dark creamy chocolate from both the sides, in such a way that it forms a V shape jacket in the center. Place them again on the wax paper leaving it to cool. Meanwhile using a toothpick or skewer, draw small buttons and a bow-tie.
Bride Berries
To make your cute Bride Berries, dip strawberries only in the white chocolate from both the sides to form a U or V shaped gown necks and decorate with a toothpick/skewer to make a simple chain or a pearl chain with dots. When it is completely hardened, remove the toothpicks/skewers and serve them cold.
Tips for Berry Stylists!
Please make sure that there is not even a drop of water in the bowl while melting chocolate as water content can cause chocolate “seize” and make it a grainy mess. Also if the chocolate gets hardened while melting, adding a bit of shortening or vegetable oil (NO WATER, pls!) will help it to soften. The chocolate dipped strawberries are best if eaten within 24 hours - refrigerate for longer storage, but serve at room temperature for greatest flavor. For a step by step pictorial representation of dressing up strawberries, Click hereSo what do you think, aren’t they all dressed up to go for the Berry Bash at Maheswari’s AFAM & Pooja’s Valentine’s Day party ? :) HAPPY VALENTINE’S DAY :) Luv Shn
|
No part of the content ( articles, photographs, recipes) of this blog may be reproduced without my written permission.Copyright © 2007-2010 Kitchenmishmash.blogspot.com. All rights reserved.
|
 It’s that time of the year again when we all search for those pretty cards, candied hearts, chocolate dipped strawberries, cute teddy bears and radiant red roses to celebrate love and friendship with our dear ones. Yes, Valentine’s Day is just two weeks away and I see lots of pink, red and white wherever I turn. This year, why don’t we Say It with Shortbread Hearts? Shortbreads, a Scottish favorite are “the ultimate expression of the four building blocks of baking: butter, sugar, flour and salt.” But modern cooks have come up with lots of variations by adding nuts, chocolates or any other dried fruits as well as cutting them differently. If it is yet to strike you, this is an EGGLESS recipe!! I found this recipe on Martha Stewart’s LIVING beautifully cut using heart shaped cookie cutters. So dear friends, let’s hit the baking corner and serve our Valentine’s with some extra love :) Ingredients: - 1 cup (2 sticks) unsalted butter, at room temperature
- 3/4 cup sifted confectioners' sugar
- 2 cups sifted all-purpose flour/maida
- 1 tsp pure vanilla extract
- 1/2 tsp salt
- 1/2 cup finely chopped dried cranberries or cherries
Directions:
- Preheat oven to 325° with the rack in center. With a hand mixer, combine butter, confectioners’ sugar, vanilla, flour, and salt,(all at the same time) in a bowl, until it’s just incorporated; not too creamy. Stir in dried cranberries/cherries or fruit of your choice.
- Grease an 8 or 9 inch-square baking pan with butter and flour and pat dough firmly into the pan and bake until just beginning to turn golden. Though the original recipe calls for only 20 min, it took 50 min for me. Cool on a wire rack and unmold the Shortbread and transfer to a work surface. Do not cut if it's still warm and wait till it’s completely cool. Use a heart cookie cutter to cut out cookies and keep them at room temperature in an airtight container.
Tricks I learnt!This was the first time I tried a Shortbread recipe and hence I did some reading before hitting the baking corner. Here are some tips: After transferring the dough into the baking pan, cover it with a plastic wrap, so it doesn’t stick to hands while pressing into a uniform thickness and before sliding the dough into the oven, prick all over with a wooden skewer. Experts do not suggest the use of forks, as its tines will pull at the dough. The holes keep the surface level and promote even baking. It’s also suggested not to substitute confectioner’s sugar with granulated sugar, to avoid grainy cookies. Please note that the original recipe calls for only 20 min baking time but it took 50 min for me. So it's better to keep in mind the variations of the oven settings. Bake until golden colour and firm in center.
You can either use cookie cutters or simply cut them into rounds or squares when it’s completely cool. I noticed that the flavour improves after a few days.
I think it's time for me to go for Monthly Mingle at Meeta's. :)* This recipe is taken from Martha Stewart’s Living and for more information and recipes on Shortbreads, refer Martha Stewart LIVING, February 2007,Pg: 82.
Luv
Shn
|
No part of the content ( articles, photographs, recipes) of this blog may be reproduced without my written permission.Copyright © 2007-2010 Kitchenmishmash.blogspot.com. All rights reserved.
|
  Everyday around 11.00-11.30am my phone rings and without the help of a Caller ID, I know for certain that it’s from CJJ, calling in to see,"What’s for lunch, today?" and if the menu includes Fish curry, I hear him chuckling coz that’s his favourite dish :) Fish curry with 'Kudam-puli' (Gamboge is the English word for Kudam-puli, I guess) is a staple in our home and I'm sure it’s same with many households in Kerala. I remember those days, when we were kids, my mother waiting for the fish vendor, who comes on a bi-cycle everyday, and the series of bargaining that follows; it’s to be noted here that the same guy comes riding a Hero Honda these days!!! Ever since I started preparing this dish, I have been trying to reproduce my mother’s recipe, but honestly, I've never been able to reach anywhere near her version! Wonder what’s her secret ingredient, is it mama’s love?? Guess all of us know the answer!
Ingredients: - 6-7 slices of cleaned fish
- 6-8 small onions
- 4 green chilies
- 2 small garlic cloves
- 1 small piece of ginger
- 1 sprig curry leaves
- 2-3 pieces of kudam-puli (Gamboge)
- 2 tsp red chilly powder
- ¼ tsp turmeric powder
- 2 cups thin coconut milk
- ¼ cup thick coconut milk
- 2 –3 tbsp coconut oil
- Salt to taste
Directions:
1. Heat oil and sauté finely sliced small onions, ginger, garlic, green chilies and some curry leaves and when it is transparent, add turmeric powder and red chilly powder and combine well. At this stage add 2 cups thin coconut milk (or sufficient enough to cover all the slices of fish) and pieces of kudam-puli and salt and let it boil. When it is boiling, check the level of sourness and adjust the same by adding/removing one or two pieces of kudam-puli.
2. Place fish pieces to this and cover with a lid and allow it to cook in medium heat; swirl the cooking vessel once in a while; avoid stirring as you may end up breaking the fish pieces.
3. When it is almost done, add the thick coconut milk and adjust the salt and let it cook in a low flame, without the lid, for 5-10 minutes until a thin coating of oil appears on top; Just 2 minutes before turning off the stove add some curry leaves. Serve with rice or tapioca and hey, don’t forget to add that secret ingredient :)
Note:
Fish curry is generally prepared in a 'curry chatti', an earthenware in Kerala and it tastes better compared to the ones prepared in a non-stick pan. The oil coating that appears on the dish at the final stage mainly depends on a fatty fish and the coconut milk extracted from freshly grated coconut. Please do not substitute small onions with big onion as it definitely alters the taste and a generous use of curry leaves is suggested as the dish gains a fresh irresistible aroma when it is added just before switching off the stove. Also the taste will not be the same if kudam-puli is replaced with the tamarind used in Sambar and Rasam.

UPDATE: Kudam puli or Gamboge, is actually a fresh orange-yellowish fruit in its initial stage, which is dried in sun and transformed into black, and later used to add sourness to dishes, in South India and in some part of Sri Lanka too, I guess. The sourness it brings to the fish curry compared to the ordinary tamarind is lot different and unique too. You can find it in most of the Indian stores if you are staying outside India. If the store bought ones are too dry, soak them in water before you start preparing the dish and when it is moist, add it to the dish along with the water. If using the ones prepared at home (like the ones in the pics) then one is enough to get the sourness. Hope this helps!
Luv
Shn
|
No part of the content ( articles, photographs, recipes) of this blog may be reproduced without my written permission.Copyright © 2007-2010 Kitchenmishmash.blogspot.com. All rights reserved.
|
 The name sounded a bit weird when this recipe was passed on to me, by a ‘true friend’ of mine, a couple of years back and I had to google it to find what it really means :) But the devil in this crowd pleaser recipe is the taste itself that tempts you to go for one more piece! This is one Easy, Simple and a Great appetizer that can really tickle the curiosity of your guests :) And hey, for all those Mom’s out there, this is a great evening snack for kids!!
Ingredients:
· 5 Hard boiled Eggs
· ½ cup finely chopped big onion
· 1 ½ tsp pepper powder
· 2 tbsp Coriander leaves/Cilantro
· 3tbsp All purpose Flour/Maida
· 1 cup Breadcrumbs
· Oil for frying
· Salt to taste
Directions :
1. Slice the hardboiled eggs in half lengthwise and remove the yolks to a bowl.
2. Heat 1 tbsp oil and sauté finely chopped onions until translucent. Add pepper, salt and finely chopped coriander leaves/Cilantro. To this, add the yolks and mash till the mixture is well combined.
3. Once the mixture is warm enough, fill them in each of the egg whites carefully.
4. Mix the all-purpose flour/maida with some water and make a smooth paste; dip each egg halves in this and roll in breadcrumbs and shallow fry in oil.
Luv
Shn
|
No part of the content ( articles, photographs, recipes) of this blog may be reproduced without my written permission.Copyright © 2007-2010 Kitchenmishmash.blogspot.com. All rights reserved.
|
 "Wine is bottled poetry."Robert Louis Stevenson Yes it is !! I had been on wine country and wine tasting tours a couple of times last year. Now I have become a huge fan of dessert wines/Sweet wines. But a nostalgia engulfs me whenever I stroll through the wine section of supermarkets; the flavour of that sweet wine I tasted years back, at a Kerala-christian wedding, rushes back followed by a strange craving for the sweet wine my mother makes….Finally, I decided to take a risk. It was X’mas time and I tried my mother’s recipe for Beetroot wine; it turned out to be a great hit ! The beauty is that none can guess its beetroot as it’s quite fruity in aroma and flavour. Many of our friends raved a lot about it and you believe it or not, I did get some calls asking for more wine!!!! So here’s your chance to fetch some compliments; the recipe follows:
Ingredients: (Approx.)Beetroot : 1 kgSugar : 1 kg (50 oz)Yeast : 1 tspLemon : 2 small onesWater : 3.5 litresCinnamon : 3-5 small sticksClove : 7nosWarm water : ½ cupDirections :1. Wash the beetroots and peel off the skin and finely grate them.
2. Dissolve yeast in lukewarm water with ½ tsp sugar and let it rise.
3. Boil 3.5 litres of water in a clean saucepan.
4. Add the grated beetroot to the boiling water and leave it till it cooks.
5. When the beetroot is cooked, turn off the stove and once it is lukewarm, strain the mixture preferably to a Bharani or any earthenware container or a glass jar and leave the grated portion. Use a cheesecloth or muslin cloth for straining the liquid.
6. Once you are done with straining, add the sugar and dilute well with a wooden spatula; then add the squeezed lime juice and the dissolved yeast. At this stage, add the cinnamon sticks and cloves as well.
7. The container should be airtight and store it, in a dark space, for fermentation for 15 days. On the 4th or 5th day, open the container and stir it with a wooden spatula and let it rest till the 15th day.
8. After the fermentation process, strain it once more to make sure that there are no residues and bottle the wine and rack them at room temperature in a cupboard.
9. Serve with a fruit cake and a smile :)
Tips:The colour of the wine will be exactly that of the beetroot used; So make sure that good quality beetroots are used. Also, for the yeast to convert sugar into alcohol, it is mandatory to keep the oxygen out and hence make sure that container is airtight. The alcoholic and the mild fizzy effect also depend on the quality of the yeast used. Please ensure that the fermentation jars and bottled wines are not filled fully; leave some room. Once they are bottled, it can be used any time; it’s better not to age this particular wine as the colour may be compromised and taste also changes. The sweetness of the wine is as per our family choice; you are free to increase or decrease the quantity of sugar but I suggest doing that only after your first trial as you get an idea how much to change and can make adjustments accordingly next time. Related Posts:   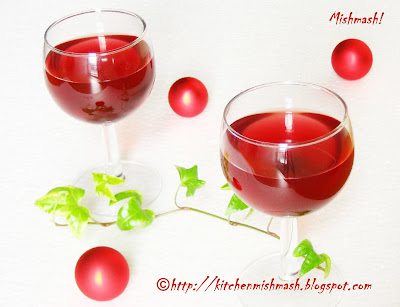
|
No part of the content ( articles, photographs, recipes) of this blog may be reproduced without my written permission.Copyright © 2007-2010 Kitchenmishmash.blogspot.com. All rights reserved.
|
Where do I start..hmm..Till two weeks back, I never thought about having my own blog spot until my husband seeded this brilliant idea of creating a space, where I can share the reflections from my kitchen. I still remember that bright summer day in my teens, when my parents literally dragged me into the kitchen to teach me to prepare two cups of tea and my image of lighting the stove from a distance as though it’s going to explode !!! Another recollection is the mail I received, just a week after our engagement, from my fiancée, my best friend CJJ, with a link from Pachakam.com. Poor guy, he had his own doubts about having some good home made food after marriage, knowing very well that the love of his life had not made any great improvement from the ‘two cups of tea and an omelet’ phase! And Ohhh..there pops up another image in my head where my MIL went speechless when I asked her whether one glass of green grams (as big as our water tumbler in Kerala) is enough for a side dish, for two persons for a meal !!!!!
And with all these above mentioned extensive knowledge and experience of mine, I started my cooking adventures with the notes I prepared, just two days before marriage, with the help of my aunt and Mummy and ofcourse, with the recipes from the great pachakam.com. Then followed innumerable STD/ISD calls to Mummy whenever I was in kitchen, sometimes struggling to differentiate coriander powder and cumin powder...and I can not remember the number of times I tuned to Food TV and other cookery shows. Fortunately, I had the beginner’s luck or I wonder if it was CJJ who was lucky !! But now when I look back I have gone too far from that teenage girl to this confident and responsible young (??) homemaker, diagnosed with the early symptoms of OCD, who can sure host a decent dinner!! And there when I am floating in the clouds, with all the confidence boosting compliments from our friends after relishing the food, here comes my CJJ with his funniest story of my first chicken curry and that chicken who got embarrassed in my kitchen seeing its final shape and am sure, that story is definitely a topping over the dessert for all our friends.
I don’t know how far I will be able to sustain this new found interest in blogging but as long as I have a bulldozer behind me, yes my CJJ, I will be sharing some of my experiments from the kitchen...and I start my first one here, raising a toast to my parents, my CJJ and to all of you, my friends !!
Luv
Shn
|
No part of the content ( articles, photographs, recipes) of this blog may be reproduced without my written permission.Copyright © 2007-2010 Kitchenmishmash.blogspot.com. All rights reserved.
|
|
|
|
|


 All text and Photographs are copyright protected.
Copyright © 2007-2010
Kitchenmishmash.blogspot.com. All rights reserved.