|
|
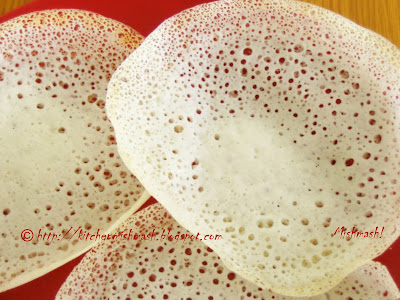
  Typically, a steamed round rice cake leavened with yeast, sweetened with sugar and flavored with the wonderful aroma and taste of cardamom, dotted with golden brown cashew nuts and plumped up raisins, that satiated my hunger innumerable times as a “Naalumani palahaaram” for those after-school tea time sessions, because of the ease with which my mother could whip it up by just steaming the batter leftover from the Paalappam made for breakfast, by adding some sugar and flavoring and ghee roasted nuts and raisins to dress it up a bit……..
…and in my teens, the same round steamed rice cake started appearing on the glass shelves of bakeries, wrapped stylishly in clear plastic……and very soon , someone tried to give a fashion makeover to those humble round steamed cakes by steaming in idli moulds and thus giving it a cute little flying saucer shape…..
…and whether it is homemade or bakery bought, for many like me it is part of teatime memories and for some out there, it is synonymous with Christmas and for some , it is that sweet snack that completes a wholesome royal breakfast, especially when guests are invited. Spongy and airy by texture, I find this one the queen of steamed delicacies from Kerala, for the ease of preparation and taste.
Ingredients: To Grind: - 1 cup raw-rice/Pachari or Idli-Ponni rice, soaked for 6-8 hours
- ¾ cup freshly grated coconut
- 2 tbsp cooked rice
- ½ cup water or enough to grind the above ingredients to make a batter ( as thick as idli batter)
To Proof yeast: - ½ tsp active dry yeast ( I use Fleischmann’s active dry yeast)
- 1/3 cup water
- 2tsp sugar
To Make Thari Kurukku/Rice porridge: (Use only 4tbsp of this paste/porridge) - 1 ½ to 2 tbsp coarse ground paste
- Around 1/3 to ½ cup water
To sweeten and flavor: - ½ cup sugar ( to taste)
- 10-12 cardamom/elakkaya crushed/powdered ( Add as per taste and pungency of the spice)
- ½ tbsp cashew nuts
- ½ tbsp raisins
- 1 ½ tbsp ghee
Directions: - Grind rice in an Indian mixer/blender, adding water, just enough to operate the mixer. When ground rice reaches a coarse texture, remove the required quantity mentioned under, “To Make Thari Kurukku/Rice porridge” and keep aside. Now add freshly grated coconut to the main batch of ground rice and grind thoroughly to a fine batter. Towards the end, add cooked rice and grind again. Leave the blender bowl on the kitchen counter until it is cold and comes to room temperature.
- Meanwhile, proof yeast by warming water in a microwave for 15 seconds. Add sugar and yeast; dissolve both the ingredients in this warm water and keep the mixture in a warm place for 15-20 minutes, or until it inflates and foams, creating a ‘dome of foam’, on top of the mixture. I usually keep the bowl inside the microwave itself, undisturbed until it foams.
- Also make Thari Kurukku/Rice porridge by heating a pan and adding the couple of spoonfuls of coarse ground rice, kept aside earlier and water; bring it to a boil and keep stirring in low-medium heat until it is fully cooked and reaches the consistency of a thick paste /porridge and turn off the stove and keep aside till it is completely cool.
- When Thari Kurukku/Rice porridge (and batter) is cool, add about 4 tbsp of the same to the main batch of ground rice batter and spin for one more time to blend it thoroughly with the batter. Next, add yeast mixture and pulse one or two times just to blend everything well.
- Pour the entire batter to a steel/glass bowl and let it ferment in a warm place for about 4-6 hours or overnight, depending on the weather zone you are in. Pick a stainless steel or glass bowl big enough to hold double the quantity of batter as during the fermentation process, the batter rises well and it should not over flow from the bowl.
- When batter is doubled and fermented, add sugar and stir gently and mix and again let it ferment for another 1 ½ to 2 hours.
- In the meantime, heat ghee in a small pan and roast cashew nuts till golden brown and raisins till they plump up fully.
- Just before steaming, add crushed/powdered cardamom, ghee roasted nuts and raisins to the batter.
- For steaming, heat some water in a pressure cooker; grease a 6 inch round pan/or cake tin with some ghee or oil. Pour the prepared batter and fill till half of the pan/cake tin; when it starts to steam, place that flat plate with holes, which comes with the cooker and on top of it, gently drop the batter filled pan/cake tin and close the cooker tightly with lid and its rubber in place (do not keep the weight/whistle) and let it steam cook for about 20 -30 minutes in medium heat. Cooking time varies depending on the stove, utensil and consistency of the batter. After about 20 minutes, remove the cooker from the heat and carefully open the lid and insert a knife or tail of the spoon and if it comes out clean or with very less crumbs, then that shows it is done or almost done, in which case, keep it covered for some more time and let it cook in that locked in steam for some more time or if you think it needs some more steaming, close the lid tightly and bring it back to the stove and heat and steam cook for some more time, till it is fully done and cooked well.
- Lift the pan/cake tin from the cooker and leave it on the kitchen counter till it is completely cool and comes to the room temperature. Now run a knife by the side of the pan and gently separate the steamed cake/vatteppam/Vattayappam from the edges of the pan. Now, slowly try to lift off the cake with a spatula or anything that has a flat surface and it will come off easily; plate it and cut into squares of wedges and serve with tea/coffee.
Notes: - If you would like to see some of those ghee roasted raisins and cashew nuts on top of Vatteppam/vattayappam as garnish, try to open the pressure cooker, at about 10 -15 minutes into steaming ; at this stage the batter has just risen to the top and you can drop some of those ghee roasted nuts and raisins on top, to get a beautifully decorated Vatteppam/vattayappam.
- You can make Vatteppam/vattayappam, using a mix of rice flour and coconut milk as well but whether it is ground rice or ready-made rice flour that you use , the texture of Vatteppam/vattayappam, is very much dependent on the quality of the rice you use; it is ideal to use rice that is less starchy to see those tiny holes and crevices on the sliced pieces.
- You may adjust the quantity of sugar to make it sweeter or adjust to your taste.
- Fermentation time varies depending on the weather zone you are in. The weather zone I am in compels me to heat the oven at 350F for 10 minutes and then switch it off; wait for 30-40 minutes or till it is warm enough to hold my hands inside the oven without any discomfort. At this temperature, keep your batter covered for the prescribed time. By the end of this process, the batter will rise-almost double and you will notice thick foam like ballooning on top and a sharp fermented smell.
Luv Shn
|
No part of the content ( articles, photographs, recipes) of this blog may be reproduced without my written permission.Copyright © 2007-2010 Kitchenmishmash.blogspot.com. All rights reserved.
|

A glance into a mesmerizing temple festival basking in the old world charm of rituals and practices and a simple traditional food that gains a personality of its own because of all the tales and rituals associated with it……
I had one such gem in my mail box early this week from Revathy, who shared with us the recipe for Kannur Style Kalathappam/Kalthappam. Here’s excerpts from a couple of mails she sent me on this topic, clearing my doubts and questions…… ………………………………..
Hi Shn,
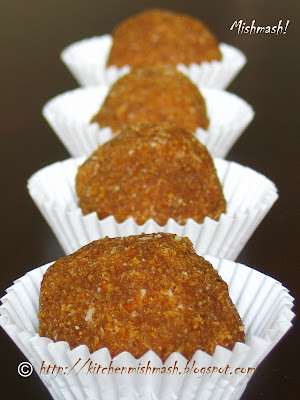
Your interest to recreate the good old recipes excites me and another traditional snack came to my mind, which is made part of "Pooram festival "We call it as Ada. Did u know about this? It is somewhat like the Ela ada you have posted but the ingredients to make the ada is different. Rice powder is mixed with melted jaggery and cooked spilt dal, wrapped in jackfruit leaf or Cinnamon leaf or banana leaf and steam cooked .It lasts for a week in cool climate.
Pooram is celebrated a few weeks before Vishu and it is to please the God Kama, God of Love. We make idols of Kama using cow dung or mud and decorate it with seasonal flowers everyday . First, the idol will be kept outside steps of the well. Old homes have wells that has a few steps outside right…. and if no steps, then just outside of the well/Kinar ("Kinnattin Karayil"). Then each day new idols will be made and kept at the courtyard in front of home ….. it is just like we make pookkalam ..only thing is we don’t throw the old ones and places keep changing everyday....and last day we take all of them to the jack fruit tree and keep it under that . It is done with a small procession of every one in the family and neighbors. Last day when take it to the jackfruit tree everybody loudly say something like this.. "neerathum Kaalathum Adutha Kollavum Varanee Kamaa "
Duration of this celebration is 8 days ..That’s till Pooram Nakshtram. And the 8th day we make this Ada.
Now the Recipe
It is a time consuming recipe..
White Rice Flour - 2 cups (Like the one we make for Puttu and roast it very well) Jaggery Melted - As per Sweetness (It shouldn’t be too loose ,So add very little water) Cooked kadala -parippu /Split gram/ Chana Dal - 3/4 cup Cardamom -3-4 Coconut slices -1/2 cup Jack fruit /Cinnamon /Banana leaves -
When the Rice Flour and Jaggery are cool mix both with hands it should be thick like we make dough for Ela Ada, then add Cooked kadala -parippu /Split gram and coconut slices and cardamom powder and mix well with hand. Make small ball ,then place it on top of a Cinnamon or Jackfruit leaf/Banana leaf. Flatten it same like Ela Ada and fold it. There no filling so just fold. Then Steam it .You should steam it around 45 mints in high steam and then keep it in med for 15 mints. And check it is done or steam some more time.
Hope this will be helpful to you.
TC Revs …………………………….
Till I read her first mail on this topic, the word “Pooram” , to me , was synonymous with the famous Thrissur Pooram of Kerala. Yes, it was my ignorance that I was not aware of such a charming festival celebrated among the northern Malabar region of Kerala. The web searches as always were not satisfactory but Revathy’s mails painted a more vivid and colourful picture and specific details of the festival…..and I loved the part where she mentioned that small yet the most interesting tidbit about the final day ceremonies of the festival and how they wrapped up the rituals with that simple prayer, “"neerathum Kaalathum Adutha Kollavum Varanee Kamaa "
I guess the links below throw light into the same festival and the Wikipedia link, talks about “Poovada Chudal” , which I assume , is referring to the same preparation. Please correct me if I am wrong.
I wish someone out there shared some photographs from the Pooram Festival of Kannur!
Revathy’s recipe is perfect and easy to follow and I just halved her recipe to get a sample and since neither jackfruit or cinnamon leaves are available at my part of the world, I had to use banana leaves and I can only imagine the depth of flavour cinnamon leaves would impart while steaming these rice flour parcels , sweetened with jaggery with the nutty taste from cooked split gram , flavored with fragrant cardamom!!
Since dark brown jaggery was out of stock in my kitchen, I have used the light brown variety and hence the colour might be different from the traditional one. Since it was one of those trials without a visual reference, please do forgive me for any mistakes I have made in recreating this dish or any assumptions I have drawn up unknowingly.
I know I would have got more tidbits and tales from Revathy, had I pestered her for more details but knowing that she juggles home, studies and a little wonder, I couldn’t think of taking her much valuable time. I really admire and appreciate Revathy’s efforts for taking time from her tight schedule and checking out all these tales and recipes with her mom and sharing with us.
Thank you, Revathy :)
UPDATE : Here's Revathy's feedback and one more tiny bit of info after reading this post:
"Hi Shn... Felt so happy and thrilled to see new post with Pooram ada.It looks almost same except the color.Does that taste good too!!! My mom told me people from Nair caste make different version of this ada that is small version of Ela ada with jaggery and cocnut mixture inside ..There may be variations depending on castes and families ...Anyway thanks a lot for trying out the recipe ..that too so soon."
Luv Shn
|
No part of the content ( articles, photographs, recipes) of this blog may be reproduced without my written permission.Copyright © 2007-2010 Kitchenmishmash.blogspot.com. All rights reserved.
|
 As I wrote in my previous post, I fall in love with recipes that comes with a story and history, which gives them a soul and character of its own, no matter how simple the recipe is. Such recipes take me to a bygone era I have not been part of. That’s what happens most of the time when I approach the elderly men and women in our family for recipes and dishes cooked during their childhood……at times, they have a story to accompany the recipe…..memories to share …take pride in the tools and techniques they possess passed down to them by their mothers, grandmas or great grandmas.
By collecting such recipes handed down from generations to generations in our family, I have been making a humble attempt to connect with my roots as well and pass on the baton, pass on that tiny slice of the past to the future generations in our family, if at any point of time they get curious as to what we cooked and ate or what their grand-parents and great grand-parents preferred for breakfast or dinner or how the family traditions associated with certain festivals evolved. Perhaps, it might be my wishful thinking but no harm in staying on the optimistic side, right?
However, it is not just the recipes passed down to us that I love to cherish….there are some other things too…..a few of my favourite things which I have inherited from my family…..those things that come under the category of heirloom, things that speak volumes for itself and the family. Some of those treasures include those flimsy old leaflets of Thaliyola/palm-leaf manuscripts from my grandfather’s collection…….the bell metal vessels used by grandmas from both my paternal and maternal sides……those faded sepia pictures from the family album…..
………and one among those priceless possessions is this Achu/mould my mother gave me recently …….a special mould used particularly for making the crispy, crunchy, deep fried old world snack, Achappam, Kerala style rosettes……a tool and a recipe her mother passed on to her has now come to my collection. As much as I look at it as a treasure, I must admit that one thing she can’t pass on to me that easily is the skill to execute the tool and the recipe. And I realized it a couple of months back as I watched my mother frying up a batch of Achappam, with the deftness and dexterity that made me wonder if I would ever be able attain that level of skill, experience and presence of mind!!
 As I wrote for Kuzhalappam, Achappam is also a popular snack that you come across during festival times like Onam or X’mas or stacked neatly and wrapped in clear plastic at bakeries and Ulsava-parambu/fare grounds, or as part of the spread on the eve of marriage/Kalyana Thalennu, or to fill up those huge snack tins carrying variety of snacks and sweets, taken by the newly-weds when they go to their in-laws house etc…..
Making Achappam is a tricky affair, something that comes to perfection only with the use of fine rice flour, right consistency of batter and ofcourse, practice. Achappam you see in my pictures lacks a bit of its finesse as my mother had to work with the ingredients and utensils available in hand, coming up with alternatives and substitutions. Generally, it is made using “ nalla nermayulla varukkatha pachari podi” , a fine raw rice flour which is not roasted. Since that was not available at home, my mother soaked some raw rice grains for an hour in water, drained it and let it dry a bit for around 20-30 minutes and then ground to a fine powder which she sieved using a very fine sieve. The finer the sieve, the finer the rice flour would be and even finer the texture of Achappam. If the batter is too thick like dosa/Indian pancake batter, then it is difficult to separate Achu/mould from the semi cooked , semi crisp fried dough and also it won’t have the right crunchy texture. Am just listing out the ingredients and method my mother followed thinking that someday I would gain the courage and skill to try it on my own!
 Ingredients: ( Approx.) - 1 cup rice flour/pacha-podi ( Not roasted)
- About ½ cup coconut milk, medium consistency
- 2 ½ tsp egg, beaten lightly
- Sugar, little less than 1/8 cup
- 1 heaping tsp black sesame seeds/ellu, lightly roasted/heated
- ¼ tsp cumin seeds/jeerakam
- Oil for deep frying
Directions: - Mix all the ingredients to the consistency of a batter- not as thick as dosa/Indian pancake batter- and leave it on the kitchen counter for around 20 minutes.
- Heat oil in a small wok or sauce pot; as soon as you turn on the stove, drop the Achu/mould into the oil, and let it heat up along with the oil. In the meantime, transfer a small batch of batter to a small container; this way, you do not change the consistency of the batter as you keep dropping the oil coated hot Achu/mould every time into the batter.
- When oil is really hot enough for deep frying - check by pouring a tiny drop of batter into the oil and see if it is coming up to the top immediately and sizzling and spitting in hot oil – lift off the Achu/mould from the hot oil and shake off the excess oil and then slowly dip Achu/mould in the batter (the one in the small container and hearing that “shhhh…shhhhoooo” sound is natural at this stage) for a second only till halfway ( DO NOT dip the Achu/mould fully into the batter) and then immediately drop the batter dipped Achu/mould back into the hot pool. At this point, you will notice numerous bubbles forming around the Achu/mould, as shown in the pictorial. Wait for about 30-40 seconds and gently shake off the Achu/mould and if you got the batter consistency right, you will see the semi-cooked Achappam coming off the Achu/mould easily; if you re having some trouble , try to separate the Achu/mould by gently pushing with a wooden skewer and it will come off easily; then let it cook until crisp and golden brown, by flipping each side. Keep adjusting the heat, otherwise it would get burnt fast. When it is fried enough, remove with a slotted spoon and let it drain on a paper towel. When it is completely cool, it gains more crunch and you can store them in an airtight container.
- Keep repeating this step for the entire batch of batter and if your wok is big enough, continue to place the Achu/mould, in the hot oil itself after shaking off the semi cooked ones from it. Otherwise, please make sure that Achu/mould is heated properly in oil before dipping into the batter each time.
Related Posts:
Luv Shn
|
No part of the content ( articles, photographs, recipes) of this blog may be reproduced without my written permission.Copyright © 2007-2010 Kitchenmishmash.blogspot.com. All rights reserved.
|
 A simple unpretentious drink by description yet the moment you gulp down that first sip the suspicious glance hidden at the corner of the eyes earlier, turns into one of a pleasant surprise followed by nodding of head in agreement. And if such a down to earth blend is accompanied with some vivid tales and imagery from the past, that’s a recipe to win your hearts. Such recipes come with a soul and character of its own. A simple unpretentious drink by description yet the moment you gulp down that first sip the suspicious glance hidden at the corner of the eyes earlier, turns into one of a pleasant surprise followed by nodding of head in agreement. And if such a down to earth blend is accompanied with some vivid tales and imagery from the past, that’s a recipe to win your hearts. Such recipes come with a soul and character of its own.
Here’s one such treasure that came in my mailbox last Monday. I let you all have a glance at some parts of that mail where the daughter, Prathibha captures her dad’s tales from the past in a very engaging mail which took me to a bygone era I ve watched only in movies. Let’s extend a warm welcome for this dad-daughter duo.
Hi Shn, Long time since I mailed you. How have you been? Warning : Long Mail!! Read when you have time :)
I just checked your blog and saw the kinnathappam post. Used to love it when achamma used to make it. But hate the one you get in bakeries these days, esply that raw taste. Did you know bakeries used to be called appakoodu? Dad tells me people rarely used to buy stuff from appakoodu and usually snacks are made at home in bulk. Dad's younger bro used to clean up all kinnathapam kept at home and when guests come, it will be just the dabba which they keep snacks. And achamma used to make achan run to the appakoodu to get snacks.
Since you have been collecting long-lost recipes, I thought I will send you this one. Chakkara-Vellam(water). According to my dad, this drink used to be popular in his youth. If I quote him "eppozhokkeya ee pilleru oru koopiyum thurannu thanniyadichirikkunne, pandokke, aval kozhachathum chakkara vellavumayirunnu. Kaikku nalla bhalamulla oruthan aval kozhakkum. Innathe pole machine-il idicha aval alla.. atha kozhakkan menakkeda..." He fondly remembers the time when people used to gather around/below some bridge in Kannur and have aval and chakkara-vellam.
I tried this out and so thought will send you the recipe.
By Chakkara , it means karipetti or pananchakkara (and not sharkkara). They used to be wrapped up in coconut/palm leaves made into a kotta. We get Karipetti here, small blocks of it. ……………..
Chop 2 shallots finely. Add a small block of mashed karipetti to it and mix with water. Salt is optional. It can be used instead of moru-vellam. I am attaching the pics, they dont look all that great and shallot pieces look quite big in it. Frankly, it took a moment to adjust to the taste. But I liked biting into the kutty shallot peices when you drink it. It is different from all the other drinks I have tasted. So I'd recommend you try it out once. After all, there is absolutely no effort in making it. ……………
Dad has a background story for it also.
Pandokke aalkaar marichal, relatives-ne okke ariyikkaan othiri dooram nadannu ponam. So the neighbours and friends start out to different directions immediately after the death is announced. They might have to walk for hours or sometimes days(Talking about the days when even telegram was pretty rare). This drink is simple that it can be made easily and the karipetti gives a lot of energy they need to walk. The neighbours only do every arrangement for the funerals including cutting the trees(esply maavu) and chopping it up into logs. So on the 16th day after death, the family of the deceased give food/sadhya to the neighbours and others who helped out in order to thank them for helping. Though these days the same tradition goes on of giving feast on 16th or 48th day after the death. .............................. ............
Take care Prathibha
“He fondly remembers the time when people used to gather around/below some bridge in Kannur and have aval and chakkara-vellam”. Well, reading that line, I was tempted to give it a try and I did. I must admit, it is a lovely pair. Considering the fact that both Aval Nanachathu and Chakkara Vellam do not require any cooking, I could very well see her dad’s point of having it not only as a simple snack and drink but also as an energy drink to those people who walked miles and hours together to pass the message to the relatives of the deceased.
Prathibha has asked to mix finely chopped shallots/small pearl onions/Kunjulli and crushed Karipetti or Panamchakkara ( a variety of palm sugar), with water and written that adding salt is optional. But I added salt and noticed that it brings out the distinct flavours of palm sugar very prominently. I didn’t have Karipetti or Panamchakkara at home, but had a block of Thenginchakkara which is similar but made from the sap of coconut palm, I guess. While sipping it , I was having a strange thought it could very well be converted to an exotic mocktail/refreshing drink if you serve it chilled in a stylish martini glass and baptize with a fashionable catchy name!! :)
Prathibha , Thanks a ton for sharing such an interesting read and also letting me publish it here. Hope you and your dad will have more tales and recipes of the past, to share with all of us. I extend my whole-hearted gratefulness to both of you :)
Related Posts:    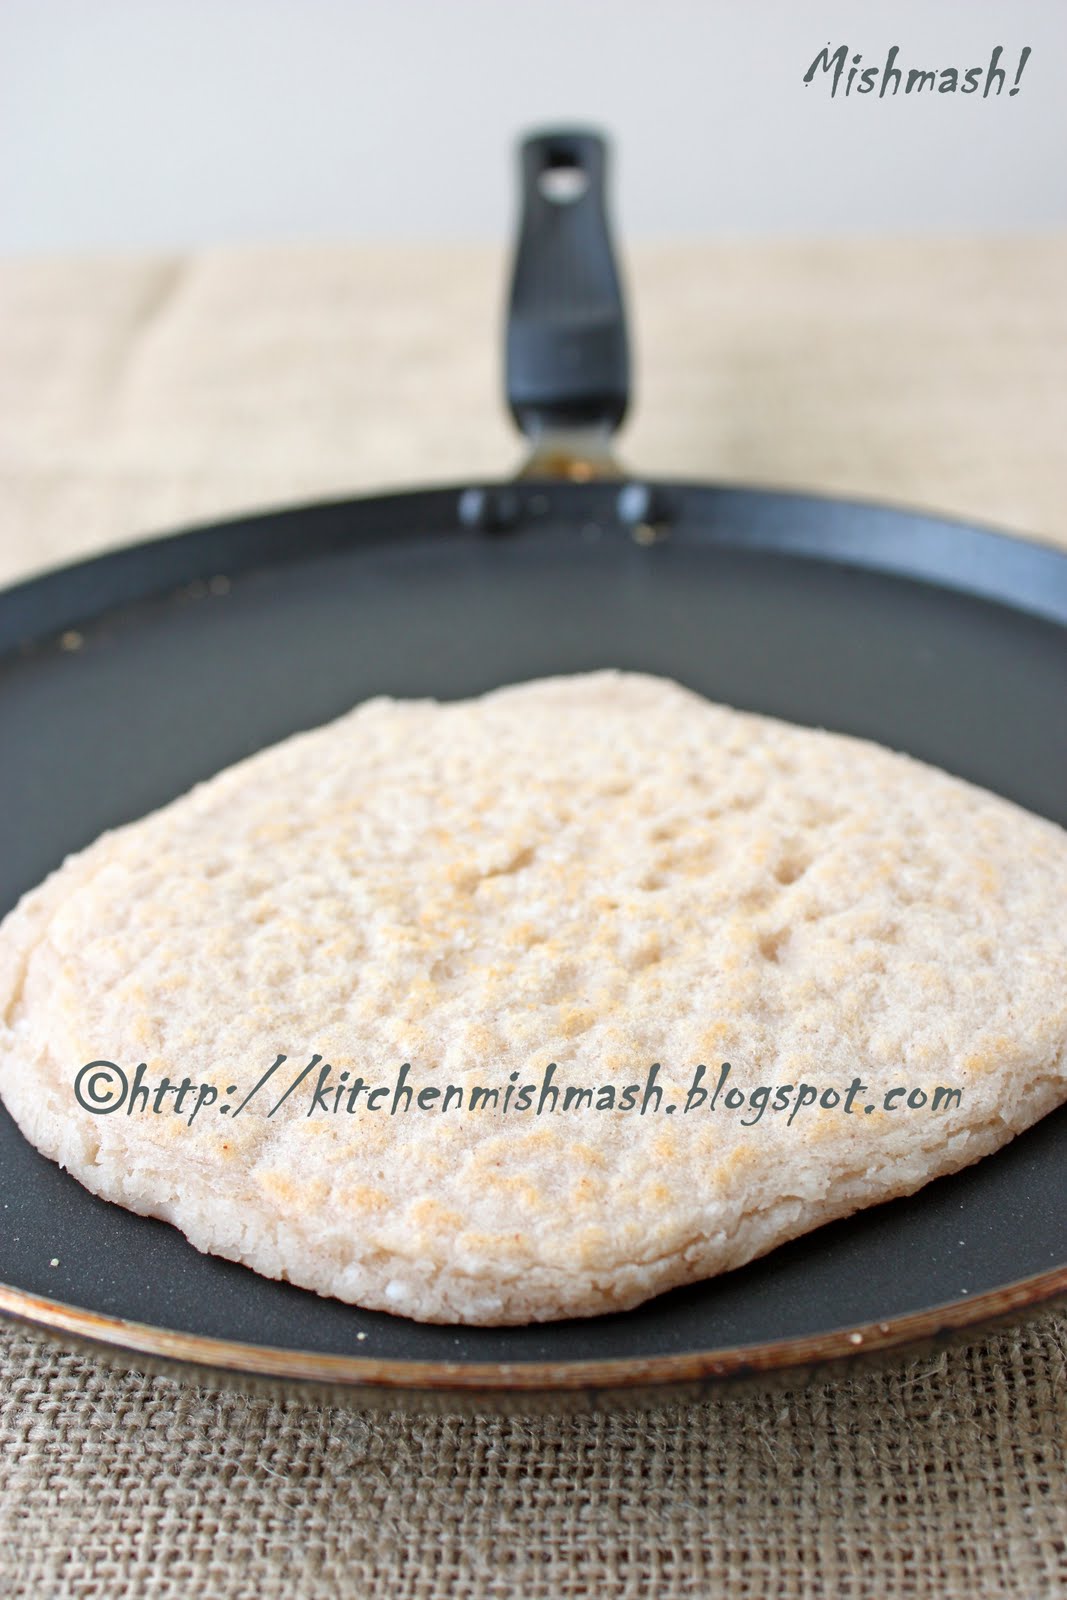   Luv Shn
|
No part of the content ( articles, photographs, recipes) of this blog may be reproduced without my written permission.Copyright © 2007-2010 Kitchenmishmash.blogspot.com. All rights reserved.
|
“Heard melodies are sweet, but those unheard are sweeter…” How eloquently Keats captured the power of imagination in those beautiful lines!!!! And I must admit , when it comes to food, never tasted or seen, my imagination has no bounds, especially if the food in discussion is painted with a heightened magical image through someone else’s words……
…..that was the case with Kinnathappam (Kannur Style) ever since Revathy left that message three months ago. Till yesterday, it was a taste unknown with not even a picture to refer to…..something that was enchanting and charming from the old cultural town of kannur …….something I wanted to taste on my next visit to this place, from one of the bakeries in those crowded streets …and in my imagination, I saw it wrapped in a clear plastic, arranged in the glass shelves of that tiny bakery…some were white and some, in a light brown hue……
…but now, I associate the word Kinnathappam with a white, soft , dense pudding cake that is cooked with ground rice ,in the delightful richness of cream of coconut and divine ghee, sweetened with sugar and flavored with cardamom and the pleasant surprise bites of cooked split gram!! Now if I walk into one of those bakeries in that old town, it is definitely not like a blind struggling to point his choice in complete darkness.
My puzzle board is still incomplete with lots of missing pieces and they range from the socio-cultural background of this snack, existing variations, the right texture, the colour – sugar or jaggery …the list goes on. At this point some of the connecting links on my puzzle board is woven with a handful of comments and messages left by my readers and blog buddies and the recipe my aunt shared.
Revathy’s messages often described Kinnathappam like this “ Kinnathampam is nnormally made in large quantites for housewarming or weddings at home, nowadays we get it from bakery shops so no one bother taking the hardwork to prepare it.I saw ppl making it in big uruli at my home for big functions when I was a kid but dont really remeber the ingredients.I will ask my mom about the recipe and let you know. Revs”
The cheerful young blogger , Ria from Kannur wrote : “I am from Kannur as well and I must say kinnathappam & kalathappam is a very yumm snack! Revathy, thanks for sharing the recipe with Shn! Shn, please try it out soon and post it! It's usually made in Hindu homes here...so we don't have a recipe for it :) “
A reader named Deepthy left this message on my Orappam post : “It looks like kinnathappam.My amma used to prepare it with rice flour,jaggery.We also add dried mango seeds powder in it.Deepthy “
In pursuit of finding out more about this snack, I asked my mother to approach my aunt, S from Kannur and she was gracious enough to share her recipe over the phone and my mother jotted down the gist in her own language : “ 1 glass ari…1 tbsp kadala-parippu…kadala parippu uppittu vevikkuka…..thenga ara-muriyude paal ozhichu panchasaara ettu elakkuka…..onnu kattiyakumbol ¼ glass nei ozhichu elakkuka….pakuthi aakumbol kadala-parippu eduka…urundu varumbol, paathrathil ozhikkuka…”
Well….well….these are two women who belong to the “ a glass of this, a handful of that and a pinch of this- generation” and trying to comprehend their language by someone who belongs to “ a cup of this and a tbsp of that – generation” is like…..well , let me not get into that aspect. I was totally confused!
I went back to Revathy and she promptly replied : “Hi Shn, I asked my mom about the kinnathappam recipe.She never tried at home in small quantities.She said it takes hrs to to make it,and we should keep stirring the batter until it become thick halwa like consistency.The main ingredients are coconut milk ,rice powder ,jaggery ,cardomom,split dal cooked.Mix all ingredients like watery consistency except ghee and in a Uruli keep strring until it become thick and then add ghee cardomom.,this is the vague idea about the recipe amma knows.She had seen it done in large quantites during house warming or weeding at our family. Take care, Revathy.”
Now the question was whether to add sugar or jaggery and Ria, my local consultant and subject expert in this case, mailed me :” As far as Kinnathappam goes I have always seen them in blurry white colour.It is not as white as vattayappam, but more or less like kanjivellam colour . So it is definately made using sugar as sweetener. Even I have heard that the process is like halwa-making...2-3 hours of continuous stirring. But the end product is yum!”
And here’s how we tried to put together the pieces of the puzzle, with the help of my mother :  Recipe Source: My aunt S from Kannur Recipe Source: My aunt S from Kannur
What we took: - 1 cup jeerakasaala /kaima rice, soaked for 4 hours in water
- 4 tsp Kadala-parippu/split gram/chana dal, soaked in water
- 2 cups freshly squeezed coconut milk
- 1 ½ cup sugar ( adjust as per sweetness)
- ¼ cup + 2tbsp ghee/clarified butter
- 10 pods of cardamom, powdered- adjust as pert your taste and strength of the seeds ( Added based on Revathy’s mail)
- Salt
What we did: - Grind soaked rice into a fine paste, adding required water to operate the Indian mixer.
- Cook soaked Kadala-parippu/split gram/chana dal with a pinch of salt until soft ( either in a pressure cooker or sauce pot) and once cooked and warm, gently press with your fingers and make it soft yet retaining the shape.
- Mix ground rice , coconut milk and sugar with a pinch of salt; pour this to a heavy bottom large sauce pot/wok and start stirring on a low-medium heat. Stir continuously. When it starts to thicken and show some resistance to easy stirring, pour the entire ghee and stir continuously. When it thickens more, add cooked Kadala-parippu/split gram/chana dal and resume stirring incessantly. When you see the dough starting to come together in the centre as one mass, take a small amount and try to roll and make it into a ball with your thumb and index fingers and if it shapes up beautifully without sticking to your fingers, then it is time to turn off the stove and add the powdered cardamom; immediately transfer it to a 6 *2 round cake pan/or a “Kinnam”/any round old fashioned plate with borders – smeared with some ghee; Fill the cooked dough in the pan and flatten smoothly. Let it rest in the room temperature for 1-2 hours and when it is completely cool, cut into small squares and serve. This whole process of cooking one cup ground rice with other ingredients took us about 50 minutes of stirring continuously.
Taste verdict: Tasty, no doubt ! Richness of coconut milk, sugar and ghee is very prominent. The occasional bite into split gram offers a pleasant surprise. Texture we got was that of a dense yet soft pudding cake.
Wonder if we got the texture, colour and thickness right! Would love to hear the feedback, suggestions and recommendations from the Kannur’ians out there. I would also love to learn more about this snack…..your stories, memories and socio- cultural significance of this snack. Please help !
My sincere thanks to My aunt S , Revathy, Ria and my mother for all their help and guidance in bringing out this post.
Related Posts:  
Luv Shn
|
No part of the content ( articles, photographs, recipes) of this blog may be reproduced without my written permission.Copyright © 2007-2010 Kitchenmishmash.blogspot.com. All rights reserved.
|
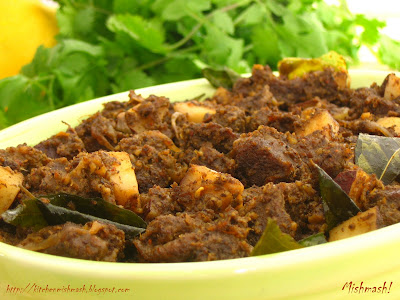
 “……..Yes, I do want to stay with her…..listen to her stories…..taste her food and of course enjoy the natural beauty of Kuttanadu, "the rice bowl of Kerala", a place near Alappuzha and as I have already mentioned in one of my posts, I have never been to Kuttanadu, and from what I have gathered from CJJ’s vivid descriptions, this place is laced with palm fringed canals and small rivers… lush green paddy fields……locals traversing in small country boats……. men herding a flock of ducks and the tail wagging and quacking of ducks !! It’s not just my husband who makes me go crazy with all these details… it is as though, my brothers-in law have also taken their vows to tickle my imagination….when one claims that it is heaven, then the other goes one step ahead and sends me the picture of mouth-watering duck roast their grandma makes!! I had no other option but to call her up and learn to make the chicken roast…..and I was quite surprised to learn that her famous chicken and duck roast is made with very few ingredients. I had to double check with her if there was no need to add coriander powder, chili powder and tomatoes which is generally used in chicken roast preparations, which are either curried and then pan seared or deep fried and then roasted but this preparation is based on grandma’s recipe!.....”
I wrote those lines more than 2 years ago and today I thought I will share the that picture ……..

……..the picture that tempted me to take a culinary peep into CJJ’s grandma’s kitchen……..and any true blue non vegetarian Malayali having one quick glance at that one can understand our plight, how self-torturing it was for us to look at that picture and drool over it each time, especially when you are away from the delicacies of your homeland……… and yesterday when we were digging for this picture from my brother-in-law’s album, I repeated the same question I had asked CJJ whenever we viewed the picture in the past, “ How could she cook so much ……that too when she is in her 80’s just ‘coz R was visiting……..?? When do you think I would be able to have a taste of her ‘kaipunyam’? “ and I was told , “ Ohhhh…you should see her cooking…..she is ….she is F..A..S..T and she comes up with the tastiest dishes!!” and as always, I was left with sufficient amount of uncertainty for the last part of my question!
In the past I have tried to translate the gist of her recipes she shared with me over the phone and though I have never had the chance to taste her real version, I have tried to interpret her recipes with my limited skills. CJJ has been my judge all these years and the way he nodded his head after tasting each of my experiments, always gave me the push I needed to explore a bunch of her dishes, I have already shared with you.
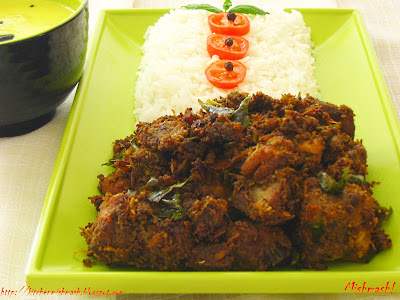
This Duck /Tharavu Roast recipe is pretty much in line with the Chicken Roast recipe that has already been featured here. Some minor changes have been made in the proportion of ingredients to suit this particular variety of poultry and I must add that though I am not a duck lover, this is the only duck preparation that makes me go for second and third serving! Here’s the recipe we followed:
Ingredients: To marinate: - Around 1 kg Duck/Tharavu, cut, cubed and cleaned
- 8 tsp Masala Powder ( Recipe follows)
- 2 tsp freshly ground black pepper ( fresh green peppercorn paste is ideal)
- 1 tsp turmeric powder
- 1 tsp vinegar
- 2-3 green chillies, cut lengthwise
- 1 tsp coconut oil
- Salt to taste
- ¼ to ½ cup water to pressure cook
To Roast: - 2 ¼ cups thinly sliced small red pearl onions/shallots/Kunjulli
- ¼ cup finely chopped ginger
- ¼ cup finely chopped garlic
- 2tbsp finely chopped green chillies
- 2 sprigs curry leaves
- ½ tsp Masala Powder* (Recipe Follows)\
- 2-4 tbsp coconut oil
- Salt to taste
- 1-2 tbsp water
To Make the Masala Powder: (Grind to a fine powder and use as per the instructions given in the recipe) - ¼ cup fennel seeds/perinjeerakam
- 12-15 cinnamon/karugapatta
- 8-10 cloves/grambu
- 2 cardamom/Elakkaya
Directions: - Marinate cubed pieces of duck meat with ingredients listed under “To marinate”, except water and leave on the kitchen counter for 30 minutes.
- Heat oil in a large pan and sauté small onions until they turn transparent and then add green chilies, ginger, garlic and curry leaves and cook until they are soft. At this stage add cubed pieces of marinated duck ; sprinkle 1-2 tbsp water to the vessel and take off all the leftover marinade and pour to the pan; cook for around 20 minutes in low heat or until the raw smell goes. Transfer this to a pressure cooker and pour ¼ to ½ cup water and cook until done and soft.
- When pressure cooker cools down, transfer the cooked meat and gravy, back to the large pan and bring to a boil in medium heat. At this stage, sprinkle ½ tsp masala powder and adjust salt if required; tear off curry leaves and throw them into the pan and let it simmer for another 15-30 minutes, until gravy and the cooked poultry come together as one single mass. Turn off the heat depending on the roasted texture you aim for; you can keep it lightly wet as in my picture or can make it a bit more dry.
- Let the cooked dish sit in the room temperature for minimum 45-60 minutes, allowing the flavours to get together and serve warm with Rice or Palappam or any leavened or unleavened bread of your choice.
Related Posts:
Luv Shn
|
No part of the content ( articles, photographs, recipes) of this blog may be reproduced without my written permission.Copyright © 2007-2010 Kitchenmishmash.blogspot.com. All rights reserved.
|
|
|
|
|