|
|
 If someone out there is dreaming about writing an international best seller I guess you should consider this topic, Young Bride’s Culinary Blunders and if you proceed with it, please do feel free to contact me if you want stories for your introductory chapters. I started my saga from the third day of marriage by shocking my mother-in-law, asking a very genuine doubt on making a simple stir-fry with green grams, Cherupayar Olathiyathu. Her eyes popped out of the socket when I asked her if a tall glass tumbler of green grams is enough for two people! The courage to even pose such a question or to initiate a query on cooking came from the experience of scribbling some basic recipes in a small notebook, two days before my marriage with the help of my mother and aunts. She stared at me with a scary look for almost 4-5 seconds before answering that only a couple handfuls of lentils are required! Just when I was mastering the art of identifying the identical twins in the kitchen- cumin and coriander powder-, my youngest brother in law dropped the bomb by calling us to let us know that he would be spending a weekend with us!! I drafted a menu with attention to every detail and prayed to all the culinary gods but on the first day at dinner time, our whole house smelled of stinking flower, garlic!!! No, I wasn’t making roasted garlic soup….I was venturing to make a simple paneer masala and to my utter embarrassment it turned out to be my signature garlic paneer!!!! Those days I was under the impression that the more you add the base ingredients, the tastier it would be!! There started the realization that there is a concept of balancing the flavours!Ohh…how could I forget our first visit to the local farmer’s market??? I showed utmost care in picking out the fresh veggies and everything was going fine until I reached the man selling green chillies. Very casually, with confidence oozing out of my face, I asked the seller in my broken tamil, “Annaa….oru kilo milaku kodunge”. The man just stared at me as though I was talking some foreign language. Thinking that he was having trouble deciphering my anglicized tamil, I made one more attempt, this time in English, “Annaa….1 kilo green chillies” ……….the man was still speechless…..and the way CJJ turned and glanced at me, made me realize that there was something wrong…….so this time, I asked “….1/2 kilo green chillies”. At that moment I noticed a grin on the face of the seller and I was still puzzled. Luckily, before I humiliated myself more, CJJ came to rescue and asked the man to pack 100gm chillies and whispered into my ears,” Did you have any plans to make Biryani for hundred people……??” hmm…..I don’t think that would even pass the rookie mistake category!Well, these are a couple episodes from my initial days of cooking. Luckily, my learning curve was quite steady and progressive. I really began to believe that blunders in the kitchen were a thing of the apprentice training until last month when we visited a meat shop in Chicago. At the counter, they had lined up an assortment of meats and there was a tray with different organ meats. With my standard “I-know-everything” look, I asked the person in the counter, pointing to the tray of organ meats, “I need some liver….is that lamb liver or mutton liver?” . At that moment I noticed a puzzled look …the same look I saw on the face of the green chilly seller years ago and then he softly pointed his fingers and said, “ those are kidneys…..the one at the end is goat liver”!!!!!!! When do I stop my making such blunders????? How many more to this list??? I don’t know!!!***
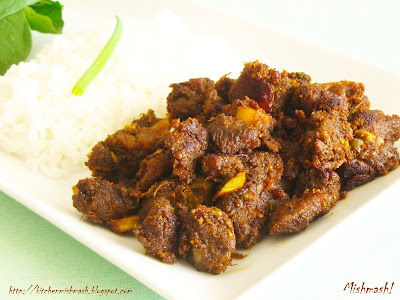
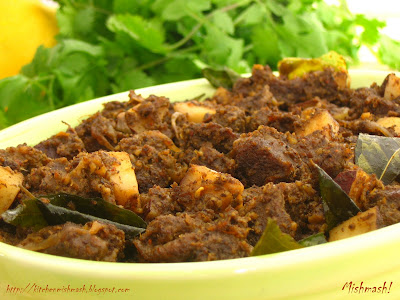
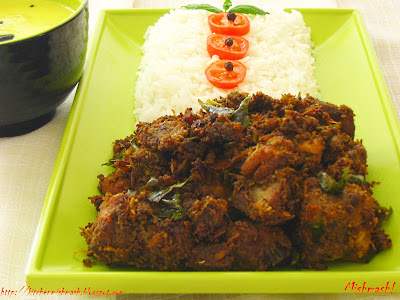
Cooking mutton liver is a tricky affair. If you add more water or if you cook for more than the required time, it turns the organ meat into a rubber-like texture. A rightly timed liver fry should be cooked to soft and adjusting the cooking time comes with practice. This was the first time I tried cooking something from the organ meat category and mine did not turn out as soft as my mother’s preparations. Though I have adjusted the cooking time and water content based on my experience, I suggest you keep an eye on the cooking time and temperature. This is a spicy pepper-y preparation and am sure you will love the taste.
Ingredients for Mutton Liver Fry:
To marinate:
- ½ kg Mutton (Goat) Liver , washed and diced into small pieces
- 1 ½ tsp Coriander powder
- ½ tsp red chilly powder
- ¾ tsp turmeric powder
- ¼ tsp homemade masala Powder/Garam Masala
- 1 tsp freshly ground black pepper
- 1 tsp ginger paste
- 1 tsp garlic paste
- Salt to taste
- 2tbsp water
To Fry:
- ¾ cup small red pearl onion/shallots, thinly sliced
- 3 Indian green chillies, slit lengthwise
- ½ tsp freshly ground black pepper
- ½ tsp homemade Masala Powder/Garam Masala
- 2 sprigs of fresh curry leaves
- 1 tbsp coconut oil
- 1 tbsp ghee
Directions:
- Marinate liver with powdered spices, ginger garlic paste and salt and leave it on the kitchen counter for 10-15 minutes.
- Place the marinated liver in a small pan and sprinkle water and cover with a lid. Heat this on medium-high heat for the first 4 minutes and then once the liver starts to produce water, reduce the heat to low. Let it cook for another 4-5 minutes in low heat. Once the meat is almost cooked, turn off the stove.
- In another shallow pan, heat coconut oil and sauté thinly sliced small red pearl onions/shallots and green chillies, till the edges start to turn golden colour. To this add the ‘almost done’ mutton liver and blend with the onion base. If it is too dry at this stage, add one or two tablesppon of water. Now sprinkle ½ tsp pepper powder and ½ tsp masala powder and tear a sprig of curry leaves and let it cook/roast in low flame; Stir often to make sure that the masala does not stick to the pan. Now do a taste-test and check if the liver is cooked and still soft. If the meat is at the right stage of doneness, slide everything to one side of the pan and on the other side, pour 1 tbsp ghee, wait for 30 seconds and then bring the liver masala to the centre and blend well. Tear the second sprig of curry leaves, add to the Liver Fry. These finishing touches gives a hint of richness and fragrance to the entire dish. Turn off the stove and let it rest for 30 minutes before serving. Goes well with yogurt/ ground coconut base curries.
Related Posts:
Before I sign off, let me ask you………Have you ever been in such shameless situations? If you have any interesting kitchen blunders, please comfort me without your stories :)
Luv
Shn
|
No part of the content ( articles, photographs, recipes) of this blog may be reproduced without my written permission.Copyright © 2007-2010 Kitchenmishmash.blogspot.com. All rights reserved.
|
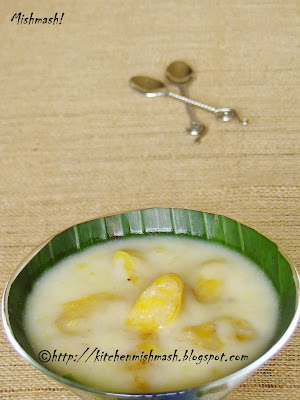 I think it was almost towards the end of the first year of my blogging that I added a note to my blog title, “ Rekindling the memories and Re-creating the forgotten taste…” At that point in time I was not conscious of the depth and spectrum of the word, “ The forgotten taste..”. Till two days back, it meant the taste of my childhood….the taste of teenage and early adulthood….the taste of those days I spent with my family and friends. Sometimes, it was the taste I was beginning to forget or the taste and smell of my homeland or the taste I was unable to recreate in my American kitchen but it was never the taste I literally forgot or the taste that has been completely washed away from the shores of my memory lake……………. Last time the culprit was Mathew and this time it is Maria who ignited my chamber of taste memories. As a comment for my previous post, she left a note for me,” hi shn, we make this at home & we call it unda payasam. we also add steamed or fried banana along with this. It's one of my fav palaharams :)” Hmm….steamed banana in coconut milk…?? I have tasted something like that!!!! I knew that it was part of my childhood …I knew that I know this dish!!! The image was blurred and the taste memory was vague…I was not sure if I had it at my grandma’s or at my mother’s. Yet, I knew it was one of my favourite evening snacks….. Winding back, digging up those days, it was hard this time. After 8 or 9 hours, I found a strip of light to the past….I could see the little me sitting on a wooden bench in my grandma’s kitchen and slurping a spoonful of steaming thick cream of coconut with some quartered pieces of ripe plantain, from a stainless steel plate !! What was vague and blurred few hours ago, was now dancing on my palate as taste dolls……the natural sweetness from the ripe plantains, the creaminess of the coconut milk …..I could almost feel it on my tongue….yet, I could not figure out what was that secret ingredient that gave the distinct flavour and a whiff of fragrance. The next day I was talking to my parents and sharing all the possible traditional names you all left here, for the snack I featured a couple days back. Suddenly I heard my mother saying,” aah….there is one more thing Amma used to make…instead of rice flour balls, fully ripe plantain was cooked in coconut milk and then flavored with a hint of cardamom.” At that moment, I was amazed at the synchronization of our thoughts. And yes, it was the cardamom that gave a unique twist to such a simple lovely snack!! You guessed it right…I recreated it in my kitchen following my mother’s suggestions and guess what, it was the same taste and the smell that pleased the palate of a 8 or 9 year old, decades ago :) I was delighted with each spoonful though it lacked my grandma’s Kaipunyam, the magic from a blessed hand and the sweetness of the native variety of plantains available in Kerala. Here’s how I made it:  Ingredients: Ingredients:- 1 fully ripe plantain, peeled and diced into small quarters
- 1 cup thin coconut milk/Randaampaal
- ¾ cup thick coconut milk/Thanipaal
- 8 tbsp sugar or to taste
- 2 whole cardamom crushed
- 1 ½ tbsp rice flour
- 2 tbsp water or thin coconut milk
Directions:- In a sauce-pot, heat diced pieces of plantain and thin coconut milk together; bring to a boil, in medium heat. Now reduce the heat, add sugar and cook until the plantain pieces are fully cooked and soft. Meanwhile mix rice flour with water and make a creamy paste (this works as a thickener) and add to the pot and blend well with the coconut milk for a minute; add thick coconut milk, cover with lid and let it cook in medium heat, until bubbles start to pop up. At this stage, it should have the consistency of Payasam. Add more sugar if required. If it is still liquid-y at this stage, reduce heat and let it simmer for some more time in low heat. Just a minute before turning off the stove, add the crushed cardamom and stir well. Turn off the stove and let it rest for 20-30 minutes and serve warm.
Well, again I don’t know the name of this snack…. :-) My mother is uncertain but doubts that my granny used to call this as ‘ Kaayasoottu’. Though she checked with her sister, both of them are not able to confirm it. I should be happy that atleast I could revive a real forgotten taste of my childhood even if I fail to find the name! Readers, you are welcome to drop a line if you know the traditional/regional/household name of this snack but no guesses and assumptions please. :) Dear Maria, Thank YOU for this tasty experience :) UPDATED on Oct 19th, 2008: Based on comments, this snack is also known as Ethakka Kurukkiyathu, Pazham Kurukku and Ethappazham Stew.Luv Shn
|
No part of the content ( articles, photographs, recipes) of this blog may be reproduced without my written permission.Copyright © 2007-2010 Kitchenmishmash.blogspot.com. All rights reserved.
|
Dear Friends, A ton of thanks to all those who took time and dropped a line responding to my request for finding the traditional name of a snack. I have updated my previous post with information collected based on your comments, mails and an article published in a Kerala magazine. Kindly check the post for the updates.Thanks AgainShn
|
No part of the content ( articles, photographs, recipes) of this blog may be reproduced without my written permission.Copyright © 2007-2010 Kitchenmishmash.blogspot.com. All rights reserved.
|
 A conversation between mother and her bloggie daughter…. A conversation between mother and her bloggie daughter….Daughter: Mummyy….I was thinking of posting that kutti unda in coconut milk…you know, the one you used to make for our evening snack time…..Mother: Which one……? I don’t remember…Daughter: Mummyyy …the one I like a lot…that small rice flour balls…and you used to soak that in sweetened coconut milk….remember?Mother: aah…. I remember now….yeah , that’s a good one ...you can write about it…Daughter: But I don’t know its name….is there any traditional name for it?Mother: hmm….I am not aware……Daughter: ….but how can I post it without a name….? It is somewhat similar to Kozhukkatta…I mean look-wise….so….. shall I say…… Kutti-kozhukkatta in thenga-paal or undayum paalum?Mother: yeah….write something like that……we don’t have any specific name for it…..***
Well, this has been a recurring situation in many of my casual conversations with my mother whenever I approach her for some recipe which is my childhood favorite and have no clue on the actual name of the dish. Sometimes my father comes up with the name he is familiar with but in this particular case, he couldn’t be of any help either. This is one of my favorite Palahaaram/snack which my mother always prepared for our after school snack and naturally, I wanted to record this recipe in my blog but I was in a dilemma as I did not want to do the blasphemy of baptizing a snack that has been around for almost a century…….!!!! These tiny rounds made of softly cooked rice flour is steamed first and then immediately soaked in sweetened rice flour, is a classic example of harmony between coconut milk and rice flour. The subtle and delicate flavor of the sweetened coconut milk embraces the warm steamed dumplings which absorbs the liquid like a sponge, making it more soft and sweet. Here’s how we make this at home:Ingredients: These tiny rounds made of softly cooked rice flour is steamed first and then immediately soaked in sweetened rice flour, is a classic example of harmony between coconut milk and rice flour. The subtle and delicate flavor of the sweetened coconut milk embraces the warm steamed dumplings which absorbs the liquid like a sponge, making it more soft and sweet. Here’s how we make this at home:Ingredients: - 1 cup rice flour,lightly roasted
- Salt to taste
- Around 1 cup hot boiling water or enough to make a smooth dough
- 1 ½ cups freshly squeezed coconut milk
- 6 tbsp sugar or to taste
Direction:
- Start with mixing rice flour and salt; to this add the boiling hot water, just enough to make a soft and smooth dough; use a spoon to blend everything well and when it is warm enough to touch, knead gently and make tiny balls. The balls should not be pressed too much to round them (Note: the dough should be looser than the chappathi/roti dough but as soft as the Idiyappam/string-hoppers dough)
- Place these tiny rice flour balls, in a steamer or Idly –steamer or on a plate, in a pressure cooker without keeping the weight, filled with enough water, and steam for 12 minutes, or till it is fully cooked, in medium heat.
- Sweeten the coconut milk with sugar; transfer the steamed dumplings and soak them in coconut milk when they are still warm/hot. Let the dumplings rest in the sweetened coconut milk for 10-15 minutes before serving.
I would really appreciate if someone from Kerala could help me find the household name or traditional name, if any, of this snack. Some of you might ask me, “what’s in a name as long as it is tasty?”. Well, it matters to me! :) This is one of those traditional snacks - the ‘prepared-at-homes-only’ category - which you cannot find in a small town tea shop or restaurant or bakery and if someone wants to recreate these dishes decades later, they should be able to locate and retrieve the recipe with a simple Google search and I believe, blogs have the reach as well as responsibility towards the same. We can preserve these recipes before it goes extinct and hence, finding out the actual name or the regional name or household name is very significant, atleast to me.
So, my regular readers, blogger friends, new visitors, subject experts and dear ghost readers….do you make this at home? What do you call it? Is there a regional name ? It means a lot to me if you can take a minute to drop a line and throw some light into identifying the name of this snack.
Am I asking too much? :)
Related Posts:
Updated on Oct 14, 2008:
Thank YOU all for responding to my request and helping me find an answer or atleast help me come close to an answer. Based on your comments and an email I got from my cousin as well as discussion with my parents, I have come to conclusion that this snack which I have featured here is the quick and easy version of Mani-puttu, Thengapaal Kozhukkatta and Allipidi. My conclusion was based on these articles and blogs given below:Allipidi: Many of you had commented that it is allipidi and it was the first time I was hearing that name! Hence, when Swapna commented that she had read an article in a Kerala Magazine, Vanitha , I requested her to scan that article and share with me. Swapna went out of her way and photographed the entire article for me; here I am sharing those pictures with you all.  Based on that piece of article, I learnt that Allipidi is an elaborate version of what I have blogged; as per the magazine recipe, the small balls made of softly cooked rice flour dough is cooked in coconut milk and sweetened with sugar and finally flavored with powdered spices like cumin, dry ginger and cardamom.Thengapaal Kozhukkatta/Paal Kozhukkatta: Based on your comment, I took a virtual trip and landed on Archana’s blog where she has featured this dish. According to her, “Thengappal kozhukatta is a simpler, soupy presentation of these dumplings made by cooking rice dough balls in coconut milk. Served in coconut milk thickened with some rice flour, this recipe is all about flour, flour and more flour.” So, there also the main point of difference is cooking the dumplings in coconut milk.Mani-puttu: There were many readers who commented that it is Mani-puttu and the same day itself I had a mail from my cousin stating that it is Mani-Puttu. So I was almost ready to zero down on that one but Veenajan commented that she has blogged a similar recipe and it is Maniputtu. On checking out her page, again I noticed the mild variation of cooking the dumplings in coconut milk. And at this point, my mother has expressed a doubt that mani-puttu is steamed in Puttu kutti with a sprinkling of grated coconut and eaten plain and I guess my reader, Jisha is also taking about the same thing.As much as I am confused, I am beginning to believe that the recipe I have featured is a very simplified version of all these three snacks as the major point of difference is the boiling part of coconut milk and hence I guess I can safely call this, Quick & Easy Mani-puttu, Allipidi, Thengapaal Kozhukkatta! Please feel free to correct me if I am wrong and do drop a message here if someone knows the exact name :)Thanks a ton to all readers and blog buddies who helped me with this :)ThanksShn Based on that piece of article, I learnt that Allipidi is an elaborate version of what I have blogged; as per the magazine recipe, the small balls made of softly cooked rice flour dough is cooked in coconut milk and sweetened with sugar and finally flavored with powdered spices like cumin, dry ginger and cardamom.Thengapaal Kozhukkatta/Paal Kozhukkatta: Based on your comment, I took a virtual trip and landed on Archana’s blog where she has featured this dish. According to her, “Thengappal kozhukatta is a simpler, soupy presentation of these dumplings made by cooking rice dough balls in coconut milk. Served in coconut milk thickened with some rice flour, this recipe is all about flour, flour and more flour.” So, there also the main point of difference is cooking the dumplings in coconut milk.Mani-puttu: There were many readers who commented that it is Mani-puttu and the same day itself I had a mail from my cousin stating that it is Mani-Puttu. So I was almost ready to zero down on that one but Veenajan commented that she has blogged a similar recipe and it is Maniputtu. On checking out her page, again I noticed the mild variation of cooking the dumplings in coconut milk. And at this point, my mother has expressed a doubt that mani-puttu is steamed in Puttu kutti with a sprinkling of grated coconut and eaten plain and I guess my reader, Jisha is also taking about the same thing.As much as I am confused, I am beginning to believe that the recipe I have featured is a very simplified version of all these three snacks as the major point of difference is the boiling part of coconut milk and hence I guess I can safely call this, Quick & Easy Mani-puttu, Allipidi, Thengapaal Kozhukkatta! Please feel free to correct me if I am wrong and do drop a message here if someone knows the exact name :)Thanks a ton to all readers and blog buddies who helped me with this :)ThanksShn
|
No part of the content ( articles, photographs, recipes) of this blog may be reproduced without my written permission.Copyright © 2007-2010 Kitchenmishmash.blogspot.com. All rights reserved.
|
 That small magic container in your mother’s kitchen cabinet……….a pinch of it spruces up that simmering bowl of spicy curried meat or a steaming pot of stewed vegetables…………..The essence that lends the authentic taste…………the aroma that awakens your senses and makes you float in the clouds of spice heaven……….a secret of many kitchens but a mystery to some!!
|
No part of the content ( articles, photographs, recipes) of this blog may be reproduced without my written permission.Copyright © 2007-2010 Kitchenmishmash.blogspot.com. All rights reserved.
|
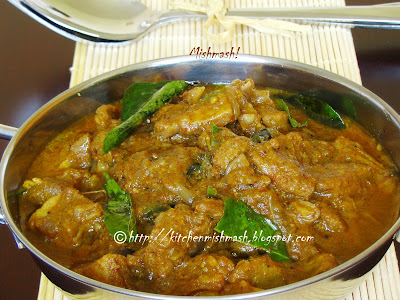
 Let me start with a request. After reading this post, some of you might think that I am touting my own horns here. Well, I cannot blame you if you conclude that way but honestly that is definitely not my intention here. As most of the things come under the category of “accidental” in my life, this one also is not an exception. I am just chronicling a magical moment in my personal-chef life!Well, some of my regular readers are aware of a particular situation in my life that I don’t compete with my mother in law to reproduce the magic from her kitchen, but I have tried to bring home the taste of the food cooked by some ‘lungi’ clad guy working in a small scale restaurant at the capital city of Kerala, as CJJ always fancies the food he tasted from restaurants like Chinnus, Ambalapattu and many others in that small junction at Kersavadasapuram. That said, I should also mention that I was trying to recreate a taste I haven’t experienced in my lifetime but my husband has. I was competing with a Pachakakkaran/local chef whose food I have never tasted in my life. But over the course of time, I realized that I was shooting in the darkness and slowly got over that ‘mysterious standard’ I was always aiming at.Life moved on……from blunders to some edible stuff, from average to good. But one day I guess my lucky stars slightly changed their jogging route and that day at lunch time, I heard the most unbelievable words from him, “mm…mm….ohhhh…ethu Ambalapatte beef curry polundu” meaning “it tastes like the beef curry at Ambalapattu”!!!!!!! Well, what I served was Mutton curry (!!) but what I heard at that moment was more than I could ever imagine. It was a bolt from the blue……I sat there in total disbelief…..I couldn’t take my eyes off of him……..I know I should have noted the time and date to mark the historical moment in my culinary adventures but I just couldn’t, not for 1-2 minutes but it took almost a week for me to verify the restaurant name again.!I hesitated to cook Mutton curry for more than a month after that…as I was doubtful if I would be able to recreate the same magic again and pressure was building on me whenever he opened the freezer and saw the meat packets. Finally, I gained some guts and rolled up my sleeves and made it again……and he relished……. and has now begun to admit that mutton is tastier than beef which was his weakness till then.My friends, please don’t think that this is some exotic dish that I whipped up from nowhere, using some mysterious spices. It is either because perhaps CJJ has begun to forget the taste from his bachelor days and his palate is getting used to my cooking or because some minor changes I made here and there was enough to tickle his taste memories and resembled something like the dish he always fancied. I don’t know!!!! I used my mother’s homemade masala powder to my Mutton Fry recipe, made some additions and deductions here and there and voila, I got my magical Mutton curry! With the food blogger sword hanging on my head all the time, I was wise enough to scribble the measurements the first time I cooked and here is how I made it. Btw, this is my magical Mutton curry, it may or may not be your magical one :)
Ingredients: (Approx.)
To Pressure cook:
- Around ½ to ¾ kg fresh mutton (goat meat) with bones, cubed and washed
- 4tbsp coriander powder
- 2 ½ tsp chilly powder
- ¼ tsp turmeric powder
- ½ tsp freshly crushed black pepper
- 2 to 4 Indian green chillies, slit opened lengthwise
- 2 tbsp ginger minced
- 2 tbsp garlic minced
- ½ cup big onion, thinly sliced (around one small size big onion)
- Salt to taste
- 1 cup water
To Sauté:
- ¾ cup big onions, thinly sliced
- ¾ cup small read pearl onions, thinly sliced
- 2 Indian green chillies, slit opened lengthwise
- 2 tsp Homemade Masala Powder/Garam Masala
- 2 -3 sprigs of curry leaves
- Salt to taste
- 3 tbsp coconut oil
Directions:
- Marinate the cubed pieces of meat with everything listed under “pressure cook”, except water for about 15-20 minutes and then pour water and pressure cook until meat is cooked well.
- In a large sauce pot, heat the coconut oil and sauté thinly sliced small onions, big onions and green chillies , in low flame, until it starts to turn transparent. Tear off half of the curry leaves and add to this. Now, add the pressure cooked meat, along with gravy produced and stir well; cook covered, in medium heat and bring to a boil. Now add the homemade masala powder (keep a pinch or two aside for the final sprinkling) and stir well with the curried meat. Reduce heat and let it cook till the gravy starts to thicken a bit. Now do a taste-test and adjust the salt. Just two minutes before turning off the heat, add some more curry leaves and sprinkle a pinch or two of masala powder, kept aside earlier which leaves the dish with a wonderful aroma of fresh curry leaves and spices. Turn off the stove when the gravy is thick enough. Let it rest for 30-40 minutes before serving as it takes time for all the spices and masala to come together.
- Serve warm with rice or Palappam (Laced pancakes), chappathi or porotta (Indian flat breads). This dish attains its real flavour after a couple of hours from cooking and tastes the best, the next day!!
Related Posts
I will post the Masala powder/Garam Masala recipe within 2-3 days…so if someone is planning to try this dish, please wait till I post the spice mix recipe.
Luv
Shn
|
No part of the content ( articles, photographs, recipes) of this blog may be reproduced without my written permission.Copyright © 2007-2010 Kitchenmishmash.blogspot.com. All rights reserved.
|
 Food evokes memories ………the smell wafting though the air and flavours lingering on the palate is powerful enough to glide us through the long forgotten days of childhood and in my case, sometimes even a mere mention of a particular food, takes me back to those days that has begun to fade away from my little brain. That is exactly what happened when Mathew wrote “ uppu itta kanjivellam is a favourite drink of mine..:-)”, as part of his comment for my post on Kanji Pidi. While reading that comment, I did not have the slightest clue that I would end up writing a post on Kanjivellam which is nothing but the rice stock you get while cooking rice. When I read that comment, my first reaction was “ewww…” as I always associated it with those days when I was down with fever and vomiting……. I remember my mother giving me a glass of the same and asking me to take small gulps every now and then, after a series of my throwing up into that red plastic bucket, kept near the cot!! I remember my father massaging my hands and legs and me swallowing it like some poison as it was unbelievably bland and my requests for flavoring it with some ghee or pickle was denied ruthlessly because of high temperature and stomach upset!! Kanjivellam flavored with a dash of salt was our indigenous home remedy to cure stomach upsets, prevent dehydration of the body and regain physical strength. Though I got absorbed in my daily routine, at the back of my mind this thread linking back to my memory lane, was going on in a loop. As the habit goes, knowingly or unknowingly I started plowing through my memory fields which opened up a deluge of images that came flashing back to my mind. I saw our maid, Omakutti Chechi, asking my mother for that hot kanjivellam, just drained from the Kanjikalam, rice cooker before she left for my uncle’s house….it was a sort of energy drink for her. It was the same case with the worker Chothi, whom my father appointed every year to clean up our yard after the monsoons……..a hot bowl of Kanjivellam fetched him energy to dig the yard with a shovel for a couple of hours. At this juncture of my thoughts, I shared what was going on in my head with CJJ and I saw his face lit up with a smile at the mere mention of “ uppitta kanjivellam” aka salted rice stock and he added how the field workers in their estate knocked at the back door of their kitchen asking, “ Chechee…..kurachu kanji vellam kitto…?“ meaning, “ Ma’m …can we get some rice stock? " !!!! That’s when it struck me how this humble ordinary homely drink is woven into the lives of a Malayalee …..and I knew it was time for me to bring Kanjivellam into the limelight :) Kanjivellam is not just an energy drink or a simple home remedy, it turns out to be our traditional alternative to modern shampoos. Yes, it was also used for hair care!!! I remember, in my early childhood, before I gained the courage to buy that blue bottle of Clinic Plus Shampoo, our hair wash on weekends included ceremonious soaking of a crushed and dried variety of herb called, ‘ enja’ in Kanjivellam and later mixed with another leafy herb called, ‘ vellilathaali’ as an organic alternative to shampoo. My maternal grandmother soaked ‘ Pappadam’, Kerala wafers in ‘ Kanjivellam’ to wash her hair.....it was used to make the hair more stronger and shinier... So I would call this as Kerala’s ‘organic shampoo’ :) This is again Kerala’s indigenous yet clever discovery for wrinkle –free cotton ‘ Mundu’ before spray starch and powdered starch made its entry into the market. Washed clothes got a quick drench in Kanjivellam diluted with water and then hung on ropes to sun-dry and later ironed to get wrinkle free clothes and a crisp finish! This might sound strange to some but if you go to a small town or village in Kerala, you will see men using Kanjivellam for mixing ‘ Pinnakku’, a type of cattle food to feed cows…..I remember my uncle doing the same before milking the cow every morning when I was there to collect cow's milk, just up from slumber, with puffy eyes and hair standing in the air like that of Fido-Dido of 7Up!! You might also come across people using one-day-old ‘ Kanjivellam’ as a plant food for Plantain or banana trees! So that was ‘ Kanjivellam’ playing the role of organic energy drink, home remedy, hair care, laundry starch, cattle food and plant food! :) If you find this whole post silly, blame it on Mathew…he is the one who fired up my dead memory cells :) On a serious note, Thanks pal…..you did help me recollect some of the images I haven’t thought about in almost a decade! Moral of the story – be careful while leaving comments in this blog, consequences can be as dangerous as this post :) Luv Shn
|
No part of the content ( articles, photographs, recipes) of this blog may be reproduced without my written permission.Copyright © 2007-2010 Kitchenmishmash.blogspot.com. All rights reserved.
|
|
|
|
|


 All text and Photographs are copyright protected.
Copyright © 2007-2010
Kitchenmishmash.blogspot.com. All rights reserved.
All text and Photographs are copyright protected.
Copyright © 2007-2010
Kitchenmishmash.blogspot.com. All rights reserved.