|
|
  Hailing from God’s own country, CJJ and myself are God’s own kids brought up in two different corners of the same state and hence the differences in usage of certain phrases or names of objects or food and the local slangs, used to sound weird and strange and at the same time, it used to bring smiles on our faces, especially in those days when we were getting to know each other and by the time we presented our marriage proposal to our families, we had become quite fluent in each other’s vocabularies. Indeed, the real fun started after marriage, when my mother got an opportunity to pamper her son-in-law. My mother being a 100% central Kerala product was not at all familiar with the phrases and words CJJ used and it was more or less the same case with CJJ too. Real fun used to happen at the dining table. Since my mother knows that CJJ loves her cooking, she used to whip up a huge spread, with all his favourite dishes and then once we start sharing the food, we saw ourselves breaking into laughter as these two start uttering the names of the dish or the ingredient which would not be familiar to the other. For instance, “kodappan” is the local name for banana-flower in our area but CJJ was familiar with the name, “koombu” and used to find the other name quite hilarious. Similarly, Stew is also known as “Eshtu” in many parts of Kerala, especially on the central regions but somehow CJJ has not been in acceptance of that, so he used to tease my mother and tried to correct her. Next time my mother served the same dish, she used to deliberately use the same name, ”Eshtu” , just to see him doing that “correction-speech” again ; somehow she still finds the whole thing amusing and never misses an opportunity to say “Eshtu” and make him start all over again :)
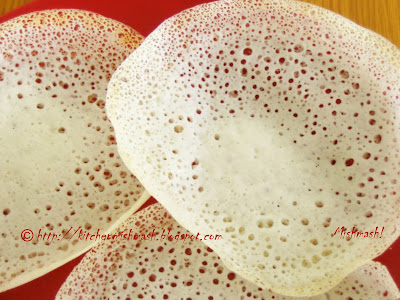
"Eshtu" aka Stew is traditionally served with Palappam ( Kerala’s laced rice pancakes). Generally carnivores like us don’t prefer the vegetarian version of many of the traditional delicacies but Potato Stew is an exception. It is as good as its opponents like Beef Stew or Chicken Stew or Mutton Stew and the taste and charm of this traditional favorite lies in its simplicity. Cooked potatoes stewed in rich coconut milk and flavored with whole spices is a treat on its own and this is one dish that I prepare confidently whenever we have some vegetarian friends coming home for food and I don’t remember an instance where our friends have left without asking for the recipe or atleast the method of cooking. So here we go:

Ingredients:
- 2 large potatoes
- 3 medium size big onions, thinly sliced (around 3 cups)
- 6-8 Indian green chillies, slit open lengthwise
- 1 small piece of garlic, thinly sliced
- A small piece of ginger ( 1 ½ to 2 inch piece)
- 2 sprigs of curry leaves
- 4-6 small pieces of carrots (Optional)*
- 3-4 small ½ inch pieces of cinnamon
- 3 cloves
- 3 cardamoms
- 2 bay leaves
- 1 ½ cups thin coconut milk/Radaampaal
- ½ cup thick coconut milk/Thanipaal
- 2 tbsp oil, preferably coconut oil.
- Salt to taste
Directions:
- Wash and clean the potatoes thoroughly and cut them into big cubes; pressure cook or microwave the potatoes in enough water with salt, until cooked well. When warm enough to touch, peel off the skin from the potatoes.
- Heat oil, throw in the whole spices like cloves, cinnamon, cardamom and bay leaves and let it fry in oil for 30 seconds. Add the thinly sliced big onions, ginger ,garlic and green chillies and cook until they turn soft and transparent. To this add the cooked potatoes and halve each of those cubes with the back of a wooden spoon and mash a portion of the halved ones. (Note: The cubes should not be mashed overly; they should still remain as pieces and at the same time a small portion should be mashed lightly as this adds thickness to the stew). Add the carrot pieces and combine everything well. Add thin coconut milk and salt and let it cook covered in low heat, for around 10-15 minutes. Now add the thick coconut milk and bring it to a boil and immediately reduce the heat, cook uncovered in low heat, until it reaches a creamy and thick stew consistency. Just before turning off the stove, add the curry leaves for the flavour and fragrance and stir well.
- To Serve: Though Appam and Stew is a match made in heaven, Stew served with white bread also makes a great pair.
Notes: * Adding carrot is purely optional; it’s my mother’s suggestion to bring in some colours in the stew and hence make sure that you use very few pieces without adding more carrot flavour to the potato stew. Stew/Eshtu prepared in fresh coconut milk tastes better but I generally use canned coconut milk for the ease of cooking and they taste good. If you are using canned coconut milk, do add water to dilute it, even if you are preparing thick coconut milk. Also I prefer using golden big onions, rather than the red ones; it's a personal choice.
Update: You may try this dish with Paalappam.
UPDATE : More on regional variations and local food habits HERE & HERE.
Luv
Shn
|
No part of the content ( articles, photographs, recipes) of this blog may be reproduced without my written permission.Copyright © 2007-2010 Kitchenmishmash.blogspot.com. All rights reserved.
|
 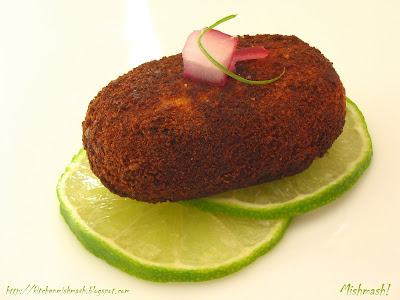 Growing up in a carnivorous family, meat cutlets were a part of our menu ever since I can remember. I remember both my mother and grandma start the preparations immediately after lunch, allotting one full afternoon, chopping the onions, getting the cooked meat minced and mashing the boiled potatoes without even a small lump, and then patting each of the meat balls again and again until they get firm cutlets. And I have burnt my tongue umpteen times while trying to gobble up those crispy brown beauties as this has been my favourite snack ever since I tasted it the first time, with some “Challas” (pickled onions in vinegar or fresh lemon juice). Something which I cannot resist and something which always tells me “eat me, pleeeaaaase” till the plate is empty, leaving me with an embarrassing smile in front of my host!! I blame it on these brown beauties, none can just stop with 1 or 2, one needs atleast half a dozen, to really get the taste of the cutlets , to get a feel of satisfaction of relishing them. Perhaps cutlet is the first appetizer that comes to the mind of menu planner, if he/she is from Kerala when a dinner party is announced ………A marriage reception is organized and cutlet, vegetarian or non-vegetarian, is first in the list of starter menu………. Friends coming home on short notice, and then you see someone from the family heading towards the bakery to catch hold of some cutlet or meat puffs. …..After a late evening class, going to the bakery nearby the college to grab some cutlets and hot cup of tea or a fresh lemon juice is something most of us have done while studying...... and still, if someone asks me about my favourite snack, it is meat cutlet forever :)
Ingredients: (Approx.) (Yields around 18-20 cutlets)
- 2 ½ cup cooked and minced chicken/beef, loosely filled
- 1 large big onion finely chopped
- 1 tbsp ginger minced
- ½ tsp garlic minced
- 1 tbsp green chillies minced (around 4-5 nos)
- ½ tbsp curry leaves finely chopped
- ½ cup boiled and mashed potato (1 medium potato)
- 1 ½ tsp freshly crushed pepper powder
- ¾ - 1 tsp garam masala
- Salt to taste
- 1 egg beaten
- 1 cup bread crumbs or powdered rusk
- 1 tbsp oil + more for shallow frying.

Directions:
- Heat 1 tbsp oil in a shallow pan, and sauté finely chopped onion and when it turns transparent, add minced ginger, garlic, green chillies and curry leaves and cook until everything is soft, in low flame, without burning any of the ingredients. Add pepper powder and mix well; add garam masala and combine everything together, adding a tinge of salt. Now add the minced meat to this mixture and stir well and thoroughly combine the minced meat with the mixture. Next add the boiled and mashed potatoes and blend well and adjust the salt and if you think, you require more spice, add one or two pinch of pepper powder and masala and mix well and turn off the stove. (Note: For the minced meat, I pressure-cook cubed chicken breast or beef with a simple marinade of salt, pepper powder, a couple of green chillies, ginger and garlic and when cooked and cool enough, mince them in a food processor. For the mashed potatoes, boil and cook the potatoes until they are soft and mash them with a fork.)
- When the mixture is cool enough to touch, divide the mixture into small elongated balls and shape them into a round or oval shapes, patting gently with a flat side of the knife, from all sides of the meat balls, until all the cracks that form in between are sealed well.
- Keep a bowl of bread crumbs and a bowl with beaten egg ready. Dip each of them in beaten egg and then roll them in bread crumbs, coating all the sides evenly. Do this one by one. Once more pat them with the flat side of the knife and remove excess bread crumbs and make them firm.
- Heat oil for frying; when the oil is hot, shallow fry the cutlets, in low-medium heat, until they turn brown as in the picture.
- To serve: Serve warm with ketchup or “challas”. To make challas, chop some fresh big onions and squeeze fresh lemon juice to it and sprinkle with some salt.
NOTE : Making a meat cutlet is a method one masters over the course of time. Even if you follow the recipe thoroughly, sometimes you will be shocked to see your cutlets falling apart or breaking while frying. This happens mainly when the meat and mashed potato is not in the right proportion or when they are not at all moist. Sometimes it could be because of the variety of potato used too; some are overly moist when mashing which causes problem while frying the cutlet. If your mixture or meat balls are too moist and not holding the shape, add some bread crumbs which will help in shaping them. Besides, there should not be any lumps in the mashed potato. Feel free to use your hands if it is necessary to break them. So, even if it is not 100% successful at the first time, this is something you can perfect, if you can figure out the basic problem. Meat cutlets can be made in advance for the party/dinner and refrigerate them or freeze them if it is not going to be used for the next 2 days and when you want to use it, thaw them in the room temperature and fry them just before serving; whether to shallow or deep fry is one’s discretion. I do not like deep fried cutlets, soaked up in oil and hence I like to shallow fry them.
Meet meat Cutlet's cousin Meat Rolls in White sauce.
Luv
Shn
|
No part of the content ( articles, photographs, recipes) of this blog may be reproduced without my written permission.Copyright © 2007-2010 Kitchenmishmash.blogspot.com. All rights reserved.
|
Sometimes we tend to romanticize a place a lot and it could be because of all the reading we have done or all those documentaries we have seen or it could be because of the food we have tasted or the people we have interacted with. I have been building up such a heightened image of Kuttanadu, “the rice bowl of Kerala” through some of my posts and if you are a regular here, perhaps you already know that it is mainly because I have never been to this place, blessed with natural beauty and known for it simple people and CJJ has the habit of waxing eloquently about its scenic beauty, calm and quiet surroundings and ofcourse the fabulous food he has tasted from his grandma. Today when we were having our lunch together, I pulled up the topic of Kuttanadu, clearing my doubts as to how they used to visit their maternal home, traversing through those narrow canals in small boats, how the private boat-jetty was used, how the houses were built behind those thin stretches of pavement, built with clay and mud from the canal and so on. He started explaining with a smile on his face, telling me stories and anecdotes from his childhood and teens but slowly I saw him getting wrapped by the clouds of nostalgia. He mirrored some of those cherished moments of his childhood when they used to visit the maternal house traveling 3-4 hours in a public transport bus and then taking the private boat from the jetty and along with his two brothers, climbing on to the top deck of the boat, under the strict supervision of their father….and when they arrived at the village, in their well pressed flashy shorts and T-shirts, wearing black or canvas shoes, CJJ still remembers ,the natural inquisitiveness on the face of the villagers wondering where these “Pattanathile kuttikal” ( city kids) were headed to or to which house they belonged.
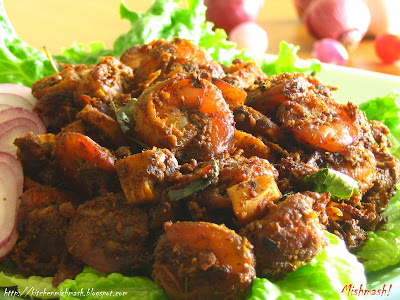
During their week long vacation, they made a visit to their paternal house as well and he remembers how they used to play cricket along with their distant cousins in their spacious backyard and those days when they used to go for hunting, with their uncles and coming back with 10-15 birds from crane family and grandma making her signature dish, “Mundi” (from crane family) Roast and all of them relishing the peppery, crispy and roasted bird. Though as kids their main duty was to hold the torch light, the adventurous days of the childhood still holds a special place in his mind. And if it was a Sunday, they used to go to the nearby church, starting 30 minutes early, though it was only 10 minutes walk, so they had time for a casual chit-chat with the locals on the way; and in the evening, his uncles used to take them to the school ground to watch football matches between local clubs and again the kids enjoyed all the attention as the villagers would be curious to see the not-so-familiar kids around. When CJJ started working, he still used to visit his maternal house once in a while and those traveling with him in the boat would be staring at him as he would be in his jean and trendy shoes and carrying a backpack which was again another unfamiliar sight for the villagers and enough to give them an impression that he was a “varathan”, meaning an outsider and then one of them would ask him, “Mon, evidutheya?” meaning “ Honey, Which family are you from ?” and the moment he told them their family name, that triggered another set of enquiries about his parents and their well-being as everyone know each other and that’s the beauty of this village . One funny incident that’s still tickling CJJ’s memories is his visit during his +2 days and this is how he describes the incident,”….. I was tagging along my father to his ancestral home and I was wearing my ankle shoe which was the IN-style those days, and on the way, there was this pavement work going on with mud taken from the canal. Normally people remove their footwear and walk barefoot. But coming from a city and wearing trendy clothes, my pride didn’t allow me to do so. So by the time we reached home, my shoes were covered with mud, a thick 2 inch layer of heavy mud. I learned the lesson the hard way and on the way back, I walked barefoot :)…It took me couple of days to clean my shoes :) “.Do you have any idea how I feel when I get mails from my brother-in-law, R with photographs capturing the lush greenery of this place, supplementing CJJ’s stories?? And that’s one of those days, I change my tone of gratefulness, for giving a romantic house-boat ride in the backwaters, to one of complaint, for not taking me to Kainakary, the village where his grandma resides and in his defense, he always has the excuse that the house was locked that day and grandma was not there!! Anyway, I thought it would be a good idea to let you have a sneak-peak into the simplicity I keep talking about, before getting into the recipe. These are some of the pictures R sent me, from his last trip to Kuttanadu.Click on the picture to start your slide show Chemmeen/Prawns Roast is another Kuttanadan recipe I learned from CJJ’s grandma. In the initial years of my stay here in US of A, I never used to cook prawns much for the simple reason that it did not taste the same like the ones we used to have in Kerala. But ever since I tried this concoction, I am a convert. I generally don’t do a taste-test while cooking, except towards the end to check if the salt is right as I don’t prefer to get used to the taste before it comes to the table but trust me, when I prepare this particular dish, I love to do sampling as the smell is quite irresistible and I keep nibbling them until a good quantity is missing from the pan! CJJ was not a prawn lover until he tried this delicacy and these days I see him walking to the kitchen and taking small bites even before it reaches the table :) This is a hot and spicy seafood preparation, spiced up with the aroma of fennel seeds and pungent black peppercorns, cooked along with small onions which has a distinct taste and wonderful aroma of coconut oil and the enticing fragrance of the curry leaves. I prefer to have this dish with a bowl of warm rice without any other dishes, not to dilute the taste of the dish:) A MUST –TRY for prawn lovers!!

Ingredients:
- 1 lb (approx. ½ kg) prawns or shrimp peeled, deveined and washed thoroughly
- 1 cup red small onions thinly sliced
- ¼ cup garlic minced
- 1- 1 ½ tbsp ginger minced
- 4 green chillies split lengthwise
- 2-3 sprigs of fresh curry leaves
- 1/3 cup small coconut slices/’Thengakothu’
- 1 piece ‘kudam-puli’/Gamboge
- Masala powder (Recipe follows)
- 1 ½ tbsp coriander powder
- 2 tsp red chilly powder
- ¼ tsp +1/4 tsp turmeric powder
- 1 tbsp freshly squeezed lemon juice
- Salt to taste
- 2 tbsp + 1tbsp coconut oil
To make the Masala Powder: (For 1 lb prawns)
- 1 tbsp fennel seeds/’Perinjeerakam’
- ½ tbsp black peppercorns
- 4-5 small ½ inch cinnamon sticks
- 1 clove
- 1 cardamom
Directions:
- Grind and powder the spices, mentioned to make the masala powder. Make a marinade with this masala powder, turmeric, salt and lemon juice and apply it thoroughly on the cleaned prawns, using your hands and leave it in room temperature for around 20 minutes. Soak the kudam-puli in some water to make it soft.
- In the meantime, chop the red small onions, ginger and garlic.
- Heat oil in a big shallow pan , sauté the small onions until they turn pale in low flame; add minced garlic, ginger and green chillies cook until everything turns transparent, At this stage, add turmeric powder, red chilly powder and coriander powder and stir continuously until the raw smell goes, making sure that you don’t burn your onions or spice powders. Now add the coconut slices (coconut slices should be smaller than the prawns) and 2 sprigs of curry leaves and combine well with the base mixture and then add the marinated prawns to this; take out the leftover masala from the bowl by adding a couple of tablespoons of water and pour it to the pan and also the softened kudam-puli (without water) and cook covered, in medium heat, until the prawns changes its colour and is almost cooked. Do not add water to cook the prawns. Once the prawns are almost cooked, remove the lid and roast them, in low flame for 10-15 minutes, until it reaches a brown colour, as in the picture, and fully dried up. Do a taste –test in between and adjust the salt, if needed. Just two minutes before turning off the heat, make a well in the centre of the mixture and add 1 tbsp coconut oil and a sprig of curry leaves and coat the entire dish well with this oil and herb; do not omit this stage of cooking as it really helps the dish to attain a wonderful aroma of the coconut oil and fresh fragrance of the curry leaves.
- Serve warm with rice or chappathi (Indian bread). This dish attains its real flavour after a couple of hours from cooking and tastes the best, the nexy day!!
Note: This Chemmeen/Prawns Roast is a spicy dish and if you are used to medium heat, you may reduce the amount of chilly powder. Please do not substitute small onions with big onions for convenience sake, as it completely changes the taste of the dish. It might be time consuming to clean up and slice the small onions but the taste it produces is worth the effort and time. Some non-Keralites might be hesitant to use coconut oil; yes, you are free to use your preferred oil but I suggest using coconut oil, to all my fellow Keralites, as the taste this particular oil gives is quite unique and very significant in this preparation, for its authentic taste. If you do not have Kudam-puli in your pantry, you may skip it as, in this preparation, it is added mainly to speed up the cooking as well as for easy digestion.
Other Kuttanadan Recipes from this blog:
Other Chemmeen/Prawn recipe from this blog:
Luv
Shn
|
No part of the content ( articles, photographs, recipes) of this blog may be reproduced without my written permission.Copyright © 2007-2010 Kitchenmishmash.blogspot.com. All rights reserved.
|
  Have you ever been in a situation where you learn that someone close to you is celebrating a special day in his/her life and then you make plans to prepare something to give them a sweet surprise… you wait for the day and finally the big day arrives….you roll up the sleeves and knot the apron and wear your chef hat and start whipping up and just when you are halfway through the whole project, your spouse calls up frantically, asking for help , to tag him along to somewhere outside to run some important errands………then you make a treaty with your husband, to drop you back in an hour and throw the whole thing into the refrigerator and tries to get into a decent outfit and leave the house ……and then you get back home just half an hour before you wish to leave for the gathering….. you hysterically run around the place, trying to dress up the whole thing , trying to finish the project as though you are under a time bomb .......grab your tools and accessories, forgetting the fact that your body is not as flexible as the trapeze artist from circus, only to end up with a sprain and pain on your back…….you roll on the floor crying for help, your hubby dear rushes to the place, trying to lift you up, though trying his maximum to control the laughter , seeing your funny facial expressions……finally you try to bring your body in control…..starts styling up the piece of food, only to come to the stark realization that it’s all messed up….try to do a make-over but more mess and finally come up with some last minute damage control techniques and ask your hubby, to receive a confidence boosting comment, ”how does it look….is it ok?” Mr. Husband looks at the beauty you have made, analyses from all the sides and corners and speaks out the unthinkable,” hmm…something is missing….an incomplete feeling…” ….clock is still ticking…….convincing talks go on between Mr & Mrs…..finally you notice that only 5 minutes is left before you pack up and leave the place…...so the selfish blogger in you suddenly pops up its head and compels you to ask your husband, to click some snaps, meanwhile you get ready to go, to meet your friend, and at the end of the day you see your friend’s face brightening up with full of surprise and smiles , eyes showing all that joy and happiness and grabbing you to give a hug….Have you ever been in such a situation, being part of all that happiness ???Well, that’s pretty much the story behind this cake!! This was made for an elderly friend of mine, D, who was turning 81 last month, whom I got lucky to meet early this spring and she touched my heart and left her handprints, sharing the story of her life and passing a bit of her passion too. D is a cancer survivor; the disease damaged her ability to speak normally and chew properly and to worsen her burden, she also suffers from arthritis and yet she continues her passion in life and earns her livelihood and drives around on her own, without depending anyone and more importantly without complaining about her plight!! Directly or indirectly, she helped me look at life with more hope and positive thoughts…….taught me what independence and self sufficiency really mean……taught me what passions mean to one. Now when I get a minor toothache and am forced to chew with one side, I think of this brave strong woman. Honestly, standing there, looking at the surprise and happiness on D’s face that day, really filled my heart!Ingredients for Yellow Cake (Makes two 8” inch cakes)
(Recipe Source: “Wedding Cakes You Can Make” by “Dede Wilson”) - 2 ¼ cups cake flour
- 1tbsp baking powder
- ¼ tsp salt
- ¾ cup (1 ½ sticks) unsalted butter at room temperature
- ¾ cup sugar
- ¾ tsp vanilla extract
- 3 large eggs at room temperature
- ¾ cup whole milk, at room temperature
Directions: - Preheat the oven to 350F. Prepare cake pan by lining the bottoms with parchment paper and grease the sides and sprinkle lightly with flour.
- Sift together the flour, baking powder and salt; Set aside.
- Beat the butter until creamy, about 2 minutes and add sugar and beat until very light and fluffy, about 3 minutes ; scrape down the bowl once or twice and then continue beating.
- Beat in the eggs one at a time, allowing each eggs to absorb fully with the mixture; scrape down the bowl a couple of times.
- Add the flour mixture in 4 additions, alternatively with the milk and flour, beginning and ending with the flour mixture and beat until smooth on low –medium speed after each addition.
- Divide the batter evenly into the prepared pan and level the tops with a spatula. Bake for about 23 minutes or until a toothpick inserted shows a few moist crumbs or the sides of the cake have begum to come away from the sides of the pan, showing a very light golden colour. Cool on racks in pans for 8 minutes before unmoulding.
Buttercream Recipe(Source: Recipe By Tami Smith from www.baking911.com.Click on the link to go to the page for the recipe.)
Note: I halved the original recipe of Tami Smith, to reduce the quantity, so as to avoid refrigerating the leftover and it yields the right quantity for this cake.
Ingredients for Praline - 1 cup granulated sugar
- 1 cup dry toasted almonds or cashew nuts
- 1 tbsp water
Direction: - Prepare caramel by heating and melting sugar along with water, specified in the ingredient list, until they turn medium brown. Keep swirling the pan but do not stir. When sugar is completely melted and bubbles start coming up and if it has reached the colour you want, turn off the stove and add the dry toasted nuts to it, and pour them onto to a non-stick aluminum foil or a lightly oil coated aluminum foil sheet, placed on a cookie sheet and let it set. While pouring the caramel coated nuts, make sure that a thick layer is not created. When completely dry, crush the caramel coated nut sheet using a rolling pin and then powder them in a food processor or in the smallest jar of a mixer/blender. (Note: Hot caramel can create serious burns, so make sure that you play safe and kids are not around while preparing it. The taste of the caramel depends mainly on the intensity of the colour. If the caramel turns too dark brown, then it will be quite bitter and it is better not to use that batch for this particular cake. Target for a medium brown colour.)
Moistening syrup - ¼ cup sugar
- ¼ cup water
- ¼ to ½ tsp vanilla extract or any flavored liquor or citrus juice
Directions: - Boil water in a pan and add sugar and let it boil until sugar melts. Turn off the stove. Just before assembling the cake, add vanilla essence and mix well to the syrup. (Note: Start adding the vanilla essence in small drops as it can be overpowering; add to taste. If you are using flavored liquor, use 1 tablespoon only, just before assembling the cake.)
Assembling the Cake: When the cakes are completely cool and ready to assemble, get the counter-top ready with baked cakes, buttercream, praline and moistening syrup. Place one round cake on a cake board or a plate and sprinkle about 3 tbsp moistening syrup. Pour some buttercream on top of that and make a thick layer of frosting. Sprinkle praline generously on top of the frosting and then place the second cake and wet the top cake with 3 tbsp moistening syrup. Cover the top and side of the cake with a thin layer of buttercream and chill for 2 hours. This is done mainly to lock the crumbs and to get a smooth surface when you apply the final coating. After this stage, apply the final thick later of buttercream and smoothen the top and sides of the cake quite well with a spatula and immediately after that cover the whole cake with powdered praline. Use your hands to apply the praline. Baking Schedule I followed: - Baked the cake one day in advance and when completely cool, double wrapped in a plastic wrap and kept at the room temperature.
- Made buttercream and praline just before assembling everything. You can make the buttercream in advance and refrigerate as well. If you made the frosting in advance make sure that you beat it vigorously with a heavy spoon before using to take away the spongy texture.
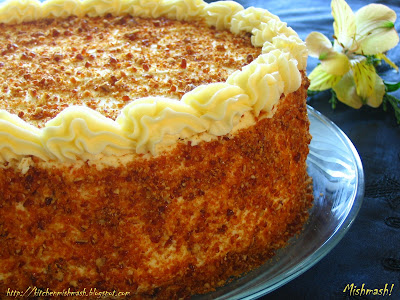
VERDICT: This has become one of our family favorites and I have received requests for the recipe after that get-together. I have made this cake twice and from my experience, one good slice is pretty impressive for any informal gathering or small birthday parties or tea-time get-togethers. The cake provides a balanced and neutral platform to absorb the flavour of the buttercream and praline and for the same reason, I feel it will go well with any other more predominant flavours. The yellow cake is soft but it is not extremely moist, like the ready-made cake mix. From my experience, I have noticed that the cake tends to become dry if you overcook the cake even 3 or 4 minutes more but moistening syrup will bring it back to its soft texture. Tamy’s buttercream recipe has been my loyal companion ever since I tried it. I am pretty happy with its consistency and taste. A bite into the soft cake feeling the crunchiness of the caramel and richness of the buttercream is quite satisfying.
Note: If you are not planning to layer the cake, then there is no need for moistening syrup, in which case make sure that cake is not baked more than the specified time.LuvShn
|
No part of the content ( articles, photographs, recipes) of this blog may be reproduced without my written permission.Copyright © 2007-2010 Kitchenmishmash.blogspot.com. All rights reserved.
|
A thoughtful gift from my reader!  The picture below is what Liz sent me for my reference.
 I know , some of us food bloggers, have a more or less same or similar morning routine……Waking up next to your loved one……..enjoying the sun rays coming through the window….embracing the new day with lots of hopes and plans…..sipping a hot cup of tea/coffee…..logging in the computer and checking the mails and comments, if any……and sometimes we feel a sense of satisfaction realizing that the recipe we blogged became someone else’s family favourite or sometimes we blush reading a nice sweet comment from one of our fellow bloggers or readers or sometimes a humorous comment lightens up our mood and spirit and very-very rarely a bad or disheartening comment that spoils your mood ! On one such day when I was enjoying my morning tea and CJJ was reading out a few comments I received the previous night, we came across a comment from someone named Liz who introduced herself and said how much she enjoyed my posts and the way she appreciated me, made my day!! She became a regular here and also showed her interest in sharing some of her family favourite recipes with me. In between she kept contacting me through the comment section clearing her doubts on the Blackforest Cake recipe. And one fine day, I received a mail from her with a picture of the Blackforest cake she made, based on the recipe I posted! If you are a food blogger, you can imagine how thrilled and excited I was receiving such a beautiful gift from one of my readers!! The story does not end there, she shared a couple of her family favorite recipes with me and Chicken Biryani was one among them. Liz is married to a Muslim family and when she shared her MIL’s classic Chicken Biryani, that was one more reason to try it out immediately for me who was already on top as this was the first time I received such a gift from one of my readers. I really felt good! Since this Muslim Style Chicken Biryani- Indian Rice flavored with spices and herbs in ghee & layered in curried meat, was a hit at our place, I thought of sharing it with you all. This was a gift for Mishmash! and now this is a gift for you all from Liz:)Before I go to the recipe writing, let me write something for my non-Indian readers and bloggers. The number of ingredients and the steps involved in cooking might stop you from trying this dish. Cooking Biryani is time consuming and process oriented but it is worth the effort. An easy route to enjoying a Biryani is probably hitting a good Indian restaurant in town, but to relish an authentic Indian Biryani, one has to go through all this process and it is worth the effort, not just because of the taste but the fact that if there is some leftovers, you can enjoy it the next day too and that’s when it tastes the best!! What you might taste from an Indian restaurant is nothing compared to the home cooked authentic Biryani. Recipe follows: Kerala Muslim Style Chicken Biryani: (Serves 4-5 adults)Ingredients for cooking rice:- 4 cups Basmati Rice (I use Tilda )
- 8 cups water or more depending on the cooking method*
- 10 Cloves
- 8 Cardamom pods
- 5-7 small ½” inch long Cinnamon sticks
- 1-2 bay leaves (Optional)
- A handful of fresh mint leaves
- 2 tsp freshly squeezed lemon juice
- Salt to taste
Ingredients for cooking Chicken:
Step 1: To shallow fry the Chicken:- 1- 1 ¼ kg (Approx. 2 ½ lb) cleaned & cut chicken pieces
- ½ tsp turmeric powder
- ¾ tsp red chilly powder
- ½ tsp garam masala
- Salt to taste
- Oil for shallow frying.
Step 2: To prepare the Chicken KurmaStep 2:A) For the spicy paste:- 1/3 cup sliced garlic (Approx. 50gms)
- 1/3 cup sliced ginger (Approx. 50gms)
- 20-26 Indian Green chillies (Approx. 75gms) (adjust as per your tolerance level)
Step 2:B)For Sautéing:- 2 tbsp ghee
- 4 cups thinly sliced big onions (Approx. 300 gms)
- 2 cups chopped or 2 big tomatoes
- ½ cup yoghurt
- ½ - 1 tsp red chilly powder
- 4 tsp coriander powder
- ¾ tsp turmeric powder
- 1/8 cup lightly packed chopped coriander leaves
- ¼ cup lightly packed chopped mint leaves
Step 2:C) For grinding the Masala Powder- 10 cloves
- 8 cardamom pods
- 3-4 small 1” inch long Cinnamon sticks
- ½ tsp Shajeera
- 1 tsp fennel seeds
- 6 mace
Step 2: D ) For the nutty paste (Soak in water for 30 mins before grinding)- 15 whole cashew nuts
- 5-10 almonds
- 1tbsp poppy seeds
For layering & garnishing:- ½ cup raisins (preferably golden raisins)
- ¼ - ½ cup cashew nuts
- 1 medium size big onion, thinly sliced
- 3tbsp + 2 -3 tbsp ghee + more ghee/ oil for frying onions
- 1/2 cup finely chopped fresh coriander leaves.
- A pinch of saffron
- 2tbsp warm milk
For the aromatic masala powder:- 2-3 cloves
- 2 cardamom pods
- 3-4 small ½ “ inch long cinnamon sticks
- 2 tbsp ghee
Directions:- Make the Chicken Kurma : To shallow fry the chicken first, make a marinade with turmeric powder, red chilly powder, garam masala and salt with some drops of water and apply it on the chicken pieces and leave it in the room temperature for 30 minutes and then shallow fry in oil, not more than 4 minutes, including both the sides. This phase of cooking is done mainly to enhance the taste of the chicken as well as to keep the pieces slightly firm in the cooking process to follow.
In a big cooking vessel, heat 2 tbsp ghee and sauté thinly sliced onions, until golden in colour; make a fine paste of ginger, garlic and green chillies (Step 2: A)and add the same to the cooked onions and sauté till they turn a nice brown colour (Note: This will fetch you a darker brown colour for the chicken Kurma, as shown in Liz’s picture. I did not cook till they turned dark brown and hence the lighter shade for my Kurma.) At this stage, add tomatoes and mix well; add chopped coriander leaves and mint leaves and combine well; add the ground Masala powder (Step 2: C), chilly powder, coriander powder and turmeric powder and mix well with all the ingredients and sauté, until the raw smell of the spices is gone, for a couple of minutes. This is base of the Chicken Kurma masala and it will be dark brown in colour. Once the raw smell is gone, add the shallow fried chicken and cook covered in medium heat. If the chicken was not shallow-fried for a longer time, then this stage will produce some water from the chicken, during the cooking time; but if the chicken is dry and there is no gravy at all, cook with very little water and salt. When the chicken is half-done, add the yoghurt and cook covered and when it is almost done, just before turning off the stove, add the nutty paste of nuts, almonds and poppy seeds (Note: Nuts, almonds and poppy seeds should be soaked in water for 30 mins before grinding them into a fine paste) and cook for a couple of minutes. Chicken should not be overcooked at all or it should not fall off the bones. The Kurma will be a thick, creamy and rich gravy. (Note: Adding the nutty paste will change the really dark brown colour of the chicken kurma to a lighter shade.)
- Cook the Rice:
Microwave Method:Wash Basmati rice well. In a microwave safe bowl, pour 8 cups of water, add rice and whole spices mentioned above, in the respective section, along with bay leaves and a handful of mint leaves and salt to taste and cook until the rice is just cooked. Since my microwave compatible bowl is not large enough to accommodate so much of rice and water, I halve the ingredients, i.e 2 cups of rice and 4 cups of water with half of the spices and herbs and microwave for 23 minutes. This way, you can make sure that no two grains stick to each other. Immediately after the microwave cooking, using a fork, gently separate the rice, so as not to get sticky and sprinkle 2 tsp fresh lemon juice. Please note that you should halve the quantity for lime juice too, if you are cooking the rice in two batches.
Stove-top Method: Liz follows stove top method for cooking rice and she does that in the old fashioned way where in a huge vessel is heated and when water is fully boiling, add the washed rice and whole spices and herbs and cook the rice uncovered, for 12-15 minutes. When the rice is cooked (do not overcook), drain the excess water immediately and sprinkle the fresh lemon juice.
- Prepare the garnish:
For the aromatic masala powder used in between the layers, heat 2tbsp ghee and fry the whole spices, mentioned in the respective section; and grind these into a fine powder. Save this ghee in a small bowl for later use.
Fried Nuts and raisins: In the same pan, add 3 tbsp ghee, fry the raisins, stirring continuously until they turn plump or look like golden grapes and keep them aside; fry the cashew nuts in the same oil, till they turn golden in colour and keep aside.
Fried caramelized onions: Add more ghee or oil to the same pan, to fry the thinly sliced onions till they become golden brown; at this stage sprinkling a pinch of sugar to the onion, while frying, to get a taste of nice caramelized onions is a good idea; remove the fried onions from the oil with a slotted spoon and let them drain on paper towels.
Saffron Milk: Heat 2 tbsp milk and a pinch of saffron
- Get your work-area ready for layering with Chicken Kurma, spices and herb flavored cooked rice, fried nuts, fried raisins, fried onions, saffron milk, ground aromatic masala powder and the leftover spice flavored ghee and some 2-3 tbsp fresh ghee and finely chopped fresh coriander leaves.
- Final layering: This Chicken Biryani can be prepared either in a conventional oven or through the Dum method. Click here, to get a better idea for the Dum Method. Choose your cooking method and depending on your choice, choose your cooking vessel. Grease your cooking dish generously with some ghee. Randomly place some chicken pieces along with gravy in the bottom of the dish; then spread some cooked rice, (do not stack); sprinkle a pinch of ground aromatic masala powder; some fried nuts, fried raisins, fried onions and finely chopped coriander leaves; sprinkle some spice flavored leftover ghee (the one used for frying the spices for making the aromatic masala powder) and also a few drops of saffron milk. Repeat this layering process 3 or 4 times, depending on the quantity of the rice and meat as well as the largeness of the vessel. Reserve some fried onions, nuts and raisins for final garnishing before serving.
- Final cooking:
Conventional Oven Method: Preheat the oven to 350F. Close the oven safe dish with aluminum foil and bake for 20-30 minutes.
Dum Method: Perfectly seal the lid with the dough and cook in low heat for 20-30 minutes.
- Serving: After the final cooking, keep the dish covered for minimum 30 minutes. Ideally, a window of 30 mins to 2 hours is suggested, to get a better taste, and for all the flavors to set in thoroughly. Place your individual serving platter; Just like you slice a cake, dig with a bigger serving spoon and transfer it to the serving platter; you should not mix the rice and meat; it’s already layered and hence just transfer it to the platter and garnish with some fried onions, nuts and raisins. Serve with Raitha (Coarsely chopped onions, tomatoes and cucumber mixed in yogurt and seasoned with a dash of salt and pepper), Indian pickle, Pappadam (Indian wafers) and a chilled Diet Coke or Pepsi :)
Cooking Schedule I Followed : - Cut and clean the chicken; marinate the chicken pieces.
- Chop the onions, cut the tomatoes peel and slice the garlic, ginger and green chilly, and chop the herbs.
- Make the spicy paste of green chilly, ginger and garlic
- Soak the cashew nuts, almonds, and poppy seeds
- Grind and powder the Masala powder
- Shallow fry the chicken
- Prepare the Nutty paste
- When half of the chicken is fried, start sautéing the veggies and make the base masala for the Chicken Kurma
- Prepare the chicken Kurma.
- While chicken is being cooked, wash and cook the rice with spices and herbs.
- Fry the whole spices in ghee and grind and powder them into aromatic masala powder and reserve the leftover ghee.
- Fry the nuts and raisins and onions
- Prepare the saffron milk.
- Get the work area ready.
- Final layering
- Final Cooking
 Verdict & Recommendation: When I finished preparing the Chicken Kurma, I was sure this is going to be a super hit in our place and when I finished cooking and served it , the first response was, ”Adipoli” meaning ”Excellent”!!. It has a nice aroma and the Chicken Kurma is medium spicy which gives a distinct character to the Biryani. The chicken Kurma on its own is very tasty and can be served with Nan or Roti (Indian breads). Though the rice preparation is different from the general method of washing and draining the rice and then roasting that in ghee along with whole spices, it does not reduce the look or taste of the flavored rice. I will be making this again on special occasions and to treat my friends and guests. Liz suggests one more method to make the look appealing; she suggests mixing some lemon juice with a pinch of turmeric powder or saffron and add it to ½ cup cooked rice and reserve and sprinkle this on the top layer to get some colour, as she has done in her picture. This dish taste better the next day but since we cannot serve one day old food to our guests, better to prepare it in the morning if guests are invited for dinner! The amount of ghee given in the recipe is my personal choice , one is free to use more than the noted measurements, it will only increase the aroma and taste. Verdict & Recommendation: When I finished preparing the Chicken Kurma, I was sure this is going to be a super hit in our place and when I finished cooking and served it , the first response was, ”Adipoli” meaning ”Excellent”!!. It has a nice aroma and the Chicken Kurma is medium spicy which gives a distinct character to the Biryani. The chicken Kurma on its own is very tasty and can be served with Nan or Roti (Indian breads). Though the rice preparation is different from the general method of washing and draining the rice and then roasting that in ghee along with whole spices, it does not reduce the look or taste of the flavored rice. I will be making this again on special occasions and to treat my friends and guests. Liz suggests one more method to make the look appealing; she suggests mixing some lemon juice with a pinch of turmeric powder or saffron and add it to ½ cup cooked rice and reserve and sprinkle this on the top layer to get some colour, as she has done in her picture. This dish taste better the next day but since we cannot serve one day old food to our guests, better to prepare it in the morning if guests are invited for dinner! The amount of ghee given in the recipe is my personal choice , one is free to use more than the noted measurements, it will only increase the aroma and taste.
I have thanked Liz enough already for this very sweet gesture of hers but it is ok if I tell this one more time, "Thank you, sweetie :) "
On another note, I thank all of you who dropped a comment checking on me and visited my blog the last one week. Thanks a lot for showing interest and I appreciate that a lot. Now that I am back, I will catch up with all of you in your blogs :)
Luv
Shn
|
No part of the content ( articles, photographs, recipes) of this blog may be reproduced without my written permission.Copyright © 2007-2010 Kitchenmishmash.blogspot.com. All rights reserved.
|
UPDATE : Meat Rolls "cooked" in White Sauce :)
  Sushmita Sen OR Aishwarya Rai?
Brad Pitt OR Matthew McConaughey?Halle Berry OR Scarlett Johansson?
Though some of us are very clear about our personal choices, it is complicated to really make a comparison between the two, isn’t it?
It’s same case with the Meat Cutlets (Indian meat croquettes) and the Meat Rolls cooked in white sauce!! Truly!! Though they look almost similar and can be deceptive to a great extent, both have a personality of their own…..….when meat cutlets are usually medium-spicy, meat rolls cooked in white sauce has a neutral taste for the reason that white sauce mellows down the flavour and heat of the spices and the boiled mashed egg gives a texture that is completely different from the meat-loaded cutlets. Someone who tries to associate the taste of the meat cutlet with the similar object in the plate will be thoroughly disappointed at the first bite itself. Hence I suggest you giving a proper orientation to your target audience before serving this appetizer/snack.
This recipe was passed on to me by my mother who perhaps is more excited about my blog than the owner itself. Sometimes I wish she could start a blog of her own and share her passion for cooking and her wonderful recipes!! She not only shares her recipes with me, sometime she also suggests how I should present or garnish a dish!! And she competes with CJJ in giving constructive criticism of my work. Trust me, there were times I was forced to cook and photograph the same dish again and again just because one of these critics thought the onions were not pale enough or the gravy does not have the right consistency or the right colour!! And my mother like all the loving mothers out there, has this blessing of sharing a recipe in their most preferred way, i.e, “…ohh, it’s very simple… you sauté ‘this’ and ‘that’……...add ‘a pinch of this’ and ‘a dash of that’......stir well, then again pour that and you ‘re all set!" !!!! Hey , she does not stop there, the dialogue continues, “….and I think this is really an interesting one for your blog….you may garnish by placing ‘this’ or ‘that’ on top.” !!! :-) Sometimes she watches the cookery shows aired in Malayalam Channels and notes down the recipes for me but expecting her to point out the proportions and measurements is still futile and this is one such recipe, from those shows, shared where she provided the basic framework for me to work with!
 Ingredients: (Makes about 7-9 rolls) - 2 tbsp butter
- 3 tsp All-purpose flour/maida
- ¼ cup milk
- ¾ tsp Garam masala + a pinch or two, if required
- ½ tsp Chilly powder
- ½ tsp Pepper powder + a pinch or two, if required
- ¼ cup finely chopped Cilantro/Coriander leaves
- 4-5 finely chopped small pearl red onions/shallots
- 2 or 2 ¼ cups cooked and minced chicken or beef
- 1 hardboiled egg mashed
- ¾ cup bread crumbs
- 1 egg beaten (or just the egg white)
- Salt to taste
- Oil for frying
Direction: - Make the White Sauce: In a hot pan, melt the butter, add all-purpose flour/maida and make a roux or stir until it thickens without any lumps and add milk to make the white sauce. (Note: You may remove the pan from stove to stir in the flour and milk.)
- In a low flame, add garam masala, chilly powder , pepper powder and coriander leaves to the white sauce and stir well; add finely chopped onions, mashed boiled egg and cooked minced meat and combine everything well. Do a taste-test here and adjust salt and if the spices are not enough for your palate, add a pinch or two of garam masala and pepper powder and turn of the stove. (Note: For the minced meat, I pressure-cook cubed chicken breast or beef with a simple marinade of salt, pepper powder, a couple of green chillies, ginger and garlic and when cooked and cool enough, mince them in a food processor).
- When the mixture is warm or cool enough to touch, divide the mixture into 7-9 balls and shape them into a tube, as the ones in picture or slightly bigger than that. If the mixture does not hold together, add some bread crumbs in very smaller quantity. (Note: I did not face any issues like that with the above measurements).
- Keep a bowl of bread crumbs and a bowl with beaten egg ready. Dip each of these meat tubes into beaten egg and then roll the tube in bread crumbs, making sure to coat all the sides evenly. Do this one by one. Do a final shaping of meat-rolls one more time, removing excess bread crumbs from the rolls. Shallow fry the meat rolls carefully in low-medium heat. Serve warm with ketchup or pickled onions. "Some" at my place feel that this taste better the next day :)
A good evening snack for your kids….a great appetizer for your dinner parties, especially kids parties…..and best for those who does not like to have spicy snacks! Wrap them in a Chappathi (Indian bread) or Tortilla or Pita Bread with some fresh veggies and there you go with your picnic lunch!! :)
Luv
Shn
|
No part of the content ( articles, photographs, recipes) of this blog may be reproduced without my written permission.Copyright © 2007-2010 Kitchenmishmash.blogspot.com. All rights reserved.
|
  Wondering if I am on a baking spree? Not exactly! It’s been a season for celebration, birthday and anniversary, and we have been indulging ourselves in some sweet luxuries. Baking cakes on special occasions has been a small sweet-tradition I have been following ever since I learnt to bake a cake properly. Hence when it was time for one such special occasion (I know…u can make out that from the design of this cake!), I asked CJJ what he wanted exactly and the answer came quickly,”Something very simple…some sponge cake…. Yellow-ish….white-ish type”. Baking an ordinary plain cake did not sound all that exhilarating to me….so to make it a bit more exciting, I gave him a very vulnerable choice to add orange zest and as expected, the answer was positive. Next thing I saw myself giving him another option, tickling his memories of a whipped cream covered Black Forest Cake which I made recently. Well, one thing led to the other and finally we ended up with a White Cake flavored with orange zest covered in whipped cream and topped with candied flowers and leaves, which did bring smiles on his face!I don’t know if there is one single recipe for White Cake flavored with orange zest covered in whipped cream and topped with candied flowers and leaves; this was something I customized to suit our palate which usually has a strong inclination towards some simple light cakes compared to heavy cakes covered in butter cream. Experts can make your own variations; beginners, you may stick to the basic cake recipe, with or without orange zest. Adding lemon zest is also a good idea.
White Cake with Orange Zest
(Recipe Source: “Wedding Cakes You Can Make” by “Dede Wilson”)
Ingredients:
- 1 ¾ cups cake flour
- 2 tsp baking powder
- ¼ tsp salt
- 3 large egg whites, at room temperature
- ¾ cup whole milk, at room temperature
- ½ cup (1 stick) unsalted butter, at room temperature
- ¾ cup sugar
- ½ tsp Vanilla extract (Original recipe suggests 1 tsp)
- 1 tbsp Orange zest (Not required if you want a plain basic white cake)
For the moistening Orange Syrup:
- ¼ cup water
- ¼ cup granulated sugar
- 1 tbsp Orange juice ( I used Tropicana)
For Filling and frosting:
- 2 cups heavy (double) cream
- 3tbsp Confectioners Sugar
- 1tbsp Orange Juice (I used Tropicana)
Direction:
- To Make the Cake: Preheat the oven to 350F. Prepare cake pan by lining the bottoms with parchment paper and grease the sides and sprinkle lightly with flour. Note: I used a single 8-inch heart shaped cake pan, and it was correct; the original recipe calls for two 6-inch round cake pans.
- Sift together the flour, baking powder and salt; Set aside.
- Whisk together the egg whites and milk in a small bowl and set aside.
- Beat the butter for about two minutes, until soft and creamy. Add the sugar gradually and beat until very light and fluffy, about 3 minutes. Scrape down the bowl once or twice and then add the vanilla and combine well.
- Add the flour mixture in 4 additions, alternately with the egg white + milk mixture, beginning and ending with the flour mixture and beat until smooth on low –medium speed after each addition.
- Pour the batter to the prepared pan and bake for 25 minutes until a toothpick/skewer comes with a few moist crumbs or none. The edges will be barely tinged with brown and will have begun to come away from the sides of the pan.
- Cool on racks in pans for 5 minutes and unmold directly onto racks and peel off the parchment paper and let it cool completely.
- To make the Orange syrup: In a small saucepan, stir together water and granulated sugar over low heat until the sugar dissolves and the mixture is hot. Turn off the stove and let it cool completely. Add the orange juice just before assembling the cake. Note: The moistening syrup can be made in advance but should not be flavored with orange juice until right before using.
- For Filling and frosting: Combine heavy cream, confectioners sugar and 1 tbsp Orange juice in a stainless steel or glass bowl and beat on medium-high speed, until it forms soft peaks. Note: I made the mistake of overbeating the cream which changes the texture of the whipped cream, so do not make the mistake I did.
- Assembling the cake: When completely cook and ready to assemble, split the cake horizontally using a serrated knife or a cake leveler. Brush 3 tbsp Orange syrup onto the top of each cake layer and spread about ¾ cup whipped cream evenly over the first cake layer. Now place the second cake layer and frost the entire cake, sides and tops, with the remaining whipped cream. Refrigerate for a couple of hours before serving. Note: To be on the safer side, I applied a very thin layer in the beginning to lock in all the crumbs and immediately after that final frosting was applied. If still few crumbs are visible, use a toothpick to remove those crumbs.
- Decorate: You can decorate your cake anyway you want; let me write down how I did it!! . I tried to create some “ripples” (Really?? Does it look like that?? ) on top by moving the spatula in a back and forth action. You can do this with a spoon too. It is difficult to achieve a smooth surface when you work with whipped cream, unlike butter cream. To create a simple, attractive and romantic look, I made some crystallized flowers and leaves and placed on one side. Before placing the flowers and leaves, pile up some whipped cream, wherever you wish to place the flowers, to gain some height and then arrange the flowers, to have a neat look. (HOW TO for Crystallized flowers follow.)

Crystallized flowers/Candied Flowers/Sugar Frosted Flowers.
(Source: “First Steps in Cake Decorating” by “Janice Murfitt”)
- 1 egg white
- 1 cup extra fine sugar (Not powdered)
- Fresh Flowers preferably EDIBLE flowers.
- Mint Leaves
- A Small Paintbrush – Food safe.
HOW TO: Make sure that the flowers you pick are edible ones and not a poisonous variety. Great care must be taken to ensure that no insecticides has been sprayed which means, flowers from your garden are the most preferred ones as you know your flowers for sure! Wash and dry the flowers without any bruises on petals. Whisk the egg white until frothy. With the paint brush, apply beaten egg white evenly over the petals on both sides. Holding the flower above another bowl, spoon some superfine sugar lightly over the flowers on both the sides. Gently shake off the excess and place them gently on a wire rack covered with paper towel. Frost the leaves also in the same way. It will take 1-2 days to dry completely. The flowers will have the best shape if allowed to dry upside down. Some edible flowers are roses, lilacs and violets. Browse for more options. This is also a great idea for decorating individual cupcakes. Check out Annita’s for a pictorial.
Baking Schedule I followed:
- Made the crystallized flowers 2 days in advance, so as to get them fully dried on the day of assembling and frosting the cake.
- Baked the cake one day in advance and when completely cool, double wrapped in a plastic wrap and kept at the room temperature.
- Made whipped cream just before assembling everything.
 Verdict: The White Cake, with a light and delicate taste, is best for tea time. It is soft and has a nice texture. When flavored with citric zest, it gives that extra kick to the cake and when frosted with whipped cream and sugar frosted flowers, it presents a simple, informal, lighthearted look and romantic touch to the occasion, if baked in a heart shape. The moistening syrup is not required if you are not planning to layer and frost the cake. The orange flavor is not overwhelming if you stick to the measurements. The lightness of the cream and the smell of the orange, with a soft and moist cake give a completely fresh and light feeling. Simple & Easy. An addition to my baking repertoire and a topper in CJJ’s favorites :) Verdict: The White Cake, with a light and delicate taste, is best for tea time. It is soft and has a nice texture. When flavored with citric zest, it gives that extra kick to the cake and when frosted with whipped cream and sugar frosted flowers, it presents a simple, informal, lighthearted look and romantic touch to the occasion, if baked in a heart shape. The moistening syrup is not required if you are not planning to layer and frost the cake. The orange flavor is not overwhelming if you stick to the measurements. The lightness of the cream and the smell of the orange, with a soft and moist cake give a completely fresh and light feeling. Simple & Easy. An addition to my baking repertoire and a topper in CJJ’s favorites :)
A good recipe…..some cool practical ideas……..a bit of patience……frost with tons of love and care…that’s all you need to bring surprise and smile on your loved ones’ face and make your special days sweet, simple and romantic ! :)
Luv
Shn
|
No part of the content ( articles, photographs, recipes) of this blog may be reproduced without my written permission.Copyright © 2007-2010 Kitchenmishmash.blogspot.com. All rights reserved.
|
|
|
|
|


 All text and Photographs are copyright protected.
Copyright © 2007-2010
Kitchenmishmash.blogspot.com. All rights reserved.
All text and Photographs are copyright protected.
Copyright © 2007-2010
Kitchenmishmash.blogspot.com. All rights reserved.