|
|

To start your Slide show , Click on the picture below.
 A couple of days back, I received a comment from someone saying that he/she is a regular reader of my blog. I felt very happy at the fact that I do have some regular readers and some ghost readers, though I started my blog hardly 2 ½ months back. But I dread the day when someone comes saying that I am a "prisoner of the past" as my rambling and musings occupy more space than my recipes and hence, better change the title from Mishmash! to Nostalgia! or as my dear friend LJ puts it Nosti ! ;-) So if someone is contemplating on the above-mentioned suggestion, then I have only one thing to say, I don’t mind being a prisoner of the past if the imprisonment is with some sweet memories :)
Whenever the festival season arrives, I get swallowed up in the whirlwinds of nostalgia and today was one such day, Vishu, a festival of Kerala and is considered beginning of a New Year even though it is not the first day in Malayalam Calendar. Last two days, I have been thinking about my childhood days and the picture of my grandfather’s house kept flashing in my mind as we used to be there during most of the festival season; A big house, our Tharavadu (ancestral home) in an extra-ordinary large plot with lots of coconut trees, mango trees, jackfruit trees and much more..In the front yard, there was a Jambakka tree and during the time of Vishu, the tree was illuminated with its own jambakka fruits, and the most splendid sight was that of the fully bloomed Kani Konna (Cassia Fistula/Indian laburnum), a golden yellow flower which is a must-have in the Vishu Kani, the most important ritual on a Vishu morning and it used to appear like a ‘golden shower’ as the Konnappoo ( flowers of Cassia Fistula) fell when the winds touched ‘em gently :)
My grandfather’s house had a couple of maids (Yes, that’s an Indian luxury!!) to help us in the outdoor chores and I remember how they used to clean up the yard and burn all the dry leaves and branches as the day before Vishu is called Sankranthi and cleaning up is part of the tradition. As kids, all our cousins used to be high spirited as we got new clothes during the festival time as well as got to burst the crackers and sometimes we started this one week in advance :) The night before the festival, my aunts made arrangements for preparing the Vishu kani, the most important ritual of Vishu, which literally means the first thing that you see or a good omen and it is based on the traditional belief that since Vishu marks the beginning of a new year, one is supposed to see good things which will bring prosperity and fortunes in the whole year. So my aunts used all the brass metal cleaning liquids and made the Uruli, a wide mouthed bell metal vessel shine like gold and then it was filled with grains and topped with traditional vegetables like a golden cucumber,mangoes, jackfruit, banana, pumpkin, a halved coconut containing oil and a wick to be lit in the morning, a mirror and some silver coins and gold ornaments on a traditional Kerala saree (as shown in the picture) and this was placed in front of a garlanded statue of Lord Krishna. Early morning on Vishu, one of my aunts would get up around 5 am to light up the lamp, to view the Kani, which is the abundance and prosperity of nature and then she used to wake up others in the household and led them blindfolded to the place where Kani was kept. Special instructions were given to all small kids not to open their eyes and have a sneak peak at the things around them :) And then followed the most luring tradition of the season, 'Vishu Kaineettam’ (a handsel) given by our grandfather and it used to be new shining silver coins. To be frank, we were a bunch of greedy kids and hence were interested in receiving some currency rather than coins and all those uncles and aunts who used to give currencies, used to be our favorite aunts & uncles ;-) We used to spend all that money for buying more crackers :)After seeing the Vishu Kani, for us kids it used to be fun time with crackers again and my mother and aunts used to hit the kitchen to prepare Sadya, a grand feast, a vegetarian meal served on a banana leaf. And I remember my father saying that when my grand mother was there, she used to prepare 'Vishu Katta and Manga Curry' ( A rice dish with Mango curry) for breakfast but I 've never tasted that and don't recollect anyone making it when we were kids. Anyway, the most interesting conversations and gossips took place at this time in and around kitchen..I still remember how two of my aunts sat on the floor and grated the coconut sitting on a 'Chirava', a wooden seat attached with serrated blade for scrapping the coconut, (the main ingredient in most of the dishes prepared for Sadya) and exchanging stories, a euphemism for gossiping, about relatives and marriage proposals and all related stories ..and two in the other corner chopping the vegetables....another pair at the kitchen doing the main cooking.....and there were some who used to be the motivators...Now one of you might be wondering how big our family is...indeed big enough for an army battalion! My father had 9-10 siblings and all their spouses and kids and these days a dozen grand kids too!! By noon, Sadya was made ready and I remember my father and uncles going into the backyard to cut the fresh banana leaves and in those days we were supposed to sit on the floor cross legged and eat; believe me, it is a fat man's as well as tall man's agony. I used to hate sitting on the floor cross legged as I could never enjoy the feast thoroughly; I used to get pain on my thighs. And when one was going through all that pain and discomfort, one of my aunts would pop up that most annoying question, whether the banana should be served on the extreme top-left or bottom-left of the banana leaf and then there followed an exchange of opinions. Now I know what is the reason behind all those discussions as there is a specific place for each of these dishes, starting with banana chips, pickles and so on. And the food used to be heavenly with two types of desserts. After the lunch time, there was generally a lump in the activities...some hit the most cozy rooms and curled up like snakes and snored like owls....some enjoyed a movie...some were still busy 'exchanging stories' !! For us kids, it was more crackers...more crackers...and more :)
Sigh !!!! Sitting in Uncle Tom’s land, at times I rewind my memories to my enriching childhood and get lost like this.....! And hey, apart from this festivals and feast, there is one more thing which is as heavenly as this, the pristine beauty of the backwaters of Kerala ! In this post, I have shared some of the snapshots from our trip at the backwaters of Alappuzha, Kerala..gliding along the backwaters in a Kettuvallom (houseboat) .......unwinding oneself enjoying the serene beauty of the nature...floating along the coconut and palm tree fringed narrow canals...paddy fields....the locals passing by in small country boats carrying vegetables and milk for sale...men diving into the waters searching for clams & mussels...taking an interim stop to buy fresh catch of Karimeen (pearl spots ) for the day’s meal and enjoying a bottle of fresh toddy (Local liquor) .......relishing the fresh meals prepared on board with local delicacies like Meen Pollichathu, Podimeen fry (small fish fried), Kakka Erachi (Clam/mussels fry)..etc..Let me tell you, ours was quite an amazing experience and I strongly recommend a backwater trip for anyone visiting Kerala. You can hire the boat for a whole day and night and the boats are the floating version of a typical Kerala house with fully furnished bedrooms and toilets, dining room, conference halls and decks with all the modern amenities. If a trip to Kerala is not in the cards, then please take a virtual tour through my slides :) For a list of 20 MUST Do’s in Kerala, Click here. Here’s a cyber Vishu Kani for all my readers and fellow bloggers; since mine was not a very traditional Kani, our friends R & R was generous enough to share a picture of their Kani for you all, so let me thank my friends too :)

And here’s the Sadya I prepared at home and hope you enjoy it the cyber way :)
We wish you all prosperous days ahead !
UPDATE: For Sadya recipes check out SADYA VIBHAVANGAL - Learn to make the traditional Kerala Feast- An Artist’s Edible Palette !
Luv
Shn
|
No part of the content ( articles, photographs, recipes) of this blog may be reproduced without my written permission.Copyright © 2007-2010 Kitchenmishmash.blogspot.com. All rights reserved.
|
Preparation of tapioca/cassava/Yucca root in a Kerala fast-food style!
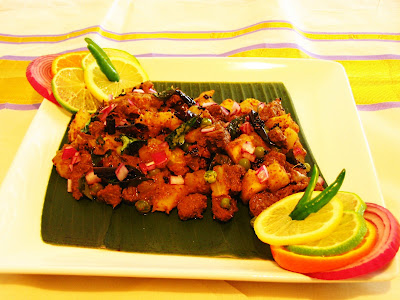  Thattukada, Kerala’s local version of fast-food joints, is a road side eatery and for any non-resident Keralite, it brings back lots of nostalgic memories and I see CJJ and his friends going all gaga over the "thattu" specials when they cherish their bachelor days. I have also had my share of "thattu" specials after pestering my father who used to give me a lecture on the hygienic and the quality of the food, whenever we were on our weekend shopping; but as a teenager, I could never resist the temptation of those ‘kappa’ and beef fry and the irresistible sight of the stacked up porottas (a multi-layered Indian flat bread). As I already mentioned in one of my previous posts, I can resist everything but food temptation!! And these Thattukadas used to be located near our local grocery store and like me, many others, both the grocery shoppers and those waiting at the nearby bus-stop, would also be in an internal tug of war, struggling to conquer their temptation to go and buy a parcel of ‘porotta’ with a side dish of beef curry or chicken fry or sometimes grab a plate of "thattu dosa" and omelets.
Around evening time, these thattukada-s, typically a moving four wheeler covered carts with a kerosene lamp and fresh banana bunches hanging down in ropes, are in full swing by firing up a large wok/kadai,an extra-ordinarily large cast iron pan as well as a steaming vessel of milk and boiling water in the cart . When someone orders tea/coffee, the guy starts pouring the beverage into the glass after stretching it to almost two arms’ length for blending, creating a foam on the top which usually fills up half of the glass; so if you order a glass of tea, usually you get to drink half a glass of tea and half a glass of foam ;-) Adjacent to these carts, one can also find rectangular shaped steel tables used for making Porotta/Parotta and it’s the best example of real craftsmanship when the guy starts punching the dough, then throws in the air for stretching and then layering and winding them like small spiral balls before he rolls out the dough. The customers would be sitting on long benches, enjoying this craftsmanship as well as relishing their food. The regular "thattu" specials are Kappa, beef fry/curry, chicken fry, Peas Masala, Dosas and Omelets, pazham pori (banana fritters) etc. The multi-tasking of "thattu" owners in making the tea, dosa and omelets at the same time and also catering to the instant orders of the customers...the sizzling sound that comes from the wok when the 'chef' throws in the ingredients... the impatient look on the face of the customers while waiting for their next order... the battle with the temptation of the passers-by..the screeching sound of the vehicles and the honking of the massive traffic ...the beaming light from the nearby shops in the background thriving with energy and activity...let me tell you, this is a MUST HAVE experience for anyone visiting Kerala and longing to enjoy the local flavor !!
Last time when we went to India, my brother introduced us to one more delightful "thattu" variety called Kappa Biriyani, a mix of tapioca/yucca root and chicken/beef curry topped with the traditional seasoning of mustard seeds, onions, dry chilies and curry leaves in coconut oil. Since my father has come to adjust himself with the reality that there is no point in straightening his two spoilt kids and an equally or more spoilt son-in-law, he let us have this dish whenever we had a craving. Also there was this sympathy wave working,"oh ..the kids come home once in two years.. let them enjoy!! :) :) And before returning from India, I made my brother narrate the visual preparation of this dish as he used to be the one who frequented this roadside eatery to buy the parcel and I tried to reproduce almost a similar version in my kitchen along with some expert tips from my mother. This dish is also called as 'Kappa-Erachi" and "Kappa Beef" in some places. Recipe follows :- Ingredients for Kappa/Tapioca Preparation:
- 2 medium size Kappa/Tapioca washed, peeled and chopped into small cubes
- ½ tsp turmeric
- Salt to taste
Ingredients for Beef Curry Preparation:
- 1 ½ lb beef diced into small pieces (Around ½ to ¾ kg)
- 3 tsp roasted coriander powder
- 1 ½ tsp roasted chili powder
- 1 tsp freshly grounded pepper powder
- ½ tsp turmeric powder
- 1 ½ tsp fresh garlic paste
- 1 tsp fresh ginger paste
- 2 + 2 green chilies
- 2tsp coconut oil or any oil
- 1 medium size onion coarsely chopped
- 1 medium size tomato diced
- ¾ + ¼ tsp garam masala
- 1 cup green peas
- 1 sprig curry leaves
- ½ cup water
- Salt to taste
For the seasoning:
- 2 tsp coconut oil or any oil
- ¾ tsp mustard seeds
- 4 dry red chilies
- 1 sprig curry leaves
- ½ cup finely chopped red onions for garnishing
Directions:
- To Prepare Kappa/Tapioca: Wash the cubed pieces thoroughly in cold water; fill a large saucepan with water enough to cover the Kappa/Tapioca and bring to a boil. When it boils, drain the water and fill the pan again with cold water and add salt and turmeric and cook until the kappa/tapioca is soft when pierced with a fork/knife. Drain off the water completely and keep it aside. For a pictorial description on cleaning and cooking the Kappa/Tapioca, click here.
- To Prepare the Beef Curry: Marinate the beef, thoroughly blending the ingredients from 2 to 7 and adding two green chilies and salt and keep it in the room temperature for 30 minutes and then pressure cook at medium heat. I wait for 4-5 whistles. Then switch off the stove and wait till the sizzling sound stops. There is no need to add water while pressure-cooking the beef, but if you are really scared of the safety valve (of the pressure-cooker) flying in the air, you may add ½ cup of water.
Heat 2 tsp oil in a pan and sauté the chopped onion and 2 slit opened green chilies until translucent and at this stage, add diced tomatoes and cook well. Now add the ¾ tsp garam masala and mix well. To this mixture, add the pressure-cooked beef and stir and combine well; add ½ cup of water and salt and bring to a boil in medium heat. When it boils, do a taste test and adjust the salt level and add fresh curry leaves and stir it and also add 1 cup of peas. Let the peas cook along with the meat for 4-5 minutes and later reduce the heat to the lowest level until the gravy is thick enough; do not make it too dry as the gravy is required to blend well with the Kappa/Tapioca. - Preparation of Kappa Biriyani: Add the cooked Kappa/Tapioca pieces to the beef gravy (both should be in equal quantities) and mix them well and finally toss with ¼ tsp garam masala to get the aroma and the flavor of the spices, at low flame. In another small pan, heat 2 tsp oil and splutter mustard seeds, dry red chilies and curry leaves and pour this seasoning onto the Kappa Biriyani. Garnish with fresh finely chopped big onions before serving.
Note: To roast the coriander and chili powder, heat the pan at low flame and roast the powdered spices separately until they change its raw color and turn a bit dark from the original colour. It will not take more than a minute to roast the powdered spices. It is always better to use fresh ingredients to make the dish taste better.
So, what do you think ... ready for a carry-out ? :)
For a list of MUST DO things in your next trip to Kerala, click here.
Luv
Shn
|
No part of the content ( articles, photographs, recipes) of this blog may be reproduced without my written permission.Copyright © 2007-2010 Kitchenmishmash.blogspot.com. All rights reserved.
|
 
Yesterday morning, it was a perfect spring day ..a pleasant morning with lots of sunshine and breeze and blue sky and we were enjoying our lazy morning chit-chat in our balcony and in between, I asked CJJ to share some of his childhood memories on Easter, thinking that he will be able to throw some light into the family traditions at the time of Easter, as he was raised in a typical Kerala Christian family. I confess I had some vested interests behind asking that question, yeah.. I wanted to get some childhood stories for preparing my write up for the latest post on Easter eggs ;) But he thoroughly disappointed me saying that it was all about 40 days lent and attending the midnight mass to observe Easter Vigil and no fun stuff like Easter egg hunt or Easter bunny et al ! And since I was brought up in a Hindu family, the only picture I have in mind is that of a yellow coloured egg which P aunty gifted along with some other Easter delicacies to my grandma. As a kid, that yellow coloured egg did tickle my curiosity and honestly I always used to wait for P aunty’s Christmas and Easter trays as she used to prepare yummy cakes and puddings ;) Anyway, CJJ’s response did get me into a thinking mode. It is true, there was no Easter egg hunts or Easter bunnies or peeps or jelly beans, atleast in those parts of Kerala, where we grew up. There it was all about Lent, Holy Week, Maundy Thursday and Pesaha Appam, Good Friday, Holy Saturday, Easter vigil and Easter Sunday; a pure religious festival celebrated to commemorate the resurrection of Jesus Christ and there is usually grand dinner or lunch in homes and visits from relatives. But after coming to US, my picture of Easter celebration has been completely changed... every year around Easter time, I see the grocery store aisles showing up a myriad of objects like Easter baskets, decorated eggs, bunnies, peeps, jelly beans and what not.
This visible difference between traditions and customs forced me into some googling yesterday and found out that though Easter is a festival celebrating the resurrection of Christ, ‘some’ of the Easter traditions go back to medieval times and some are pagan in nature, have nothing to do with Christianity and some are influenced by European settlers to North America. Wikipedia says that the English and German names, "Easter" and "Ostern," are not etymologically derived from Pesach (another name used by Europeans for Easter) and are instead related to ancient name for the Anglo Saxon goddess, Eostre, Goddesses of mythology signifying spring and fertility whose festival was celebrated on the day of the vernal equinox. It is a spring holiday and spring is synonymous with fertility and new life and eggs are linked because of their connection to the fertility. Painted eggs represented the sunlight of spring in medieval times and it seems German settlers in America are said to have brought over the tradition of a bunny named "Oschter Haws", the white Easter Hare who would visit houses on Easter Eve, leaving coloured eggs for children. Now, that explains why Easter bunny is not popular in our place :)
So, it is that egg-stra special time of the year where kids and adults get to enjoy the fun in decorating eggs. There are various colouring kits and acrylic paints available in craft stores for decorating eggs but using natural dyes also produce equally beautiful and at the same time, edible eggs. Our kitchen is full of natural dyes. Just rummage around your pantry and refrigerator and to your surprise you will come across numerous options available from turmeric to beetroots, blueberries to onions and coffee to spinach !! Here’s my share of the fun: -
Ingredients:
- Hardboiled eggs
- Beet roots
- Turmeric
- Coffee Powder
- Vinegar
- Vegetable shortening or butter
Directions:
- Hard-boil know-how: Boil around 8 cups of water, or enough to cover the egg, in a saucepan and when it brings to a boil, simmer it and place the eggs into the pot and let it cook for 8-10 minutes. I usually use a ladle to place the eggs gently in the boiling water, to avoid cracking. When it is done, turn off the stove and drain the hot water and fill the saucepan with cold water. Completely dry the eggs before colouring them and apply some vinegar on the shell in order to help absorb the egg colour.
- Pink & Red Eggs: Boil the beetroots (3 nos) chopped, with some salt and 1 tbsp vinegar in 4 cups of water and crush them well to extract the maximum juice and strain the dye; soak the hardboiled eggs overnight in the refrigerator. For a lighter pink shade, soak the eggs for not more than 3-4 hours.
- Yellow Eggs: Boil 3 tbsp turmeric with some salt and 1 tbsp vinegar in 4 cups of water and soak the hardboiled eggs overnight in the refrigerator.
- Brown Eggs: Make strong coffee solution and leave the hardboiled eggs in it over the night and keep them refrigerated throughout the dyeing process.
- Polishing: Remove the soaked eggs from the natural dye and place on a paper napkin to dry. When dry, gently polish it with a bit of vegetable shortening or butter to make it look glossy.
Note: Naturally dyed eggs are edible (make sure they are refrigerated until they reach the breakfast table) and they make a great centerpiece too, on your Easter breakfast table. It is safe to eat naturally dyed eggs but if you display decorated eggs longer than two hours outside the refrigerator, do not eat them. Adding a pinch of salt while hard boiling eggs makes it easier to remove the shells. The fun part is that you never know what colour will appear when using natural dyes. If you try soaking the eggs in two beet solutions, it will produce two different shades and the patterns :)
Check out for some Easter facts here and egg decorating techniques here and for some eggy facts,click here.
I would like to thank Johanna of The Passionate Cook for accepting my entry at the last minute for her WTSIM (Waiter, there's something in my ... Easter basket!) event !
Let me also thank Janelle of "Talk of Tomatoes" for accepting my entry for her Centerpiece of the Month Event, an excellent idea to come up with novel and unique centerpieces every month from all fellow bloggers.
This may be an Easter tradition, but I think it’s also a great craft idea to have some fun-play-time with kids and also to lure those fussy eaters to a colourful plate of nutritious food.
Have fun colouring the eggs and HAPPY EASTER/SPRING HOLIDAYS :)
Luv 
|
No part of the content ( articles, photographs, recipes) of this blog may be reproduced without my written permission.Copyright © 2007-2010 Kitchenmishmash.blogspot.com. All rights reserved.
|
 There is only one person whom I miss the most in my life, my grandma whom I call Amma. If the time machine were a reality, then I would rewind and go back to tell her how much she meant to me and how much I loved her! I knew she was a part of me but never realised the depth of the bonding we shared until she left us 4 years ago! I never had a closure, I could not bid farewell to her, I was not there at the time of her death nor at the funeral....and towards the end she had lost her memory too, so I don’t even know if she was aware of my occasional visits to her, whenever I came home during my holidays.....she comes in my dreams and thoughts quite often and at times I miss her a lot..I think about the days I spent with her...my summer holidays... my weekends during my childhood....her image is still crystal clear in my mind; standing in front of the gate anxiously waiting for me to get back from the school ..she used to send her maid to pick me up from the school and accompany me till I reached home safe..and I am sure she enjoyed those days, when both of us waited for the mobile bakery man to buy hot puffs and samosas and some sweets, because her kids, that’s my mother and her siblings never allowed her to eat any sweets coz of her high blood sugar. I learned the basics of bargaining from her; it was a pleasure and a great time pass to watch her bargain with the fish vendors...and at the end of all that intense bargaining, sometimes she offered them a cup of tea or some breakfast occasionally...my exposure to different varieties of fish started there. The root cause of my obsession with cleanliness and organizing traces back to her; she had a spotless kitchen and home and a perfectly pressed and arranged wardrobe. Even at the age of 70s, she wore neatly pressed clothes at home and such thoughts help me neglect my obsession for pressing each and every piece of cloth, including my apron and kitchen towels !! I have great respect for her..she was a strong woman who raised her three kids all alone after losing her partner at a very young age. She was very generous and affectionate too...I wish she had met CJJ before she left us, in which case, he would have been her favourite. My mother is a great cook, nevertheless, at times I tell her some of her preparations don’t even come close to that of Amma’s. She was a fabulous cook...she did not have an oven, but she used to bake cakes with a stove top vessel; she never used to frequent Chinese restaurants but she used to make the best fried rice and ofcourse the authentic kerala dishes and snacks....the days I spent with her are some of the sunken treasures of my life and when I dive into those memories, I get lost somewhere........!! There is only one person whom I miss the most in my life, my grandma whom I call Amma. If the time machine were a reality, then I would rewind and go back to tell her how much she meant to me and how much I loved her! I knew she was a part of me but never realised the depth of the bonding we shared until she left us 4 years ago! I never had a closure, I could not bid farewell to her, I was not there at the time of her death nor at the funeral....and towards the end she had lost her memory too, so I don’t even know if she was aware of my occasional visits to her, whenever I came home during my holidays.....she comes in my dreams and thoughts quite often and at times I miss her a lot..I think about the days I spent with her...my summer holidays... my weekends during my childhood....her image is still crystal clear in my mind; standing in front of the gate anxiously waiting for me to get back from the school ..she used to send her maid to pick me up from the school and accompany me till I reached home safe..and I am sure she enjoyed those days, when both of us waited for the mobile bakery man to buy hot puffs and samosas and some sweets, because her kids, that’s my mother and her siblings never allowed her to eat any sweets coz of her high blood sugar. I learned the basics of bargaining from her; it was a pleasure and a great time pass to watch her bargain with the fish vendors...and at the end of all that intense bargaining, sometimes she offered them a cup of tea or some breakfast occasionally...my exposure to different varieties of fish started there. The root cause of my obsession with cleanliness and organizing traces back to her; she had a spotless kitchen and home and a perfectly pressed and arranged wardrobe. Even at the age of 70s, she wore neatly pressed clothes at home and such thoughts help me neglect my obsession for pressing each and every piece of cloth, including my apron and kitchen towels !! I have great respect for her..she was a strong woman who raised her three kids all alone after losing her partner at a very young age. She was very generous and affectionate too...I wish she had met CJJ before she left us, in which case, he would have been her favourite. My mother is a great cook, nevertheless, at times I tell her some of her preparations don’t even come close to that of Amma’s. She was a fabulous cook...she did not have an oven, but she used to bake cakes with a stove top vessel; she never used to frequent Chinese restaurants but she used to make the best fried rice and ofcourse the authentic kerala dishes and snacks....the days I spent with her are some of the sunken treasures of my life and when I dive into those memories, I get lost somewhere........!!

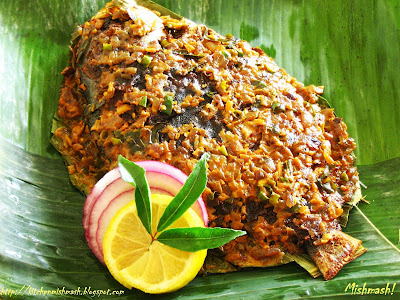
Grandma was from a quaint little town in Kerala, named Alappuzha or Alleppey which is labeled as the ‘Venice of the east’ because of its breathtaking view of the backwaters and house-boats; it’s a beautiful small town, famous for its network of canals and lagoons, crisscrossing the center of the town as well as boat races and coir products. Mean Pollichathu (Roasted Fish in a Banana leaf Wrap) is a ‘must try’ local delicacy which is generally prepared with a fresh catch of karimeen (Pearl Spots), marinated with various spices and a ground paste of pearl onion/small onions, green chilies, ginger, garlic, tomatoes and coconut milk and then cooked in banana leaf wraps. My grandma’s preparation is slightly different from this widely used recipe and this is my 4th attempt at reproducing her signature dish with certain changes adopted in the cooking method to suit my cooking conditions here in US; grandma used to do this at one shot where as my method consist of three stages. Recipe follows: -

Ingredients (Approx. for the size of fish shown in the picture)
Step 1: - Ingredients for Marinating and roasting the fish:
- 1 whole fish cleaned, preferably Karimeen (pearl Spots); Pomfret,Tilapia
- 3 tsp chilli powder
- ¼ tsp turmeric powder
- ½ tsp pepper powder
- ¼ tsp ginger paste
- ¼ tsp garlic paste
- 1 tbsp lemon juice (optional)
- Salt to taste
- ¼ cup coconut oil (or vegetable oil) for frying
Step 2: - Ingredients for the gravy:
- 1 cup finely chopped red pearl onions/small onions (around 20-22 nos)
- 1 ¼ tbsp finely chopped ginger
- 6-8 finely chopped green chillies
- 1 sprig of curry leaves
- A pinch of turmeric powder
- A pinch of chilli powder
- 2 tbsp coconut oil (or vegetable oil)
- ¼ cup thick coconut milk
- Salt to taste
Step 3: - Ingredients:
- Banana Leaf - big enough to wrap the fish from all the sides.
Directions : Step 1
- Make 4-5 slits on the cleaned fish; mix chilli powder, turmeric powder, pepper powder, ginger and garlic paste, lemon juice and salt with 1-2 tsp of water to make a thick paste and marinate the fish evenly on both sides and keep it for atleast 2 hours. The slits made on the fish will help the marinade to penetrate into the fish during this time.
- Heat oil in a flat non-stick pan and place the fish, when the oil is steaming hot. Shallow fry the fish at medium heat by flipping each side when it is almost done; do not make it too crispy and do not overcook ; it should be soft and moist as the same fish is cooked again at the final stage. When the fish is done, (at this stage the oil will stop spluttering) transfer it to the gravy on the banana leaf,instructions for which follow.
Directions : Step 2
- Heat 2 tbsp oil in a pan and sauté the chopped small onions, ginger, green chilies and curry leaves, in low heat, until they are cooked and golden brown in colour and add a pinch of turmeric powder and chilli powder to get a roasted colour. At this stage, add the thick coconut milk (Users of canned coconut milk need to dilute it by adding some water- for eg: 3 tbsp of coconut milk & add 2tbsp water) and salt and mix well to make the gravy; just combine the gravy well and turn off the stove; do not boil/cook it at all.
Directions: Final Step - Cooking in Banana Leaf Wrap
- Mildly wilt the fresh and washed banana leaf by keeping it on a low flame; Place it in a large flat non-stick pan; Make a thin bed with half of the gravy and keep the roasted fish and top it with the rest of the gravy. Cover and wrap the fish completely by folding the banana leaf, from all the sides and place a lid on top and let it cook for 10-15 minutes on low flame, until the gravy is thick.
- Serve hot with rice. You may wilt one more banana leaf and wrap it again before serving, to make it look like 'banana leaf parcels'.
Verdict & Recommendations!
It is very different from the usual fish preparations like fish curry and fish fry. It is not very spicy but still I suggest reducing the number of green chilies for those who cannot eat hot n spicy type of food at all. And if you are lucky to prepare this with a fresh catch of Karimeen (Pearl Spots), then you will notice an oil coating on the sides of the fish along with the gravy, which is not there in my picture as I used a different fish. Oil coating mainly depends on a fatty fish and also on the freshly squeezed coconut milk. Instead of using one whole fish, the same preparation can be done with fish steak pieces, wrapped individually in banana leaf, to serve for a group. This is one of the most famous central Kerala delicacy that adorns the dining table at the time of guest visits as well as X’mas and Easter lunches.
 This post is a tribute to my grandma and hence my contribution for FAHC Campaign and Group Cookbook Project. Hope it meets all the criteria. This post is a tribute to my grandma and hence my contribution for FAHC Campaign and Group Cookbook Project. Hope it meets all the criteria.
Thanks for reading this loooooooong post :)
Shn
|
No part of the content ( articles, photographs, recipes) of this blog may be reproduced without my written permission.Copyright © 2007-2010 Kitchenmishmash.blogspot.com. All rights reserved.
|
Spring is here and winter is bidding adieus! Poets’ two favourite seasons to metaphorically drive home the idea that adversities and prosperities of life are seasonal. How can one forget the lines of P.B Shelley, one of the English romantic poets who wrote “O, wind, if winter comes, can spring be far behind?” How true !! It is again reinstated when Hal Borland quotes, “No winter lasts forever; no spring skips its turn.” Isn’t it so synonymous with the dull days and happy days of life that come and go? Spring is the renewal of life and hopes and somewhere I read, "winter is door to spring...its a resurrection of hope " . I don’t think I can sum up this concept in any better way than these wise men did. Well, its time to talk about March winds, April showers and May flowers….spring cleaning and spring blossoms……the thought itself is quite refreshing ,isn’t it? :) But honestly, I do enjoy the winter days too, even though we all grumble about removing the pile of snow from the driveway and the slick roads and the icy winds and the dull days. It makes me all romantic, when the star shaped snow flakes tickle my face….waking up in the morning to see the nature covered under a soft, silky white blanket of snow…….the pine trees holding the snow flakes…goose walking across a frozen lake……the eerie look of the naked trees…..somewhere I see a pristine beauty during this season…..and one of those days I was lucky to capture a shot of this natural snow grotto that formed in a lake in our community. Thought it’s incredible and felt only a Virgin Mary is missing in there ;)
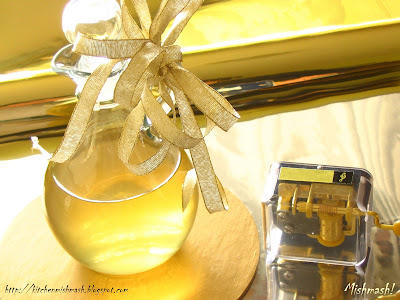
Now coming to the substance…. Well, I had a grin on my face when I read that pineapple was the chosen fruit for this month’s AFAM because I had something ready in my pantry, waiting for its turn to go into the spotlight! I am talking about "bottled poetry" here, yes, Pineapple Wine :) This is something I tried along with my experiments with Beetroot wine, which is my personal favourite as I get to enjoy the beet wine from the 16th day after its fermentation, where as I have to wait for more than 3 months to pour some of the bottled pineapple wine into my wine glass. And this recipe is for those who have the patience to wait that long and let me assure you, it’s worth the wait :)
Ingredients:
- 1 kg fresh ripe Pineapple
- 1 kg (50 oz) Sugar
- 1 tsp Yeast
- ½ tsp sugar
- 1 small Lemon
- 2 litre Water
- ½ cup warm water
Directions: - Dissolve yeast in lukewarm water with ½ tsp sugar and let it rise.
- Wash the pineapple well and dice them into small pieces. No need to remove the skin.
- Boil 2 litres of water in a big pan and dilute 1 kg sugar. When the water boils well, add the pineapple chunks and let it cook for not more than 4-5 mins and turn of the stove.
- When it cools down, transfer it preferably to a Bharani or any earthenware container or a glass jar and add the dissolved yeast and lemon juice and stir well with a wooden spatula and keep the container airtight and store it in a dark place, for fermentation for 21 days. On the 4th or 5th day, open the container and stir it with a wooden spatula and let it rest till the 21st day.
- After the fermentation process, strain it, without squeezing or crushing the pineapple at all, using a cheesecloth or muslin cloth on the 21st day and make sure that there are no residues; bottle the wine and rack them at room temperature in a cupboard and let it rest for 3 MONTHS allowing it to settle all the impurities and smells FRESH & PLEASANT at the end.
Tips:
Once the wine is bottled, it should be left in a dark shelf, at room temperature, for 3 months for sure, as the smell that results from the activation of the yeast with the pineapple is very overpowering and it is not at all suggested for serving during this time. Also, for the yeast to convert sugar into alcohol, it is mandatory to keep the oxygen out and hence make sure that container is airtight, during the fermentation period. The alcoholic and the mild fizzy effect also depend on the quality of the yeast used. Please ensure that the fermentation jars and bottles are clean and not filled fully; leave some room. It is also suggested to open the bottles once in 2-3 weeks to let the gas out, formed inside the bottles. After 3 months, you will notice all its impurities settling down, creating a thick layer at the bottom, and the wine will be refined and clear and smells fresh and pleasant and tastes GREAT!
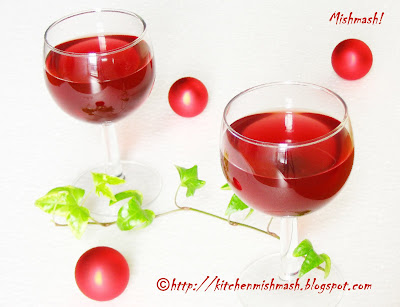
So, lets pour some wine and raise a toast to Maheswari for hosting this wonderful fruity event,AFAM and also to Sushma for hosting the interesting Monthly Cooking Tipology event!
Related Posts:
Cheers!
Shn
|
No part of the content ( articles, photographs, recipes) of this blog may be reproduced without my written permission.Copyright © 2007-2010 Kitchenmishmash.blogspot.com. All rights reserved.
|
  Italian flavour, whether it is in food or music, always entices me. Bruschetta is a classic Italian appetizer (pronounced [brus'ket.ta] in Italian); slice of fresh country bread toasted with a nice rub of fresh garlic and a drizzle of extra virgin olive oil. There are lots of variations to bruschetta. A traditional bruschetta topping is a blend of fresh tomatoes and herbs and garlic with a bit of olive oil. This is a simple & colourful, easy to prepare appetizer as well as an afternoon snack too.
Ingredients (Approx.) - ½ loaf French bread
- 2 red tomatoes
- 1 garlic clove finely chopped + 1 whole clove
- ¼ cup fresh basil chiffonades
- 1 tbsp green spring onion chopped
- 1 1/2 tbsp + 3tbsp Olive Oil
- A pinch of freshly ground pepper
- Salt to taste
Directions: - Cut the tomatoes and squeeze out the juice and seeds from it and finely dice them. Mix the tomatoes, garlic, basil chiffonades and spring onion and toss with 1½ tbsp olive oil and ground pepper and salt and blend well and leave it in room temperature for 30 minutes to 1 hour to let all the flavours combine well.
- Preheat oven to 400 F . Slice the bread diagonally with around ½ inch thickness and brush with olive oil and toast each side for around 2 mins or until the bread turns slightly golden.
- Cut the garlic clove in half and lightly rub garlic onto the toasted bread and spoon the mixture on the slices and serve immediately. The bread will get soggy if it is kept too long, so heap the topping just before serving. Serve with a glass of red wine and sorriso* :)
This is my entry for JFI - Tomato and thanks RP for hosting this month's JFI.*Sorriso is Italian for smile :)LuvShn
|
No part of the content ( articles, photographs, recipes) of this blog may be reproduced without my written permission.Copyright © 2007-2010 Kitchenmishmash.blogspot.com. All rights reserved.
|
|
|
|
|


 All text and Photographs are copyright protected.
Copyright © 2007-2010
Kitchenmishmash.blogspot.com. All rights reserved.
All text and Photographs are copyright protected.
Copyright © 2007-2010
Kitchenmishmash.blogspot.com. All rights reserved.